Pluto Drop Valve Review
INTRODUCTION
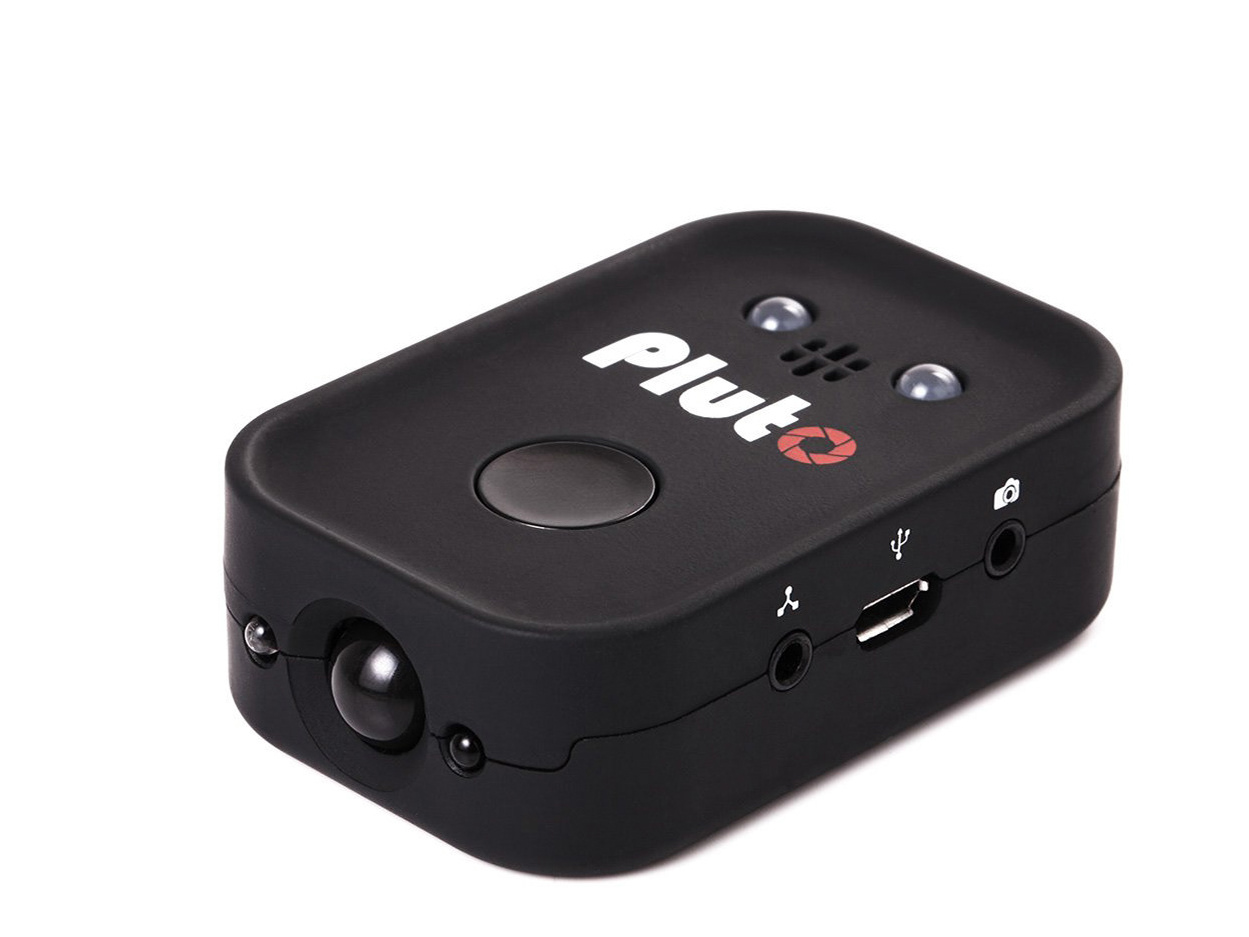
Hello my friends, this time i had curiosity to test the drop valve, and i have to say thank you to Pluto. I did not pay for this. They did send this my way, so thank you for letting me try this out and I’m looking forward to it and like everything else I will share my positive feedback and my negative feedback.
In the world of photography, water droplets are something of a rite of passage. It’s the perfect rainy day photography project and one that many of us try at some point or another – to varying degrees of success.
If you recall, I did a review of the my Pluto Remote Trigger and I was quite pleased with the results. You can check out the by clicking the link up above right now. Now the Pluto Drop Valve has a different purpose than the remote. The remote is to just trigger with a bunch of different trigger types like motion or like lightening in vibration or just a timer. It could just be a long exposure timer and many other types of triggering events, but one thing you can’t do on its own is to get the perfect timing for water drops and that is where this, this kit comes in hand.
ABOUT PLUTO
BAICHENG INNOVATIONS
Baicheng Innovations was founded to create smarter photo & video devices in 2015. Our first product is the Pluto Trigger - a high-speed, smart camera trigger for photographers of all levels. This full-featured device will take your skills to a whole new level. We aim to continue creating innovative photo & video gadgets just for you!
We are based in Shenzhen, China, and have an office in Hong Kong, as well. We are close to our suppliers and manufactures.
THE FOUNDER
Jimmy Chen, the founder of Baicheng Innovations, graduated from The Chinese University of Hong Kong. He has a Master's Degree in Electronic Engineering. His research interests include wireless sensor networks, wearable medical sensors, medical robots and humanoid robots. As a senior pursuing new technologies, he loves making innovative, smart, intuitive and affordable products.
PACKAGING AND UNBOXING
The Drop Valve came with a box, and another box for magic arm. After opening we can find this inside the packages:
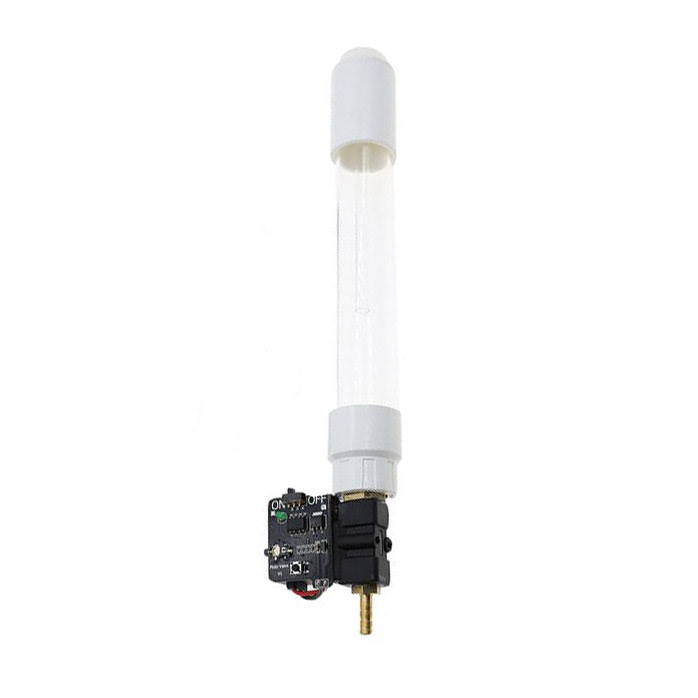
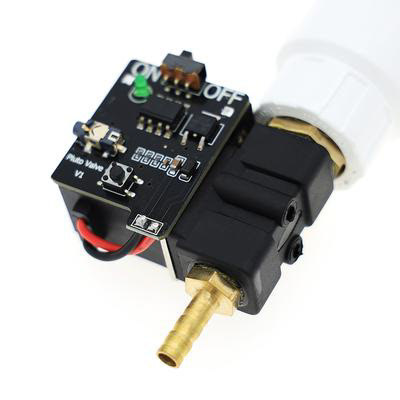
->Pluto Drop Valve
->Valve Cable
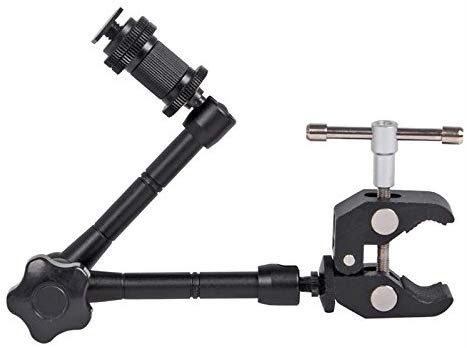
->Magic Arm
->Clamp
DESCRIPTION
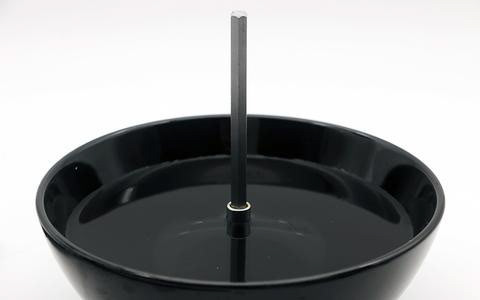
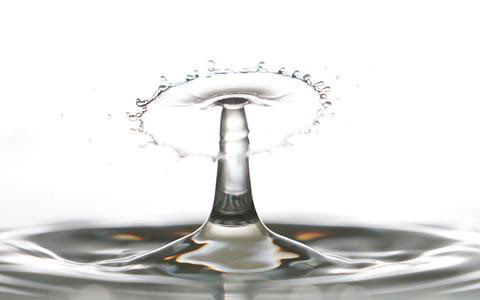
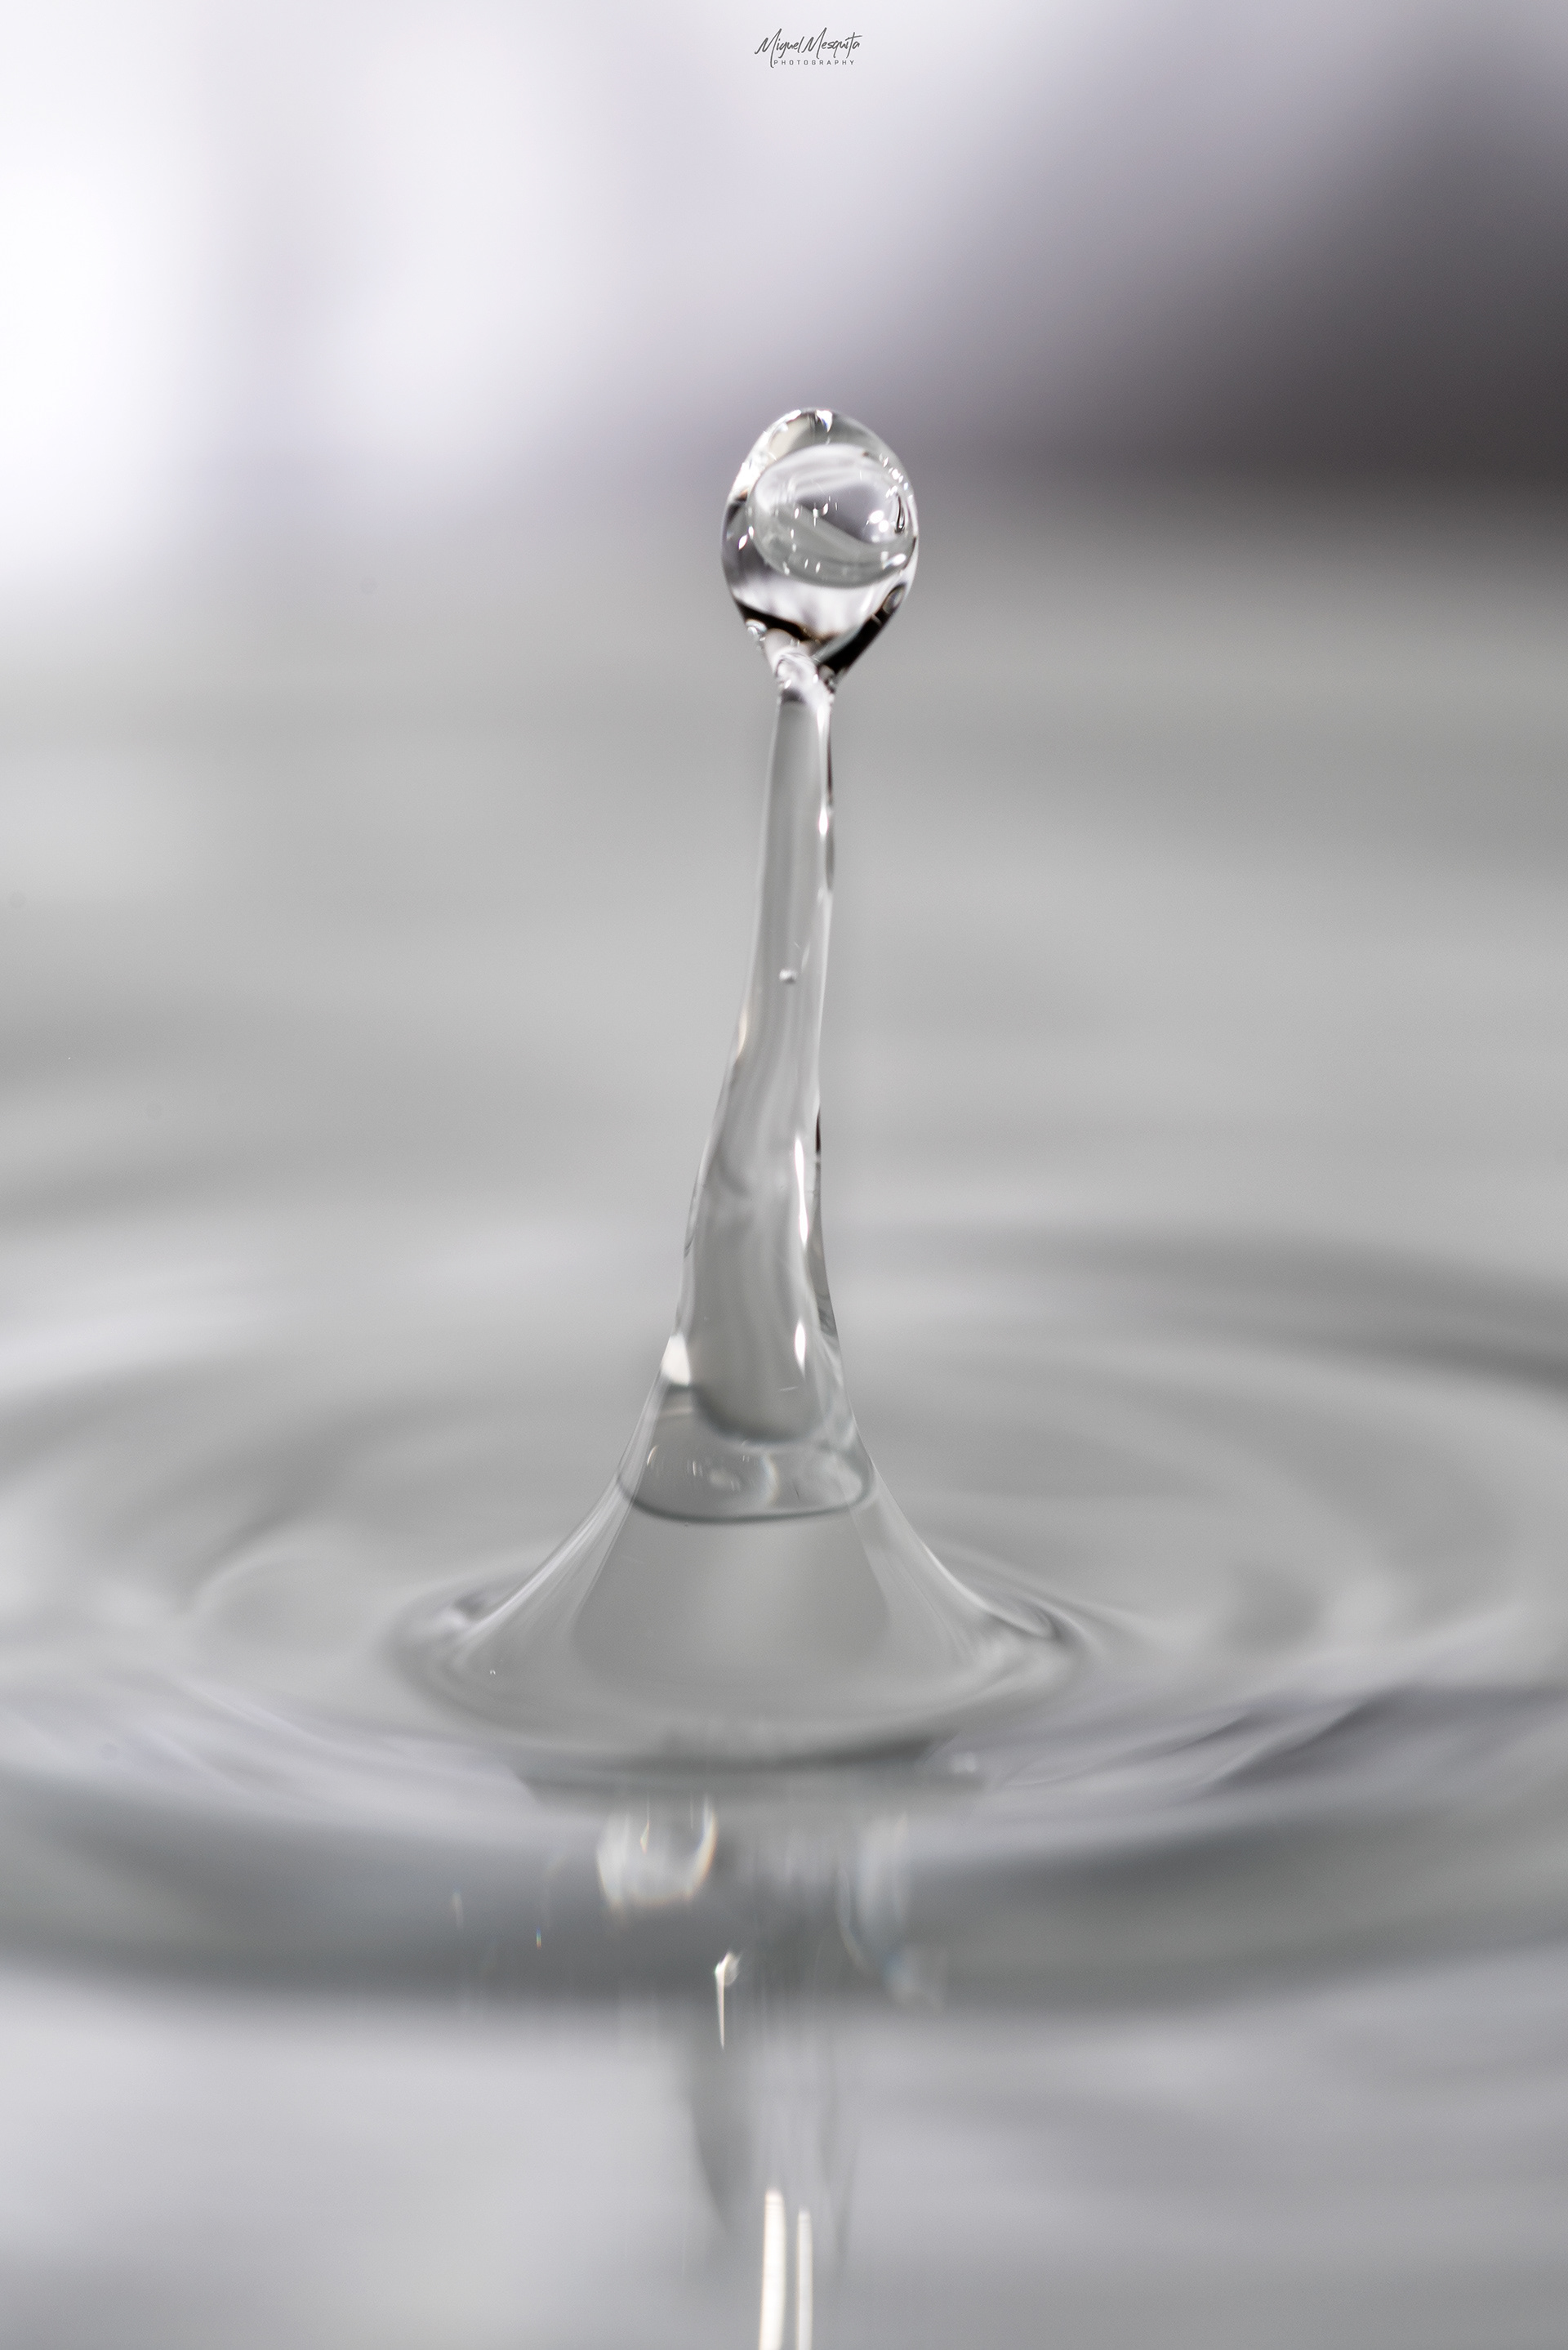
Water droppers / colliders are nothing new; they have been around for ages but chances are you have never heard of them or thought of buying one. The thing is they are not exactly an essential piece of gear or even something you are going to use on a regular basis. For those that don’t know what they do, a water collider basically fires drops of water into a dish of water below it. As the first drop is fired and hits the water below, it bounces back up. The second drop is then fired, hitting the water that has bounced back up and creating a collision.
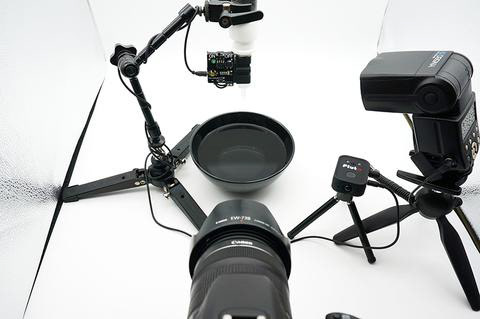
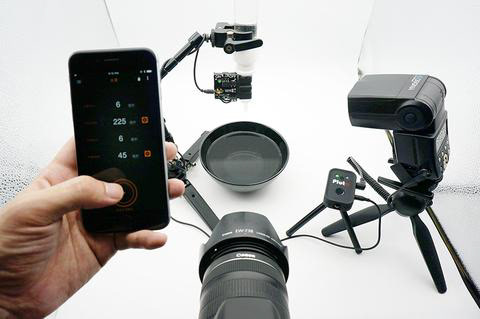
The boom arm is actually used to hold the dropper, in a certain angle, you can get it over a bowl or a plate and up are up higher in new mount that on a tripod or a light stand or something like that. And then the clamp is actually meant to hold the the dropper kit. So there you go. You’ll see what I mean a little bit when you see the behind the scenes of. Well me testing this out. All right, so basically I have the, a bowl right here, which you’ll see in a little bit. This is a bowl and then behind the bowl is a flash.
SPECIFICATIONS
DROP VALVE
- Length: 33cm
- Tube Diameter: 3cm
- Battery12V 23A Alkaline Battery (not included)
MAGIC ARM
- Length (Max): approx. 11"/285mm
- Height: up to 2kg
- Net Weight: 277.9g
WHAT YOU NEED
- A Quiet Room:
First, you’ll need a room that can be darkened where you can create a lot of mess in that room. It’s better to choose a spare room as you may need to keep your equipment setup for a few days.
- Camera and Lens:
You can use any DSLR camera for water droplet photography, or any other camera that has manual controls. Lens choice is important as you need one with a longer focal length and shorter minimum focusing distance so your camera is safe from water splashes but you can still fill the frame with splashes. I used a 105mm macro F2.8 lens is the best option for this project.
- Flashes/Speedlights:
Next, you need flashes with manual control over power. You are going to use the flashes at the lowest power setting so you need a minimum of two flashes. If you have more, that is even better.
- Tripod:
A steady tripod is a must for the camera so you can focus on other aspects of the shoot. You also need an extra tripod for attaching the Pluto Drop Valve device.
- Water Containers:
You may use a glass bowl, wine glass, or a designer cup. But if you don’t want to show the container in the picture you need around an 20cm×30cm glass tray with two-inch depth.
- Backgrounds:
You also need some colorful background images. Go to Google and search for “blur abstract background” and you’ll get an idea about what type of images you require. You can buy similar images from stock sites or there are some sites that provide images at no cost. You now have two options, you can print these images on paper or transparencies.
SETUP
Now you have everything ready, so let’s start. First, place the acrylic sheet as the background, making sure to leave at least two feet at the back for placing the flashes. Now place a tripod and attach the Pluto Drop Valve. The distance between the background and the point where your drop will fall should be around 30-50cm.
Now put your water container below it and ensure that the drop falls in the center of this container. Also, align your background with it.
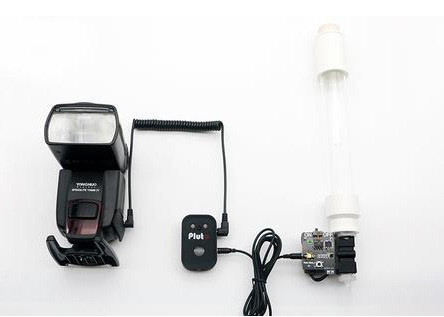
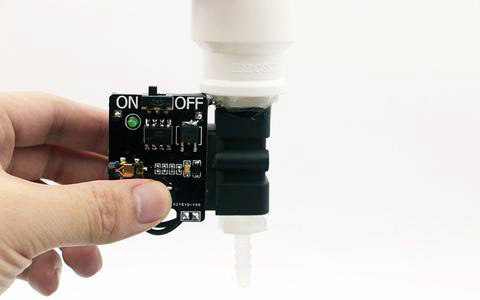
Connect the valve to the Aux port of your Pluto Trigger using the valve cable. Connect your flash to the camera port of the Pluto Trigger. Point the IR emitter on the Pluto Trigger to your camera.
Fill the tube with water so that the water level covers the bottom of the small tube. Never let the water level goes below the bottom of the small tube, or else the valve will not be able to keep constant pressure.
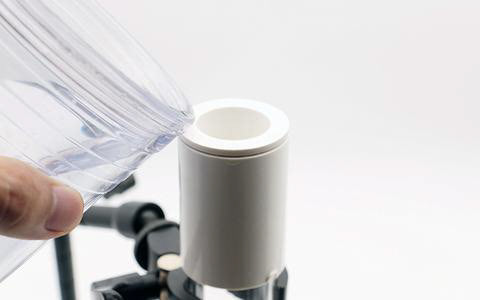
Insert and press the small tube. Make sure the air above the water and between the small tube and the big tube will not leak.
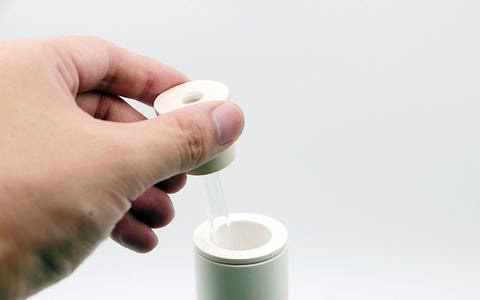
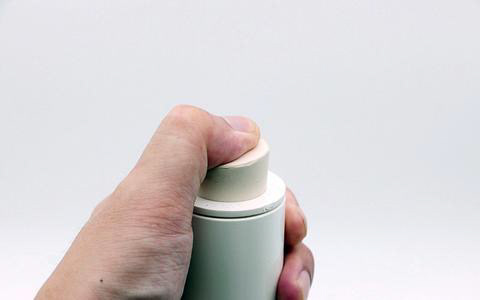
Turn on the valve. Click the button on the control board of the valve to purge water from the small tube and purge the air from the valve. DO NOT press and hold the button for a long time, as it will consume a lot of power and make the battery overheat. Try multiple, short clicks instead.
Turn on your camera. Frame and adjust focus. Put something at the position where the water drop falls into the water to make focusing easier. Set the shutter speed to 1-2 seconds. Set the Drive Mode to IR Remote. If your camera does not support IR Remote, then you will need to set off your camera manually.
Turn on your Pluto Trigger. Launch the Pluto Trigger app on your phone. Set the IR settings to match your camera model. Select Droplet mode from the menu. Press the start button to test. The Pluto Trigger should send IR commands to trigger your camera, release two droplets and then trigger your flash.

Next, we will calibrate the timings to capture droplet collisions. We will determine the Flash Delay first. Set "Drop1 Size" to 10ms and "Drop2 Size" to 0, so that only one drop will be released. The flash should be triggered when the first drop rebounds from the water and goes up to its highest position. Click the auto-calibrate button to the right of the Flash Delay setting. Set "Step" to 5ms and "Interval" to 5s, then click the Start Calibration button. Pluto Trigger will now take a photo every 5 seconds and increase the Flash Delay by 5ms each time. Monitor the screen of your camera. When the droplet reaches its highest point, stop the calibration.
Set the "Drop2 Size" to 10ms and calibrate the Drop2 Delay. The procedure is similar to that of the Flash Delay calibration.
So, take a shot and check if the lighting is good or not. If your picture is too dark, increase the ISO or move the flashes a little bit closer. Keep in mind that you should not increase the power of your flashes above 1/32 or you’ll start getting motion blur. If your picture is too bright, lower the flash power to 1/64 or 1/128 or move them back.
Once the light is okay, take another shot and see if it’s properly focused. If not, focus again.
When everything is set and you get your first shot, it’s time to do some experiments to create different masterpieces. Change the size of drops to see what difference it makes. Remember that first drop size won’t make any major difference, it’s the size of the second drop what will create different shapes. Now change the delay time, every time you change it, you’ll get different shapes.
Now experiment with both drop size and delay between drops. Each change will give you different results. Just keep in mind that you should make small changes like 5-10 milliseconds.
PRICE VS PERFORMANCE
At 38€ for the valve , and 17€ for the magic Arm, on the Pluto web Site. Pluto is compact, easy to set up gadget provide users. If you are in the market for a device of this type but you are not willing to spend a fortune, the Pluto Trigger is one good choice in this respect as it offers a lot of useful features at a relatively low price.
In the Pluto site the items are shipped worldwide from Hong Kong. Shipping costs vary from between 6€ - 10€ depending on the type of shipping you select. Pluto Trigger is shipped worldwide from Hong Kong. Orders are processed and scheduled for shipment in 1 to 3 business days, (excluding holidays) after being received. All orders are shipped using DHL Express or Standard Post. DHL Express takes 4 to 7 days to arrive and Standard Post takes between 8 to16 days to arrive.

FINAL THOUGHTS
For what you pay, it’s a pretty outstanding little unit. It’ll get you up and running very quickly with the minimum amount of fuss.
Being able to individually control up to four droplets also provides a lot of opportunity for different configurations and variety in your results.
But if the idea of making your own doesn’t sound all that fun to you, or you don’t want to spend days finding bugs in your code to get it working perfectly and you just want to buy something that works, then the MIOPS Splash is a great way to get started.
WHAT I LIKED
-Appears to be the least expensive in its class
-Works right out of the box, just add water
-Up to four water droplets with precise, repeatable timing and size on a single press of the trigger
-Consistent and reliable
WHAT I FEEL COULD BE IMPROVED
-No 1/4-20″ socket, so you have to resort to less conventional attachment methods
- Could have a better appearance box