Hyperfocal distance can be a confusing topic, both for beginning and expert photographers. However, if you want to take the sharpest possible images, particularly landscape photographs, it is simply invaluable. In this article, I will explain hyperfocal distance and give several methods to get the sharpest possible photographs with maximum depth of field. This article covers hyperfocal distance charts, as well as other, simpler methods to find your hyperfocal distance.
1. What is Hyperfocal Distance?
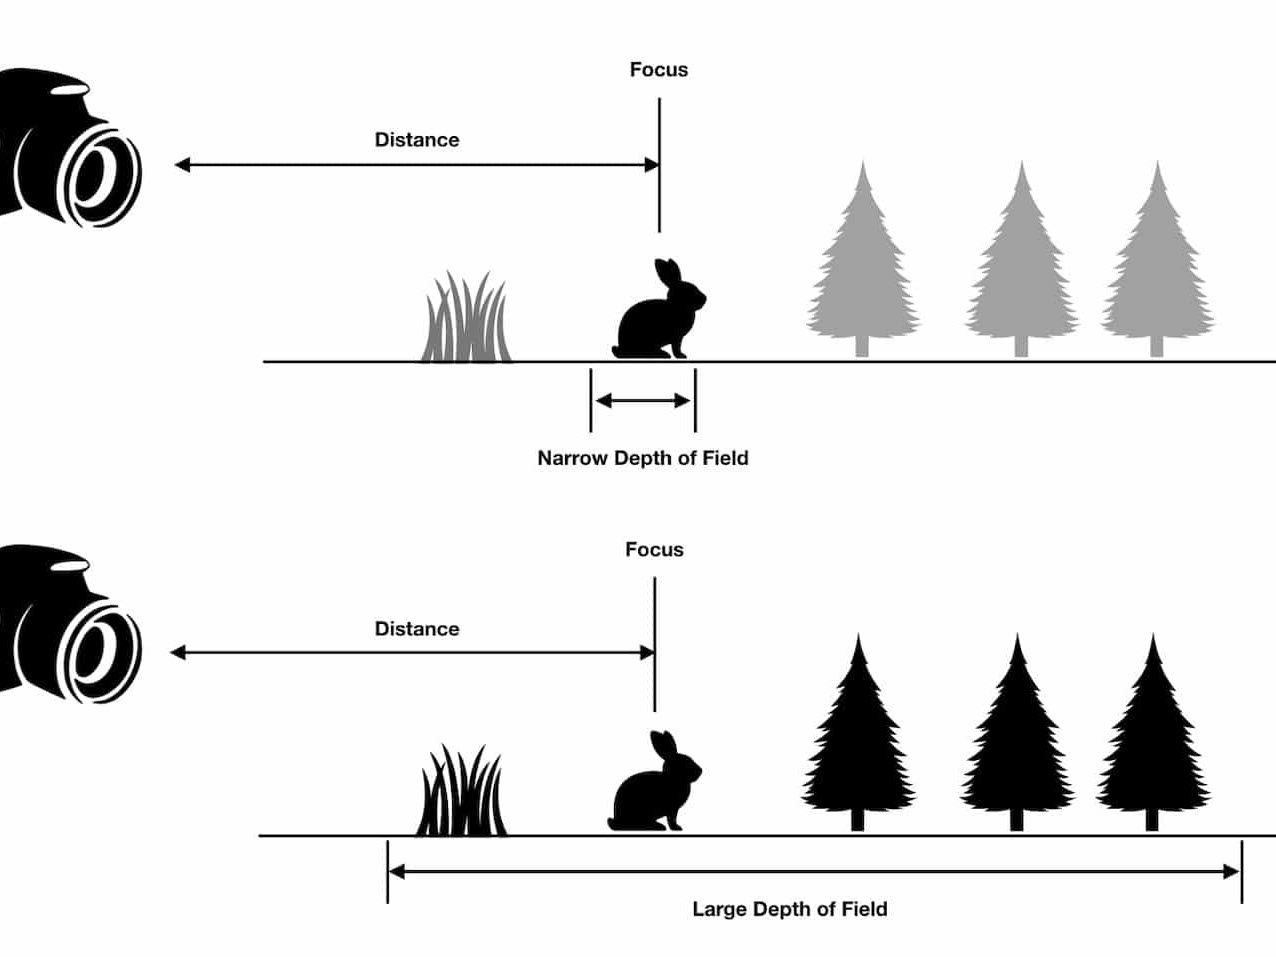
Hyperfocal distance, at its simplest, is the focusing distance that gives your photos the greatest depth of field. For example, consider a landscape where you want everything — foreground and background — to appear sharp. If you focus on the foreground, the background will appear blurry in the image. And if you focus on the background, the foreground will look out of focus! How do you fix this? Simple: you focus at a particular point between the foreground and the background, which makes both the foreground and the background elements of the scene appear reasonably sharp. This focusing point is called the hyperfocal distance.
In the optical world, hyperfocal distance is a bit more nuanced. The technical definition is the closest focusing distance that allows objects at infinity to be acceptably sharp. By “infinity”, I am referring to any distant object – the horizon, for example, or stars at night.
In one interpretation, the hyperfocal distance of your lens will vary with aperture. Why? Think about it like this – if your aperture is wide, such as f/2, you will need to focus quite far away for objects at infinity to appear in focus. However, at a small aperture of f/11 or f/16, distant objects will continue to be sharp even if your lens is focused more closely. So, in this case, hyperfocal distance moves closer to your lens as you use smaller apertures.
By another interpretation, though, hyperfocal distance does not vary with aperture. Why not? In this interpretation, hyperfocal distance is the focusing distance that provides equal sharpness between the foreground and background. That isn’t something that changes as you alter your aperture (even as both the foreground and background become more and more out of focus at wide apertures).
The reason for these different interpretations is the key phrase “acceptably sharp” in the definition of hyperfocal distance. For some people, acceptably sharp is an exact value, while for other people “acceptably sharp” means that the background is equal in sharpness to the foreground. Neither interpretation is wrong, and the definition of hyperfocal distance allows us to use either. However, the second interpretation has the benefit of offering the sharpest overall photo from front to back, since it doesn’t prioritize background sharpness over foreground sharpness.
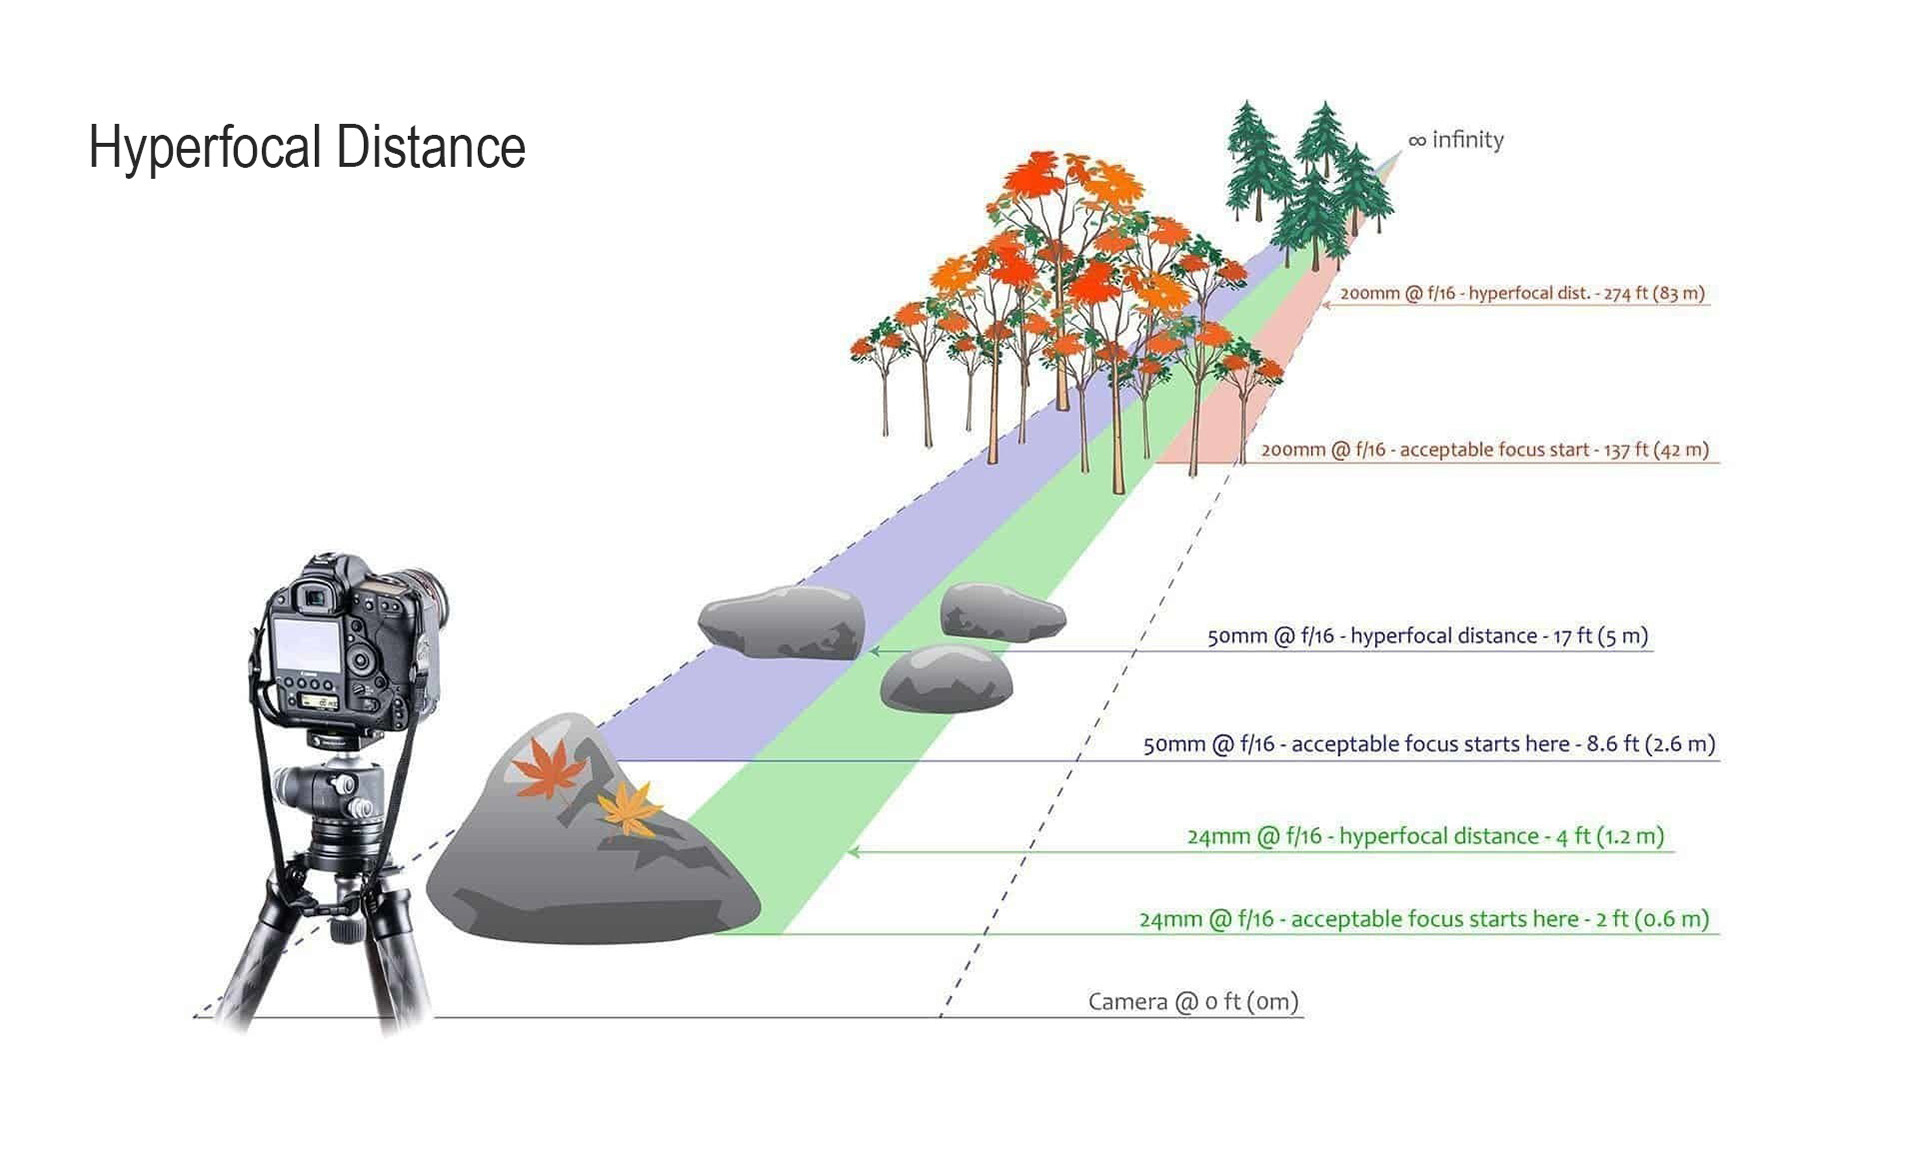
Your focal length also has a huge impact on hyperfocal distance. As you zoom in, your hyperfocal distance moves farther and farther away. For a 20mm lens, you may need to focus just a few feet from your lens to get the horizon (distant background at infinity) acceptably sharp. On the other hand, for a 200mm lens, your hyperfocal distance may be hundreds of feet away.
It is important to note that, if you focus at the hyperfocal distance, your photo will be sharp from half that point out to infinity. So, if your hyperfocal distance for a given aperture and focal length is ten feet, everything from five feet all the way until the horizon will appear sharp.
2. When to Use Hyperfocal Distance
Not all photographs require that you focus your lens at its hyperfocal distance. Consider, for example, an overlook of a distant mountain. If you are standing on the top of the overlook and there are no objects in your foreground, it would be silly to try and calculate the hyperfocal distance, since your nearest object is effectively at infinity. Just focus on the distant mountains! And your aperture does not really matter either – since the closest object is so far away, you could shoot wide open if you wanted to (probably not a very good idea, since most lenses aren’t as sharp at wide apertures, but this is just in theory). Hyperfocal distance is only important to calculate when you have objects both close and far away from your lens that need to be sharp. Since you are actually focusing between these objects, neither is “perfectly” sharp; they are both simply close enough, or “acceptably sharp.”
Likewise, even hyperfocal distance won’t come to the rescue if you have objects that are too close to your lens. For example, it is impossible for a distant object to be sharp at the same time as an object that is only a few inches away from your lens (unless you shoot with specialized equipment, like perspective control / tilt-shift lens, lens attached to bellows, and so on). Instead, you have two options: you can use focus stacking (taking several photos at different focusing distances, then blending them together in post-processing), or you can move your camera farther away from the closest object. The latter is often preferable, because focus stacking is not a simple technique, and it has its own drawbacks and limitations.
3. Advanced Background Information
The sections above have some slight simplifications to make it easy for beginners to understand the topic. In this section, we will explore more advanced background information. These aren’t crucial to understand, so feel free to skip this section, but I want to set the record straight in case you were looking for a better understanding of hyperfocal distance.
In reality, the formula that provides a lens’s hyperfocal distance (according to interpretation #1) is as follows:
Typically, you don’t need to use such a formula to take photographs; instead, you can look at an app or chart that already calculates this. However, if you are interested in the optical science behind hyperfocal distance, it can be a valuable way to visualize your settings.
The above formula is why a long focal length (say, 200mm) or a large aperture (say, f/2) both cause your hyperfocal distance to move farther away from the camera. The third variable in this formula, the circle of confusion, is complex enough that it could merit its own article; I will only give a brief outline here. At its most basic, the circle of confusion – measured in millimeters – is the size that a blurred pinpoint of light on your camera sensor would appear due to being out of focus. A larger circle of confusion represents a blurrier area in the photo, solely due to being out of focus.
Not surprisingly, some photographers have come up with values for the circle of confusion that are “small enough” to still appear sharp in a photo. Traditionally, with film photography, the blurriest acceptable circle of confusion was considered to be 0.03mm for a 35mm film image. This number is based upon the sharpness that people with 20/20 vision can see when viewing an 8×10 print at a distance of about 10 inches.
In practice, especially considering today’s high-resolution cameras, it’s arguable that the circle of confusion should be much smaller. Higher resolution cameras allow much larger prints than 8×10, and people who view them (especially up close) are likely to notice a 0.03mm blur very easily. So, the greater your resolution (and more specifically, the greater your print size), the easier it is to notice when your image quality isn’t perfect.
4. Using a Hyperfocal Distance Chart
The most common method of finding a photo’s hyperfocal distance is to use a chart like the one below:
With a chart like this, you control two variables: your focal length and your aperture value. The chart, in turn, tells you the hyperfocal distance. By dividing this distance by two, you know the closest object that will be in focus. If you are interested in creating the most accurate hyperfocal distance chart, you should calculate your own values using the formula given in the previous section; the numbers above were calculated from a 0.03mm circle of confusion, which, as noted, is not always best for modern cameras, larger prints and closer viewing distances.
To use a hyperfocal distance chart, follow the steps below:
Choose a lens, and be sure to note the focal length that you are using.
Pick an aperture value.
Find the hyperfocal distance that corresponds to your chosen focal length and aperture.
Focus your lens at the hyperfocal distance. This can be done by estimation, or by the focusing scale on your lens (if you have one).
Now, everything from half that distance until infinity will be sharp.
As you can guess, there are countless smartphone apps that do the same thing – and those are much better than a chart, which takes more time and has fewer exact values. Still, a chart and an app both fulfill the same requirement; they provide the hyperfocal distance for your given camera settings.
Unfortunately, there are a few problems with hyperfocal distance charts. The biggest issue is that they don’t take into account the landscape that you’re photographing. Although they might make the background of your photos acceptably sharp, what about your foreground? These charts have no idea whether your foreground is right next to your camera, or way off in the distance. They simply aren’t optimized for today’s modern cameras — and, in fact, they weren’t even optimal in the film days, for this same reason. The same is true for hyperfocal distance apps. (You can read much more in-depth on this topic in our article on why hyperfocal distance charts aren’t accurate.)
Another major drawback of hyperfocal distance charts is their impracticality. Do you really want to bring a chart into the field while you are taking pictures? It can take quite a while to find the values and focus in the right spot, particularly given that it isn’t all that accurate in the first place. These charts may be valuable if you shoot film, but the ability to review your digital images renders them generally unnecessary. It’s no wonder that many photographers simply go by trial-and-error, reviewing their photographs after every shot. However, there are better methods than that, which I will cover below.
7. The Live View Infinity Focus Method
Another method to find your hyperfocal distance, and one which can be just as accurate as the method above, is to focus your lens at infinity, or the farthest point of the background in your photograph (ideally using live view while zoomed in, already set at the aperture you plan to use). Take a picture, then review the image on the LCD screen. By magnifying the image to 100% view and starting to move down from the background where you focused to the foreground, you can find the spot that has begun to look blurry. This spot – the closest point that looks acceptably sharp in the photograph – is your hyperfocal distance.