Warthog Gimbal Review
INTRODUCTION
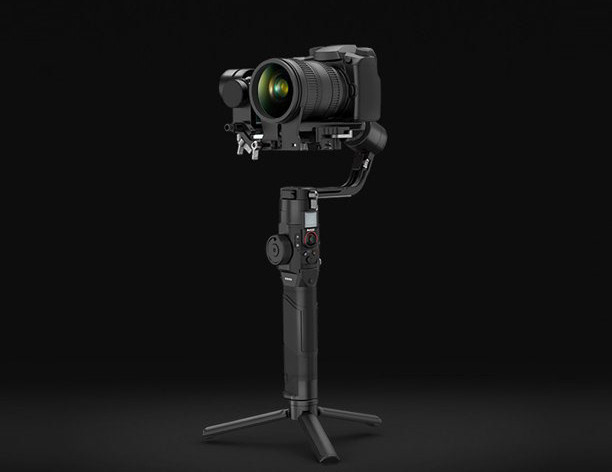
Hello my friends here I am again, I have been a little absent but now I am back with strength, in Portugal the summer is over and I have a little free time to tell you about this new product. New to the public for some time now, the Warthdog is a 3 axis gimbal that was created by Inkee and was sent to me for testing, a few months ago they sent me a prototype that was not finished yet, but now they have it, finished the product and released it to the market.
PACKAGING AND UNBOXING
Inkee, made a good work in the package of the gimbal, they made a box of polystyrene thinking in the security of the material inside,inside the box we can find;
- Stabilizer Head;
- Battery Handle Grip;
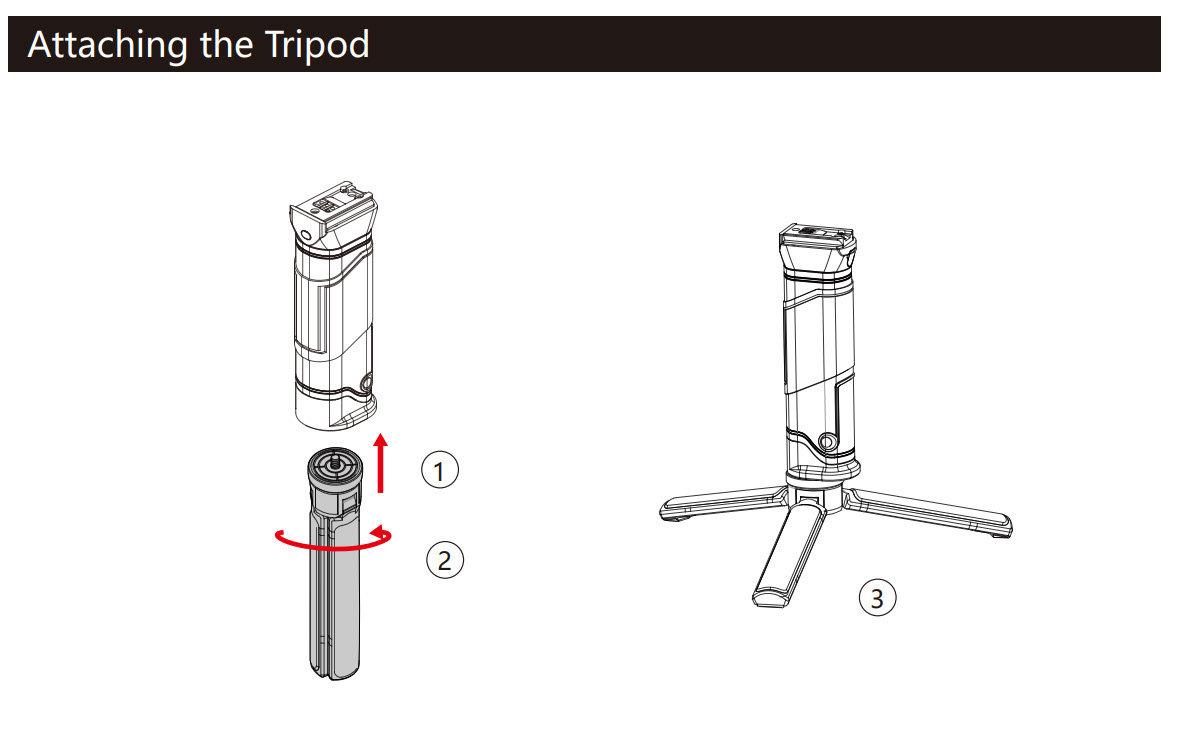
- Stand Tripod;
- Quick Release Plate;
- Follow Focus;
- USB Carger;
- 6 USB Cables:
- USB Type-A to USB Type-C Control/Charging Cable;
- USB Type-C to USB Type-C Control Cable;
- USB Type-C to 2.5mm TRS Control Cable;
- USB Type-C to Micro-USB Control Cable;
- USB Type-C to Multi Sony Control Cable.

DESCRIPTION
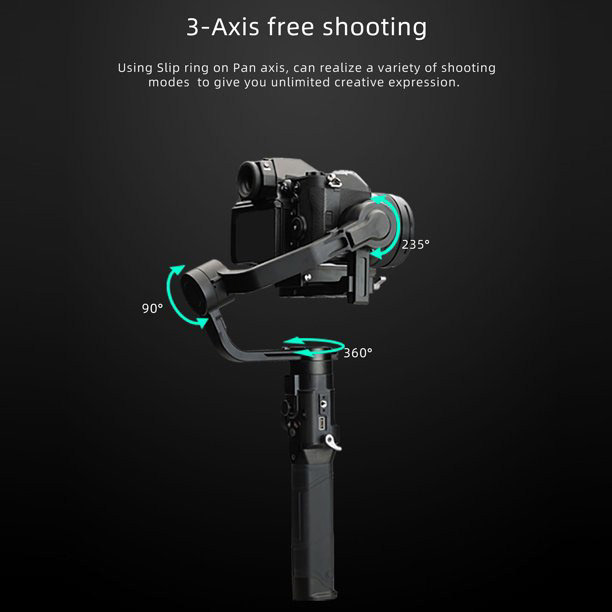
INKEE Warthog is a professional 3-axis single-handed gimbal that’s been specifically designed for mirrorless cameras. The wide range of operation modes include Pan Following Mode, General Locking Mode, Horizontal Locking Mode, General Following Mode and Flashlight Mode. With the rotation function of the Flashlight Mode users can shoot smooth rotational footage effortlessly. While the hyper button allows more faster following speed of gimbal, which meets the needs of the lens in fast-moving scenes. Warthog boasts axis lock allowing for individual axis balancing and for faster, more convenient storage. With Warthog , users can control the movement of the gimbal and switch control profiles easily with a click of a button. Used with the provided camera control cables.
Warthog is able to control shutter, recording, and focus. With the accessory ports, users can attach accessories such as follow focus.
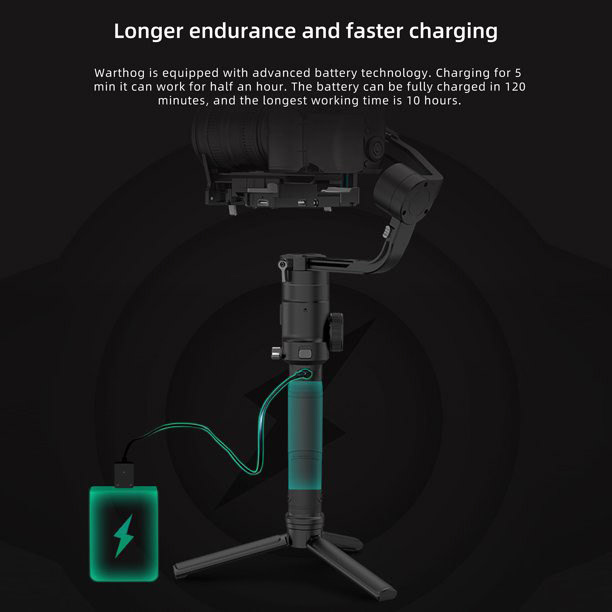
The gimbal and grip are detachable, with a built-in 2500 mAh battery, providing a maximum standby time up to 10 hours. This gimbal have a extra USB to charge a extra device.
After connecting to the app, it is easy to control gimbal movement and parameter settings.

KEY FEATURES
- 3 HANDHELD STABILIZER: Using slip ring on pan , can realize a variety of operation modes like pan following mode, general locking mode, horizontal locking mode, general following mode, flashlight mode, to give you unlimited inspiration expression.
- BUILT-IN RECHARGEABLE BATTERY: Charging for 5min, the stabilizer can work for half an hour. When the battery is fully charged, and the longest working time is up to 10 hours.
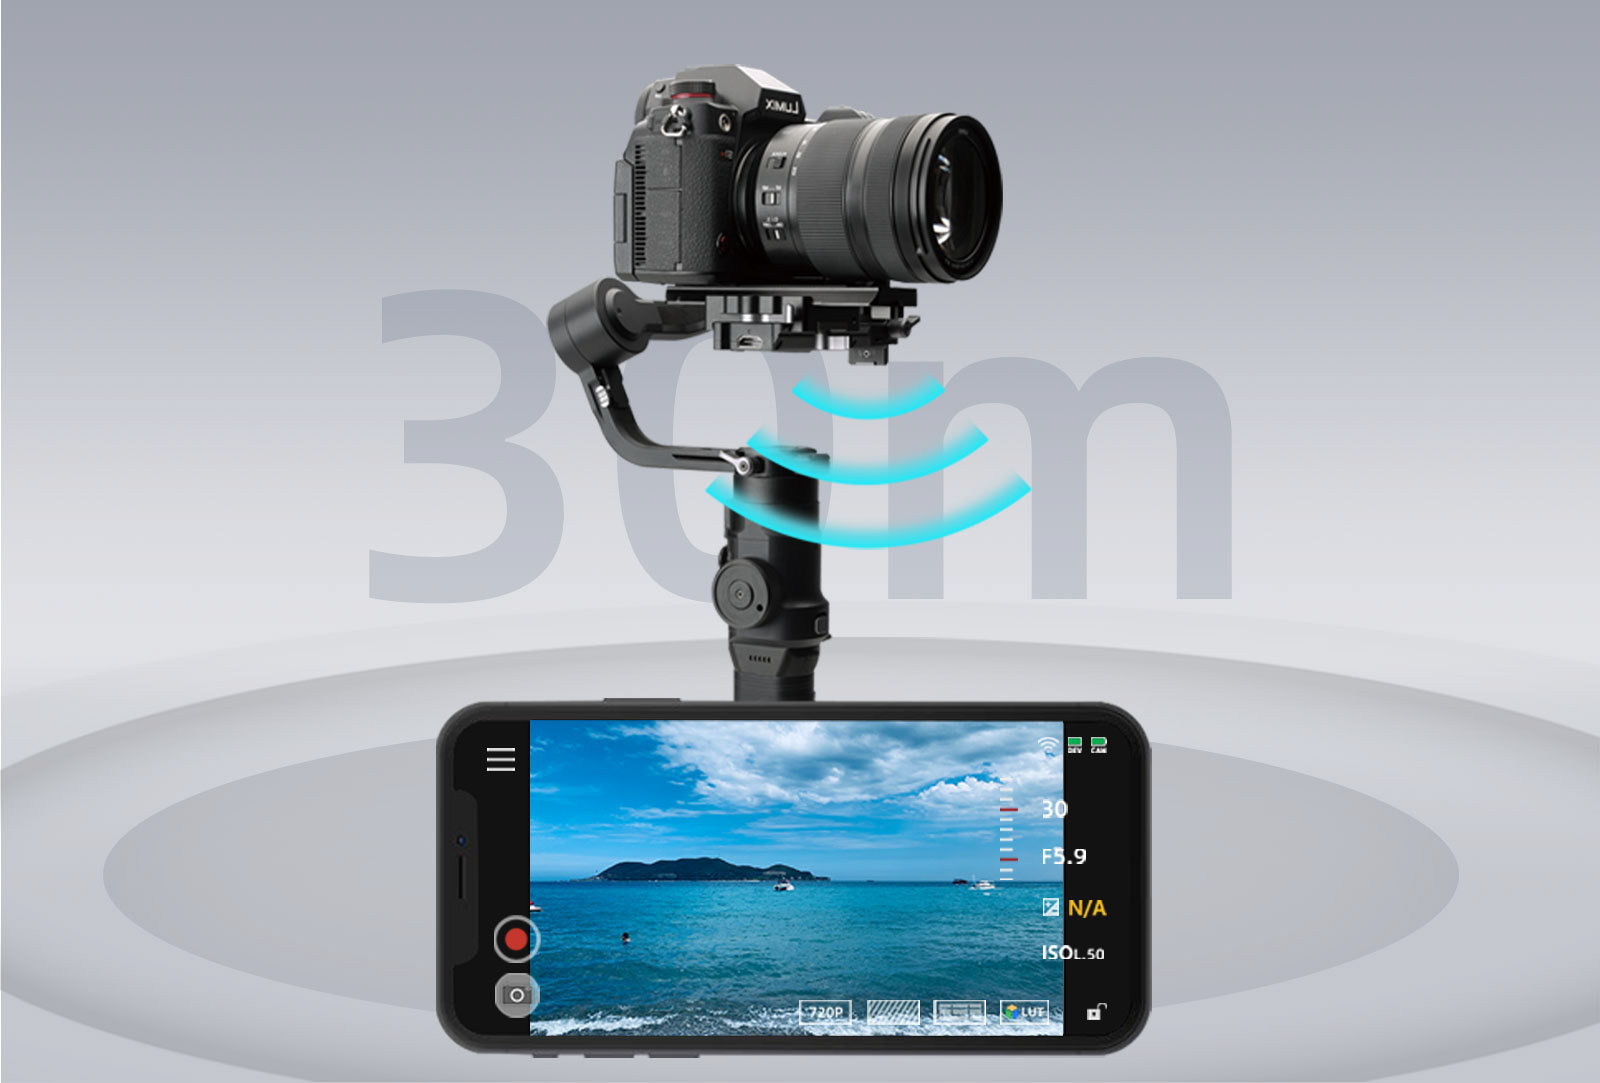
- BUILT-IN WIRELESS IMAGE TRANSMISSION SYSTEM: Wireless BT connection and supports 30 meters transmission with ultra-low latency and real-time monitoring.
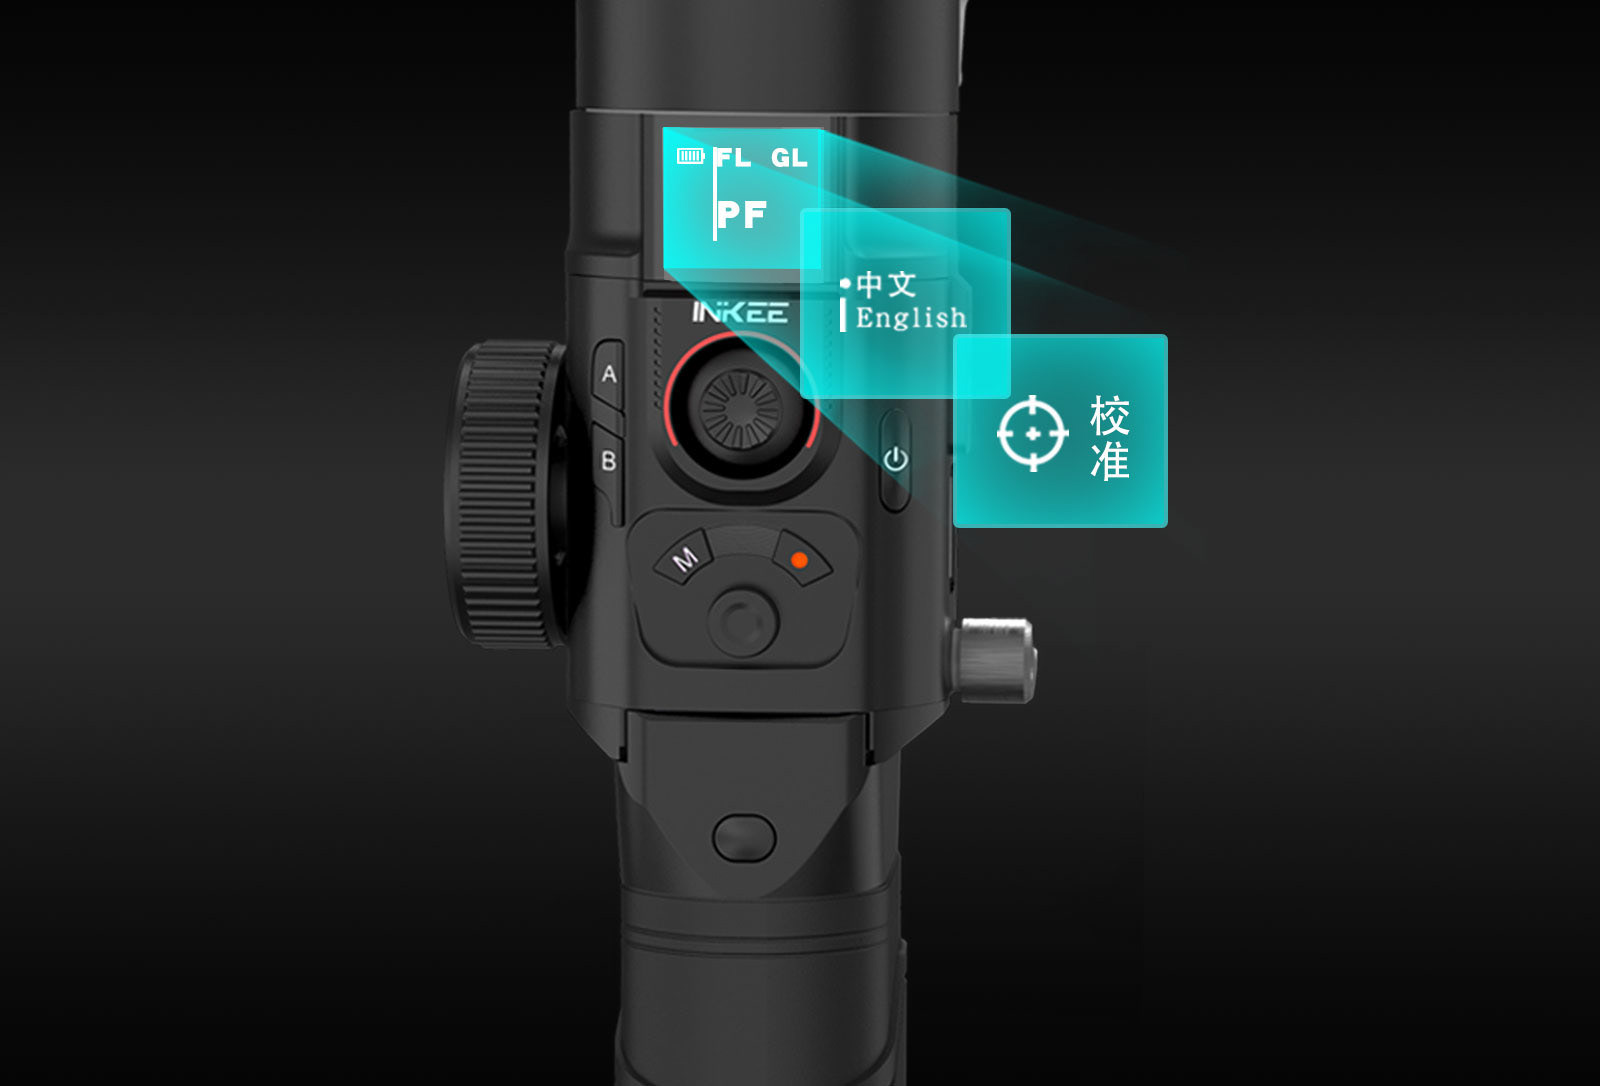
OLED SCREEN: 1-inch OLED Black-and-white parameter adjustment screen, supports switching of Chinese and English subtitles. Easy to view the working state and adjust the parameters and function modes.
- WITH INTELLIGENT FOLLOW FOCUS: Featuring latency and precise control, the gimbal is designed to provide optimum stability and comfort.
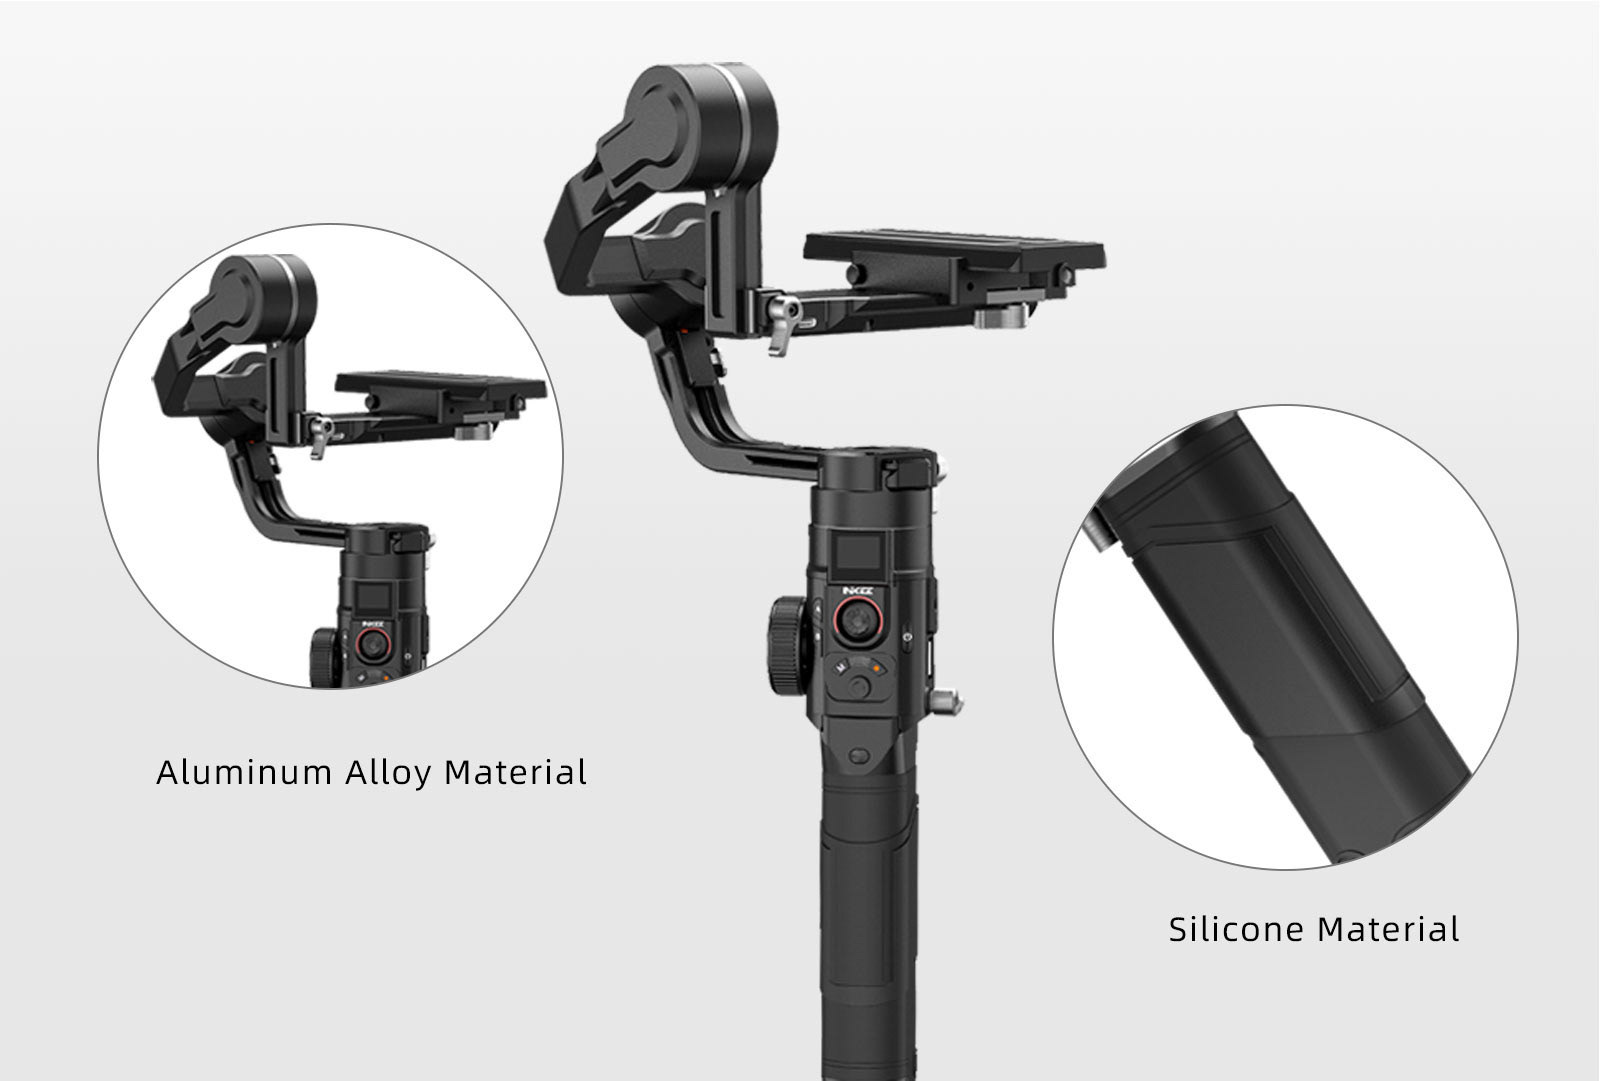
- ALUMINUM ALLOY MATERIAL: With aviation aluminum alloy body and silicone handle, the stabilizer is skid, friction and comfortable to hold.
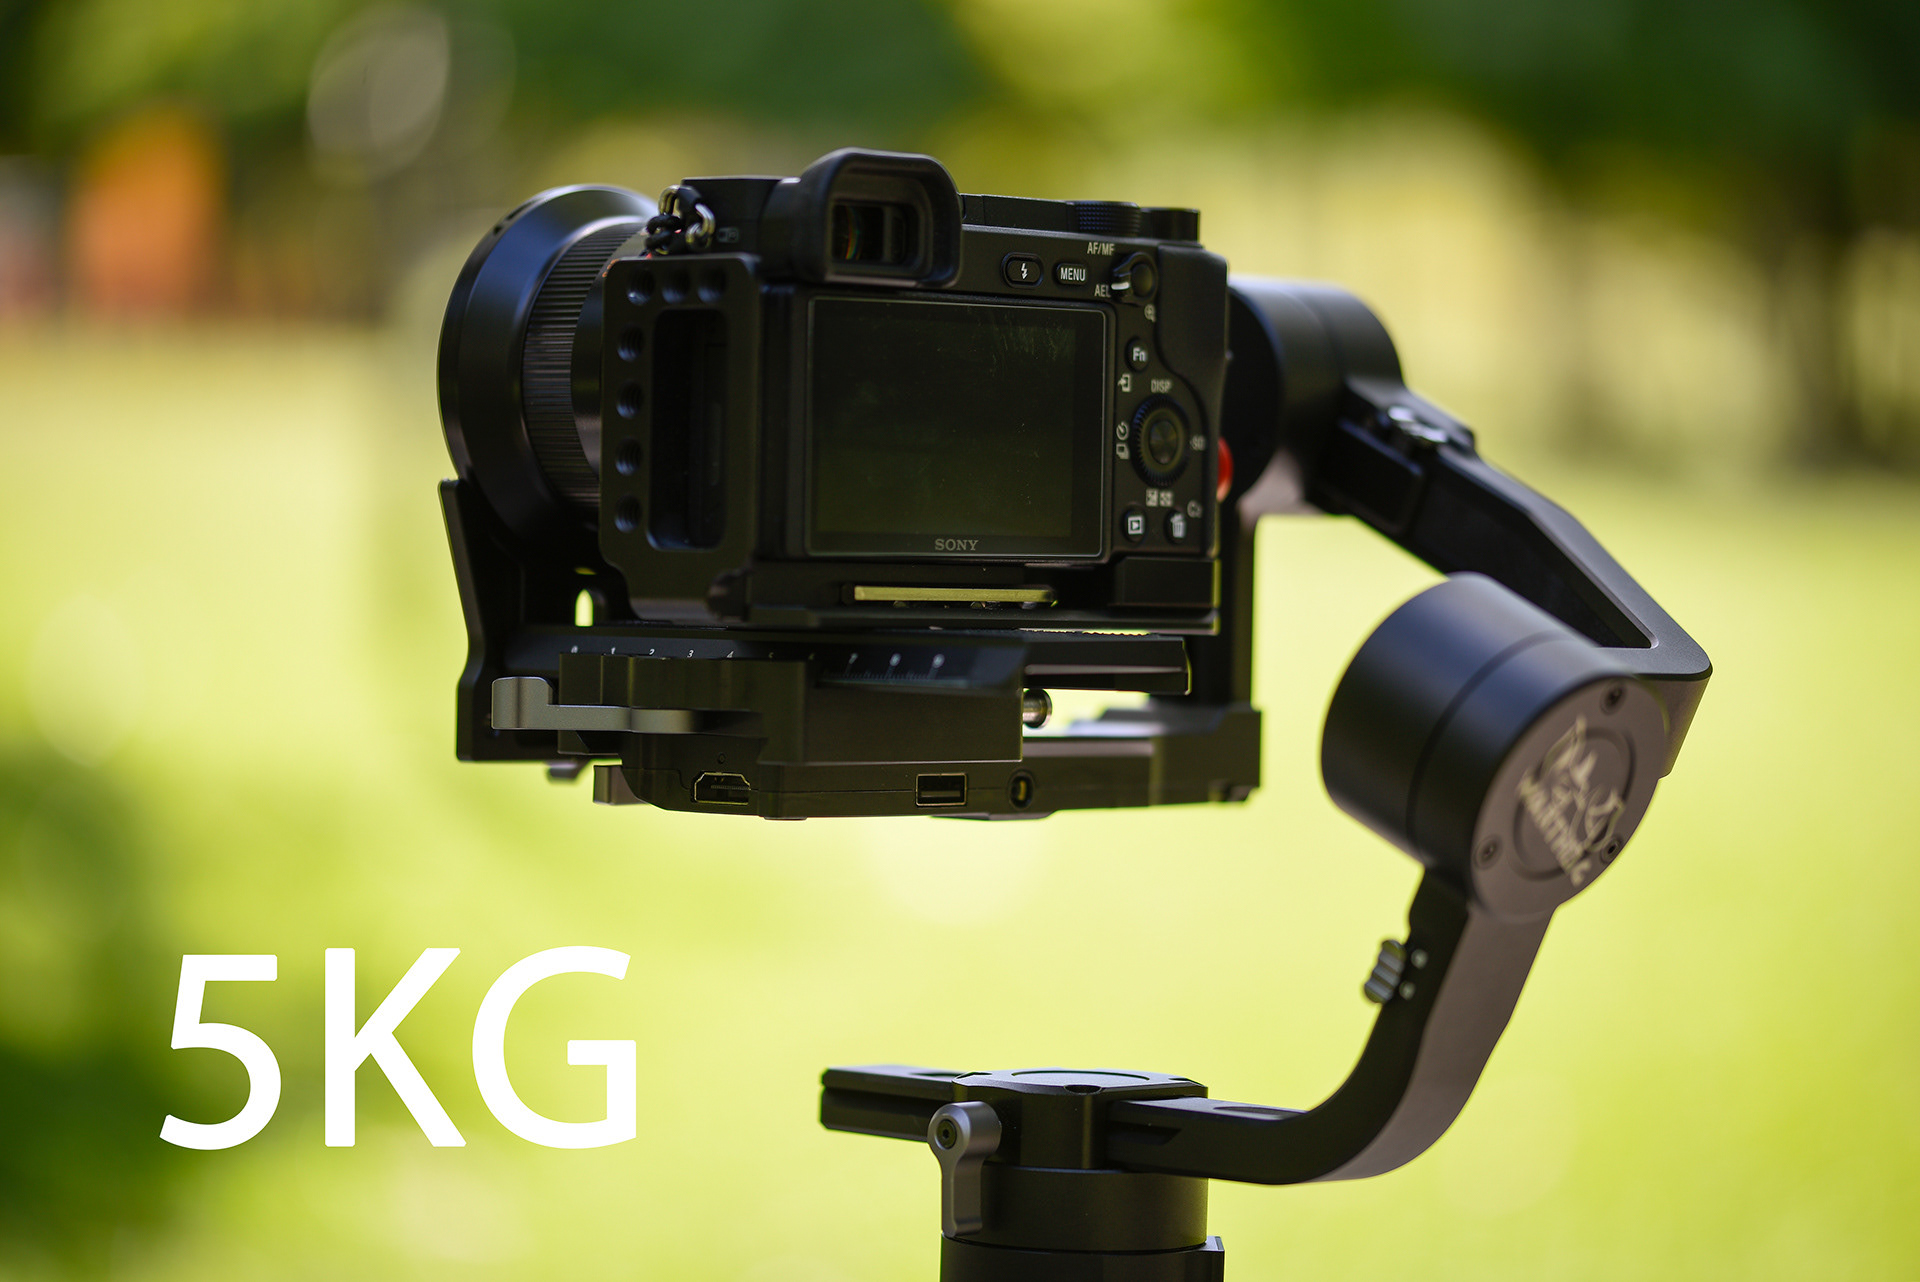
- UP TO 5KG MAXIMUM LOAD: The stabilizer is lightweight design, but the motor performance is more powerful, supporting various of mirrorless and DSLR cameras.
SPECIFICATIONS
- Max payload updates to 5 kg, say no to hands shaking! Easily work with popular mirrorless cameras;
- Exclusive OLED, super clear page. Black-and-white parameter adjustment screen, supports switching of Chinese and English subtitles. Easy to view the working state and adjust the parameters and function modes;
- Aluminum alloy creates an ultra-light body which weighs Approx. 1.46 kg (gimbal only) Approx. 1.84 kg(gimbal and grip included;
- Charging Time: 25W far charging 1.5H, 18W far charging 2.5H, 5V 2A 4H;
- Battery: 2500mAh lithium battery, 36Wh;
- Magic foldable quick release plate, three-axis motor lock, all of these detail designs make the gimbal more portable;
- Optional motion-sensing remote control provides remote shooting and more creative possibilities;
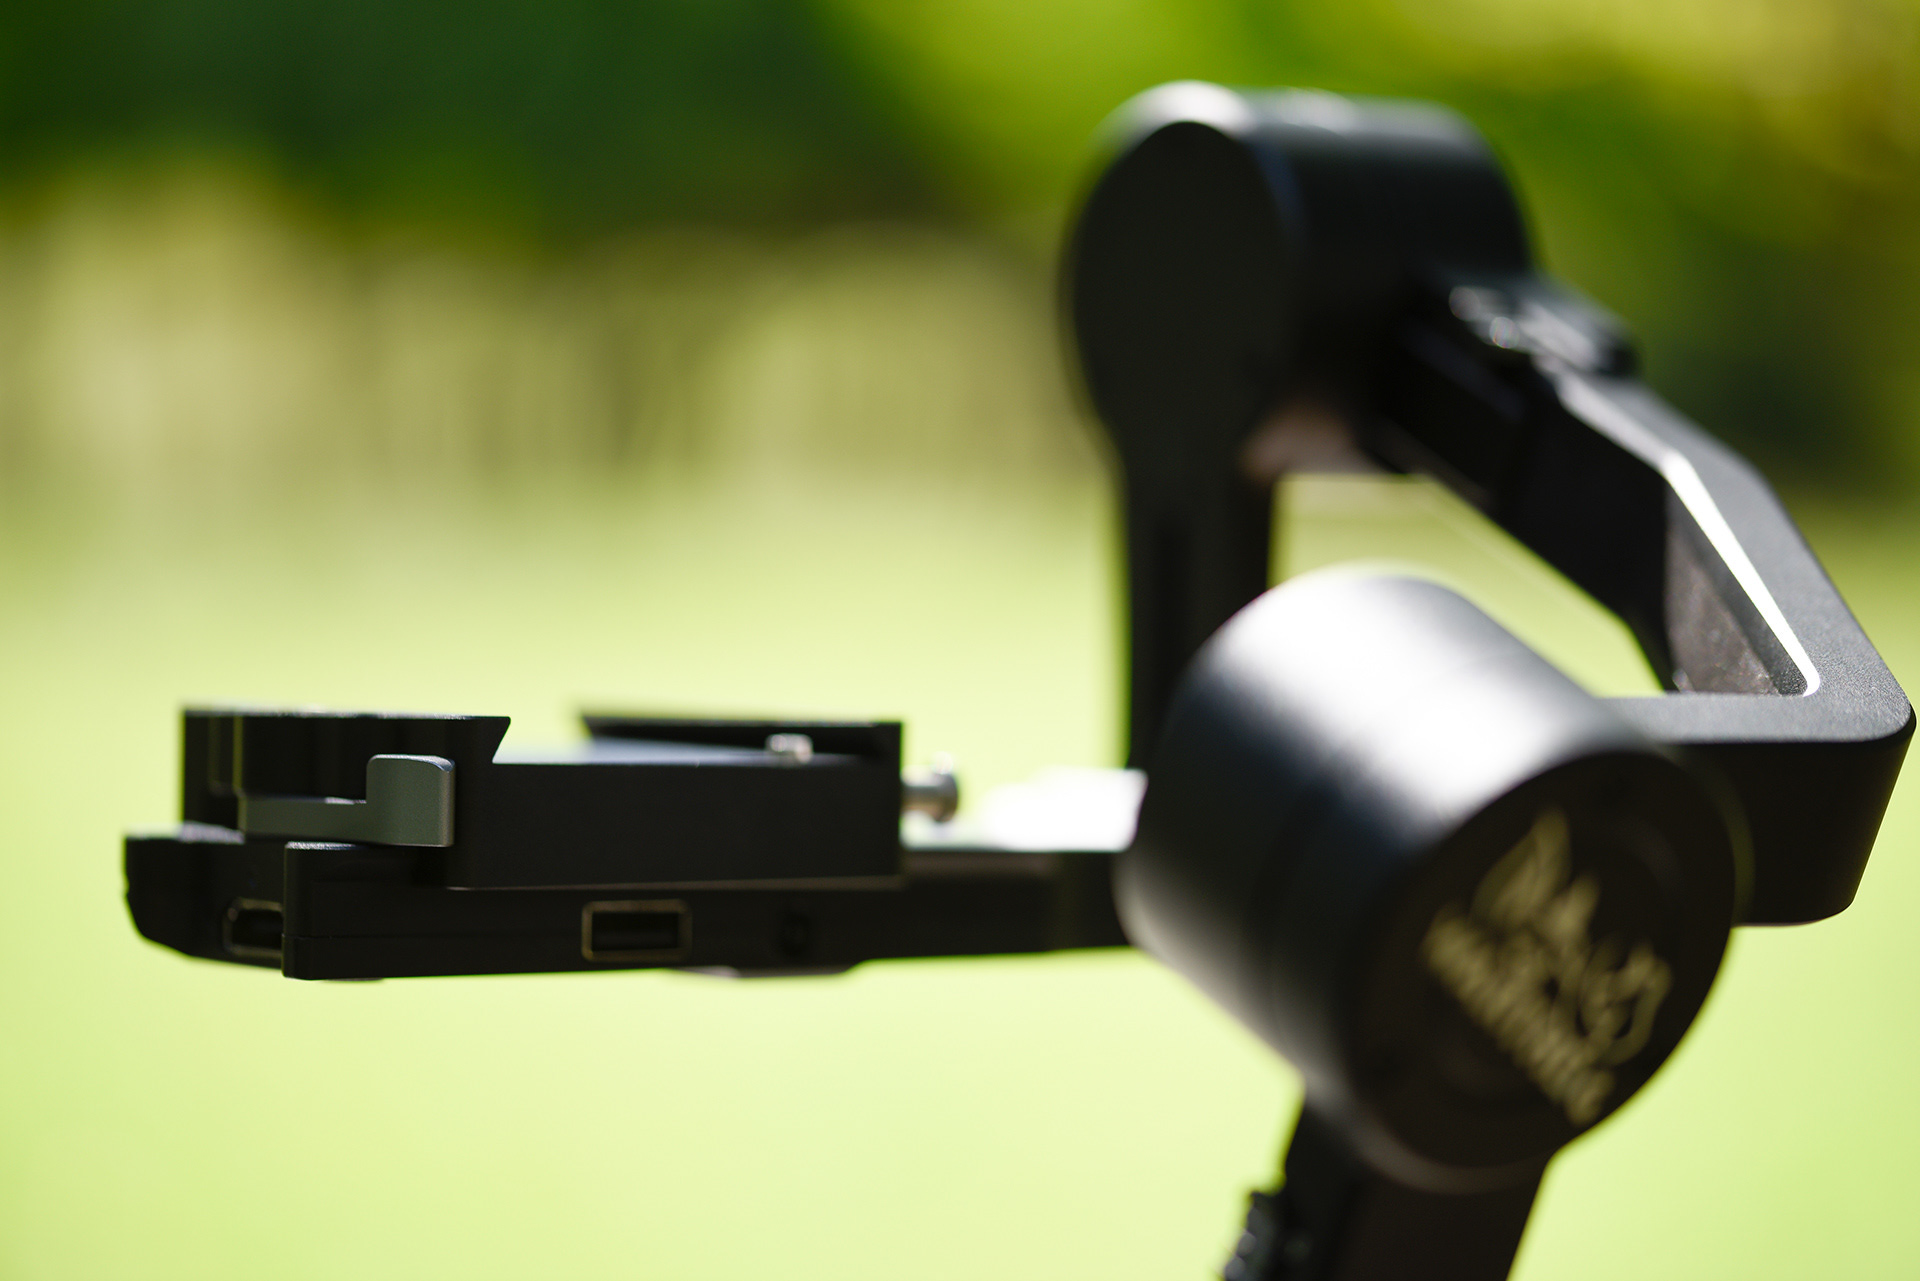
- Supply USB Cable control,USB-A Power Port: 5V/1A;
- Camera Control Port: 5V/1A;
- Camera HDMI Port: Standard HDMI Port;
- Wirless transmissition WIFI: 2.4g and 5g Dual Channel;
- APP Installation Requirement: iOS 9.0 or above, Android 5.0 or above;
- One 1/4inch thread hole and one 3/8inch thread hole at the base of handle for all types tripod/ monopod in the market.
1 - GIMBAL
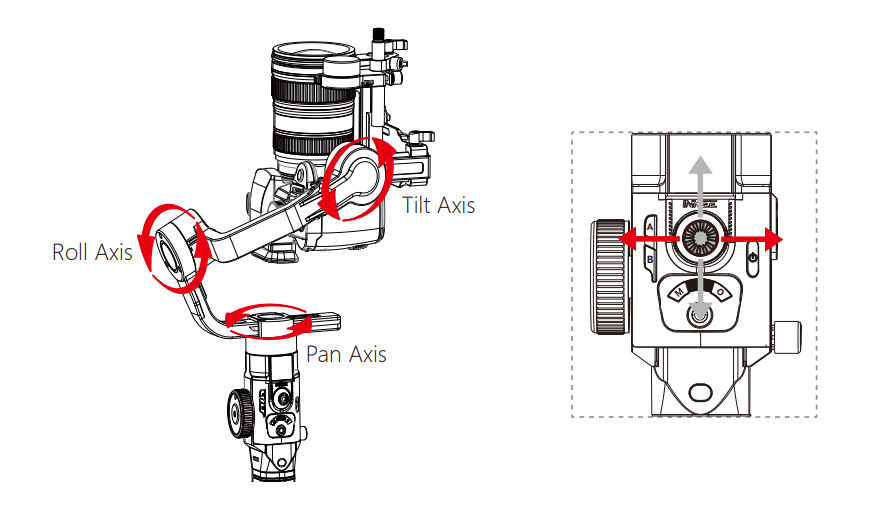
- Number of Axes: 3-Axis (Pitch, Roll, Yaw);
- Rotation Range: Yaw (Pan): 360° (Unlimited);
Pitch (Tilt): 180° (with limitation);
Roll: 360° (with limitation);
Pitch (Tilt): 180° (with limitation);
Roll: 360° (with limitation);
- Controllable Range: Tilt:+ 205° to - 115°;
Roll+ 230° to - 90°;
Roll+ 230° to - 90°;
Follow SpeedPan: 120°/s;
Tilt: 2 to 75°/s;
Load Capacity:5 kg.
2 - COMPATIBILITY
- Camera Mounting Screw: 1 x 1/4"-20 Male;
- The size of compatible cameras for reference :
- Camera height (include the height of viewfinder)≤120mm;
- The distance from screw hole to the right edge of camera ≤95mm;
- Maximum length at lens direction: about 170mm.
3 - CONNECTIVITY
- 2 USB-A, USB Communication;
- Bluetooth 4.2;
- WIFI: 2.4g and 5g Dual Channel.
4 - BATTERY
- Model: SK01-2500mAh-14.4V-36Wh;
- Type: 18650 LiPo;
- Capacity: 2500 mAh;
- Battery Cells: 4(4S1P);
- Energy: 36 Wh;
- Usage Time: 10h;
- Charging Time: 25w;
- Fast charging 1.5h 18w Fast charging 2.5h 5V/2A 4h.
5 - GENERAL
- Materials: ABS, Aluminum, Silicone;
- Mounting: 1 x 1/4"-20 Female
1 x 3/8"-16 Female
1 x 3/8"-16 Female
Weight:
- Approx. 1.46 kg (gimbal only);
- Approx. 1.84 kg(gimbal and grip included);
- Payload: 5Kg;
- Water-Proof Grade: Not Water-proofd).
6 - PACKAGING INFO
- Package Weight: 2.5kg;
- Box Dimensions (LxWxH): 39.1 x 23.8 x 8.3 Cm.

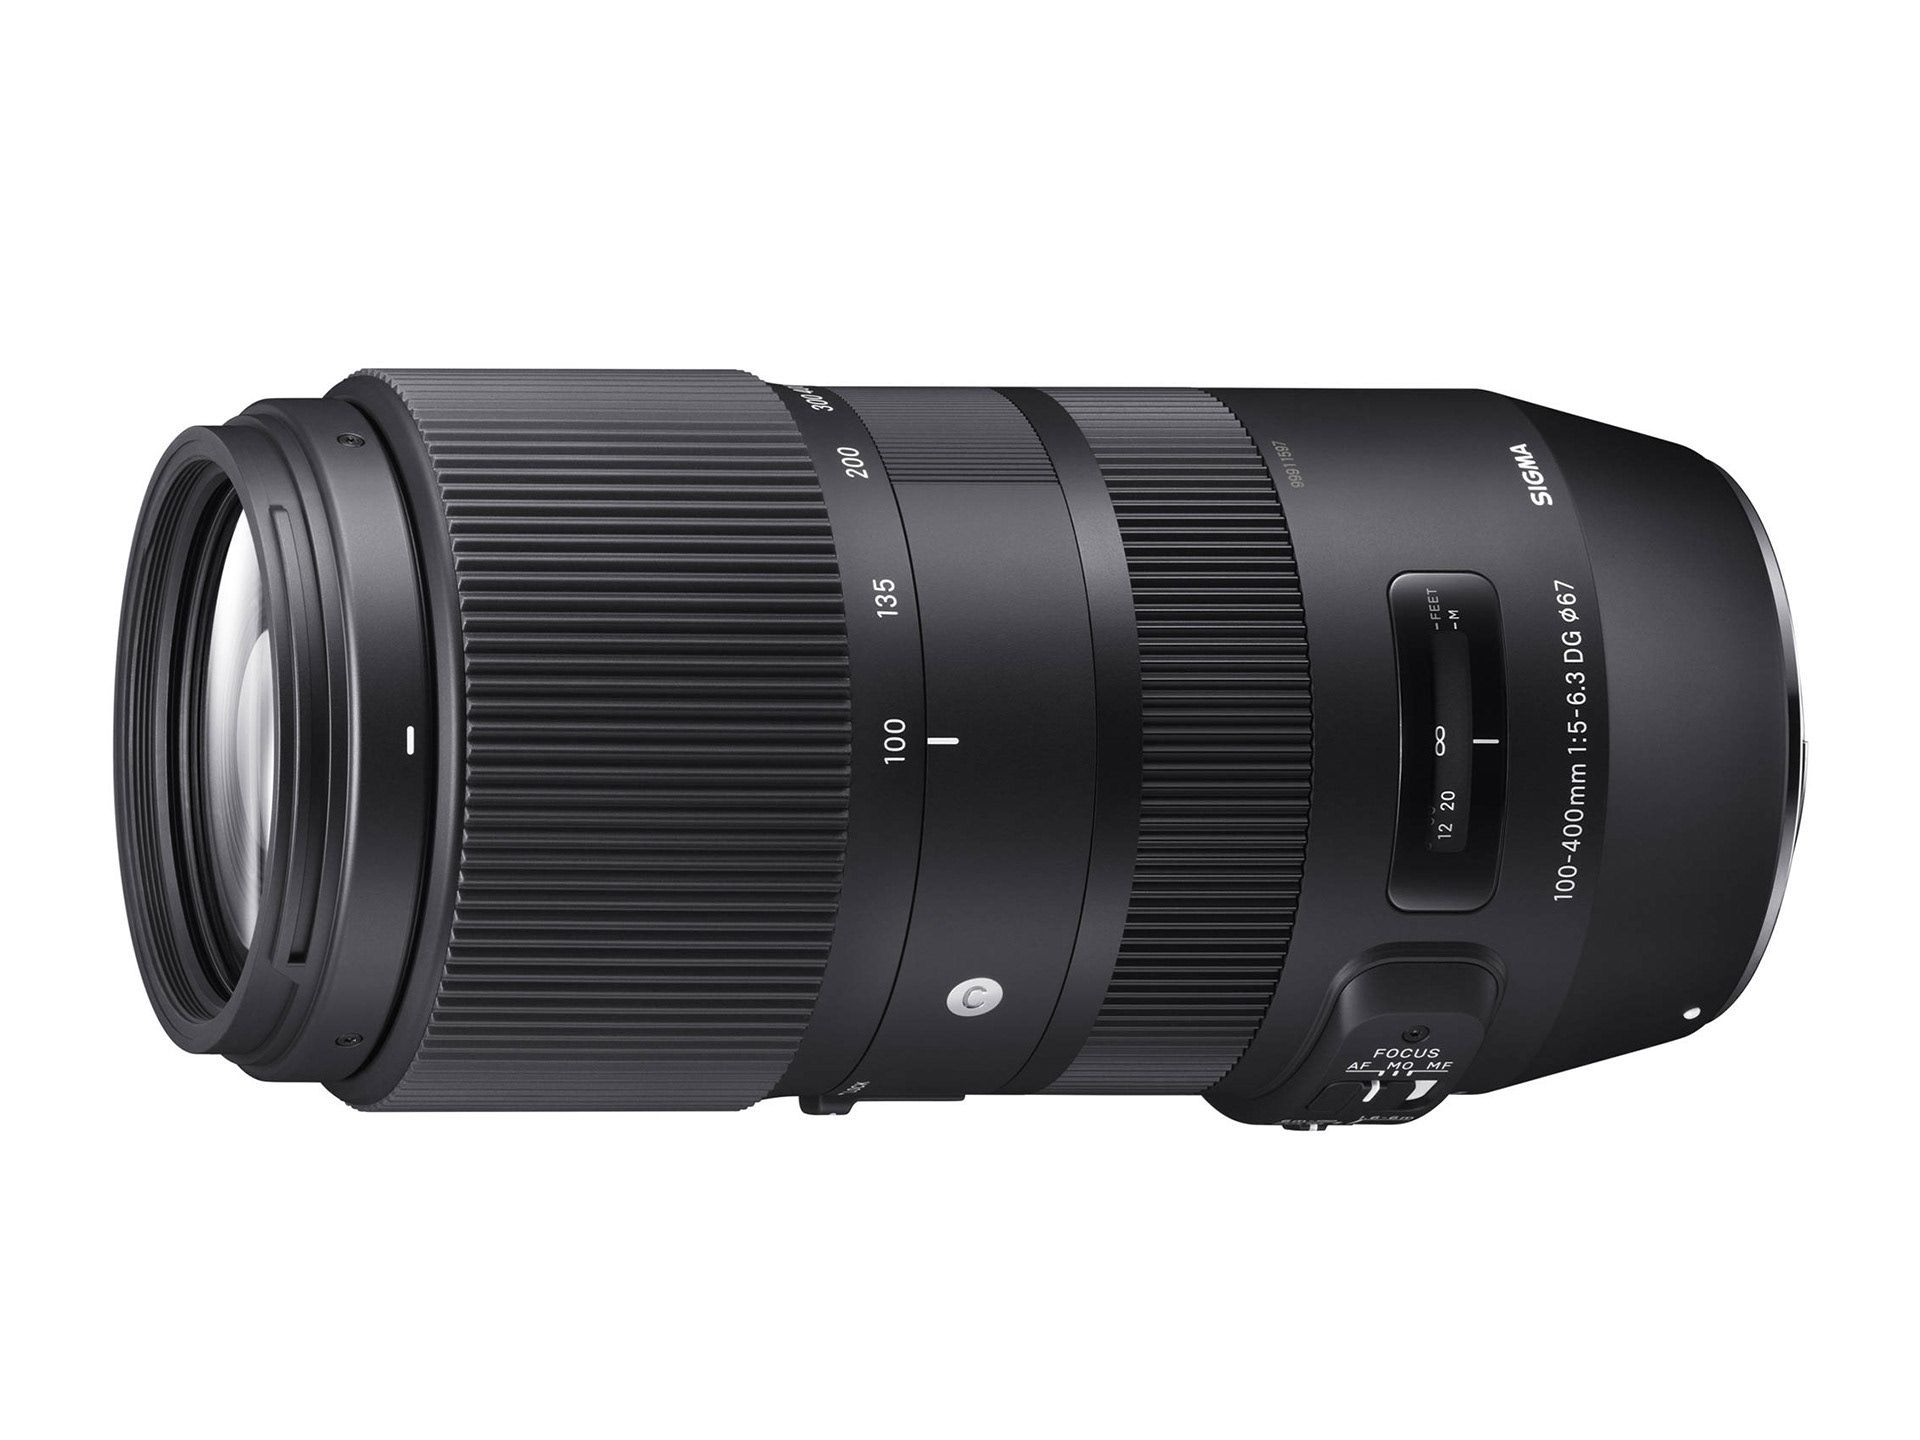
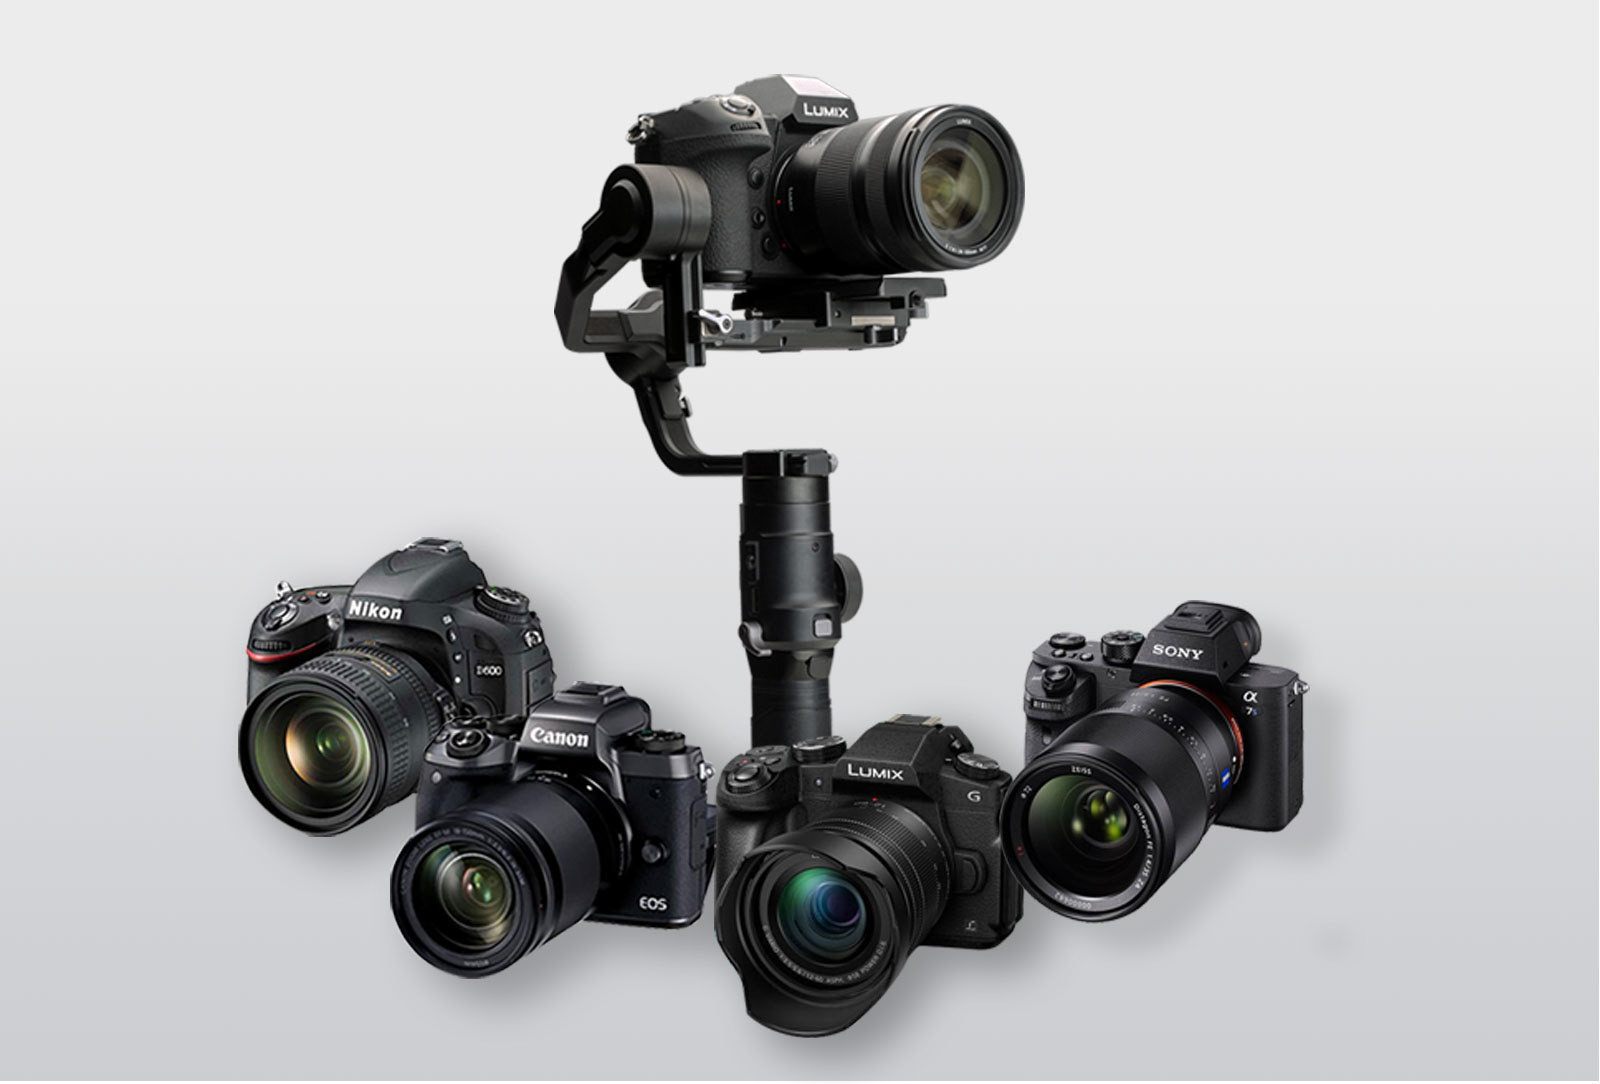
CAMERAS SUPPORTED
Popular DSLR& mirrorless camera supported (Check Camera Compatibility Lists for more details, will be updated continuously ):
1 - SONY:A9 series、A7 series and other DSLR camera series;A6300/A6400 and other Mirrorless camera series
Lenses: SONY FE28-70mm f/3.5-5.6 OSS、SONY E PZ 16-50mm f/3.5-5.6 OSS and etc.
2- CANON:EOS R、5D Mark IV、M50、6D、600D、80D and other cameras with similar size and weight
Lenses: Canon EF 24-70mm f/2.8L II USM、Canon EF 24-105mm f/4L IS USM and etc.
Lenses: Canon EF 24-70mm f/2.8L II USM、Canon EF 24-105mm f/4L IS USM and etc.
3 - Panasonic :GH4、GH5/GH5S、GX9、GF9
Lenses: OLYMPUS M.ZUIKO DIGITAL ED 12mm f/2.0、LUMIX DG Summilux 25mm f/1.4 ASPH、LUMIX G 12-32mm f/3.5-5.6 and etc.
Lenses: OLYMPUS M.ZUIKO DIGITAL ED 12mm f/2.0、LUMIX DG Summilux 25mm f/1.4 ASPH、LUMIX G 12-32mm f/3.5-5.6 and etc.
4 - Nikon:Z7, Z6/ D7500/ D760/ D850
ERGONOMICS & HANDLING
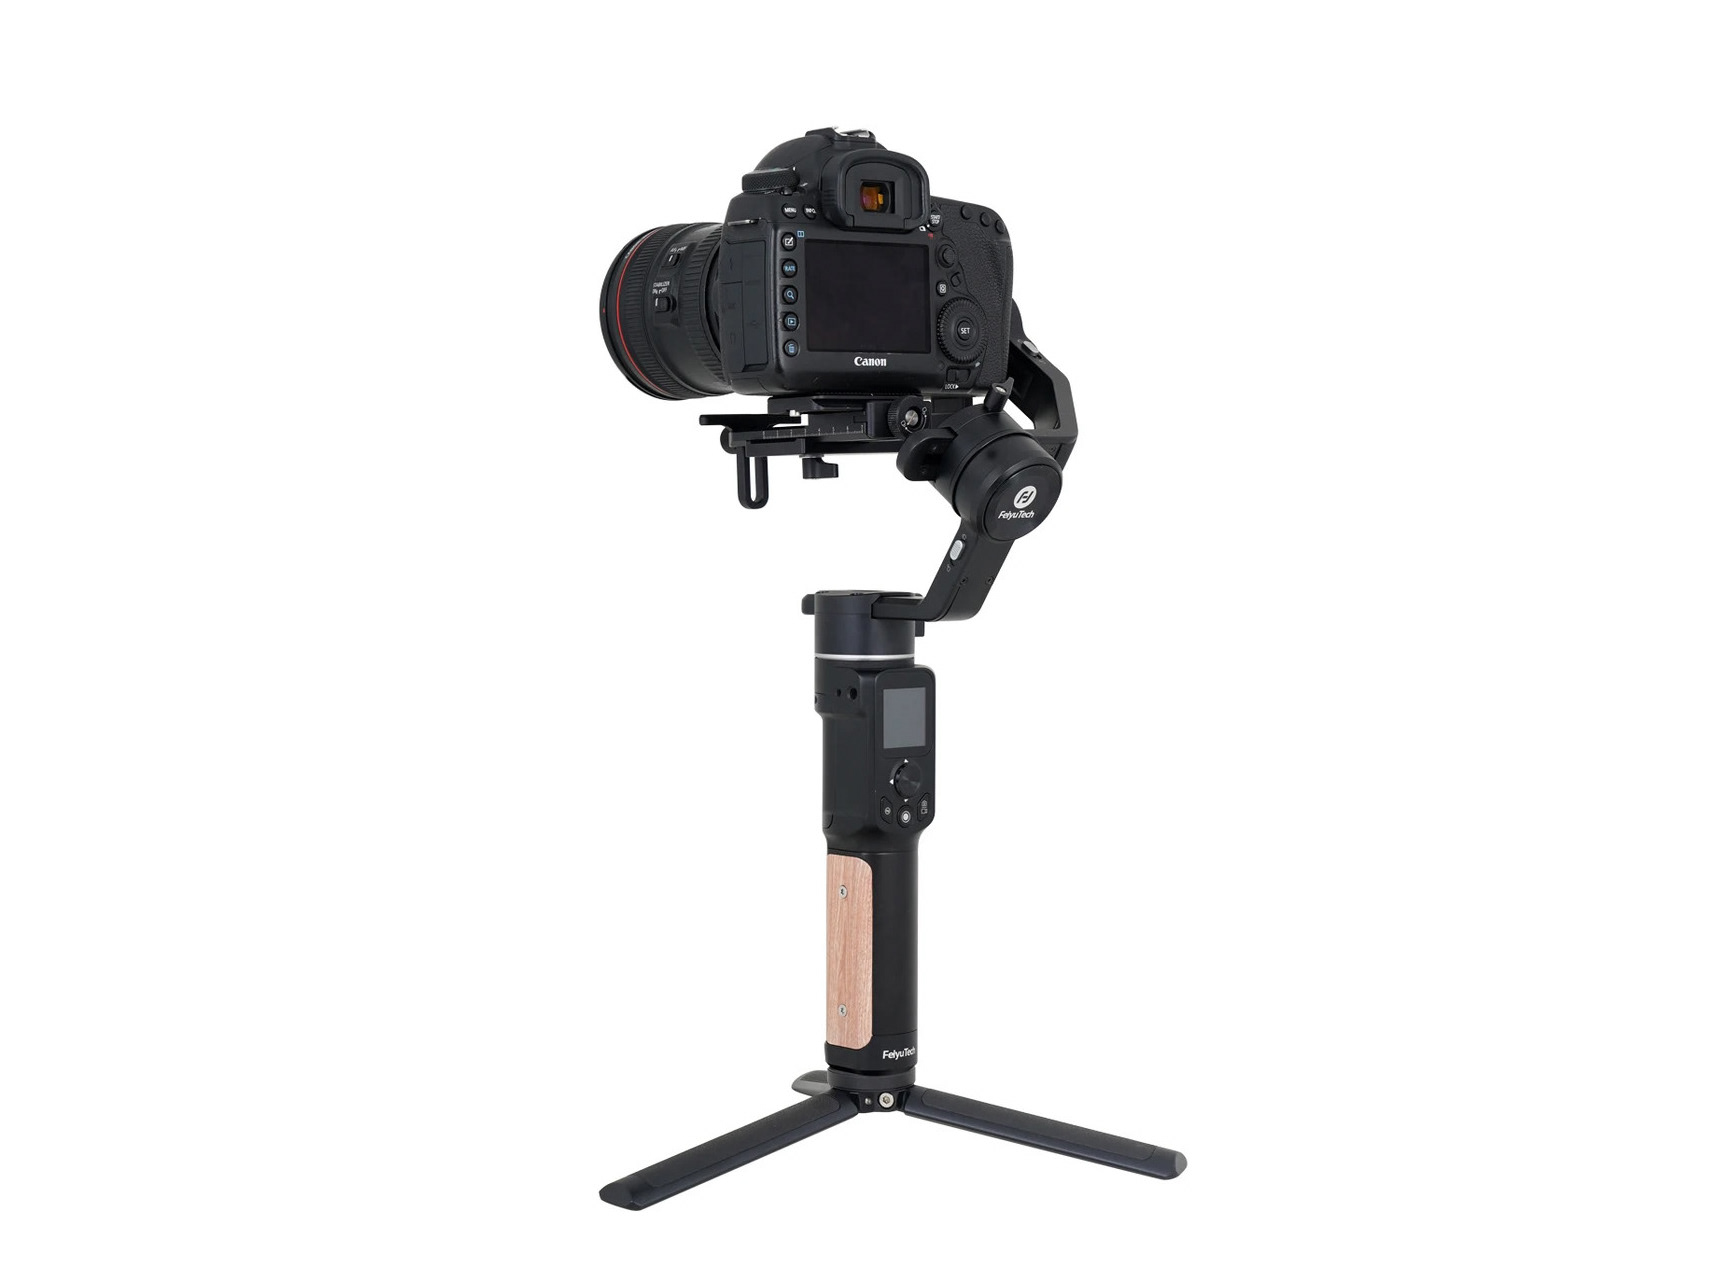
The Inkee Warthog is considered medium for its category. When in “storage” mode, the Warthog wins to all the concurrence it divides in two peaces that's very useful and it can be storage in a normal backpack . This gimbal is not one of the lightest on the market, but given its features, and the 5kg payload capacity this weight of 1.8kg, which should allow for a variety of different camera and lens setups.
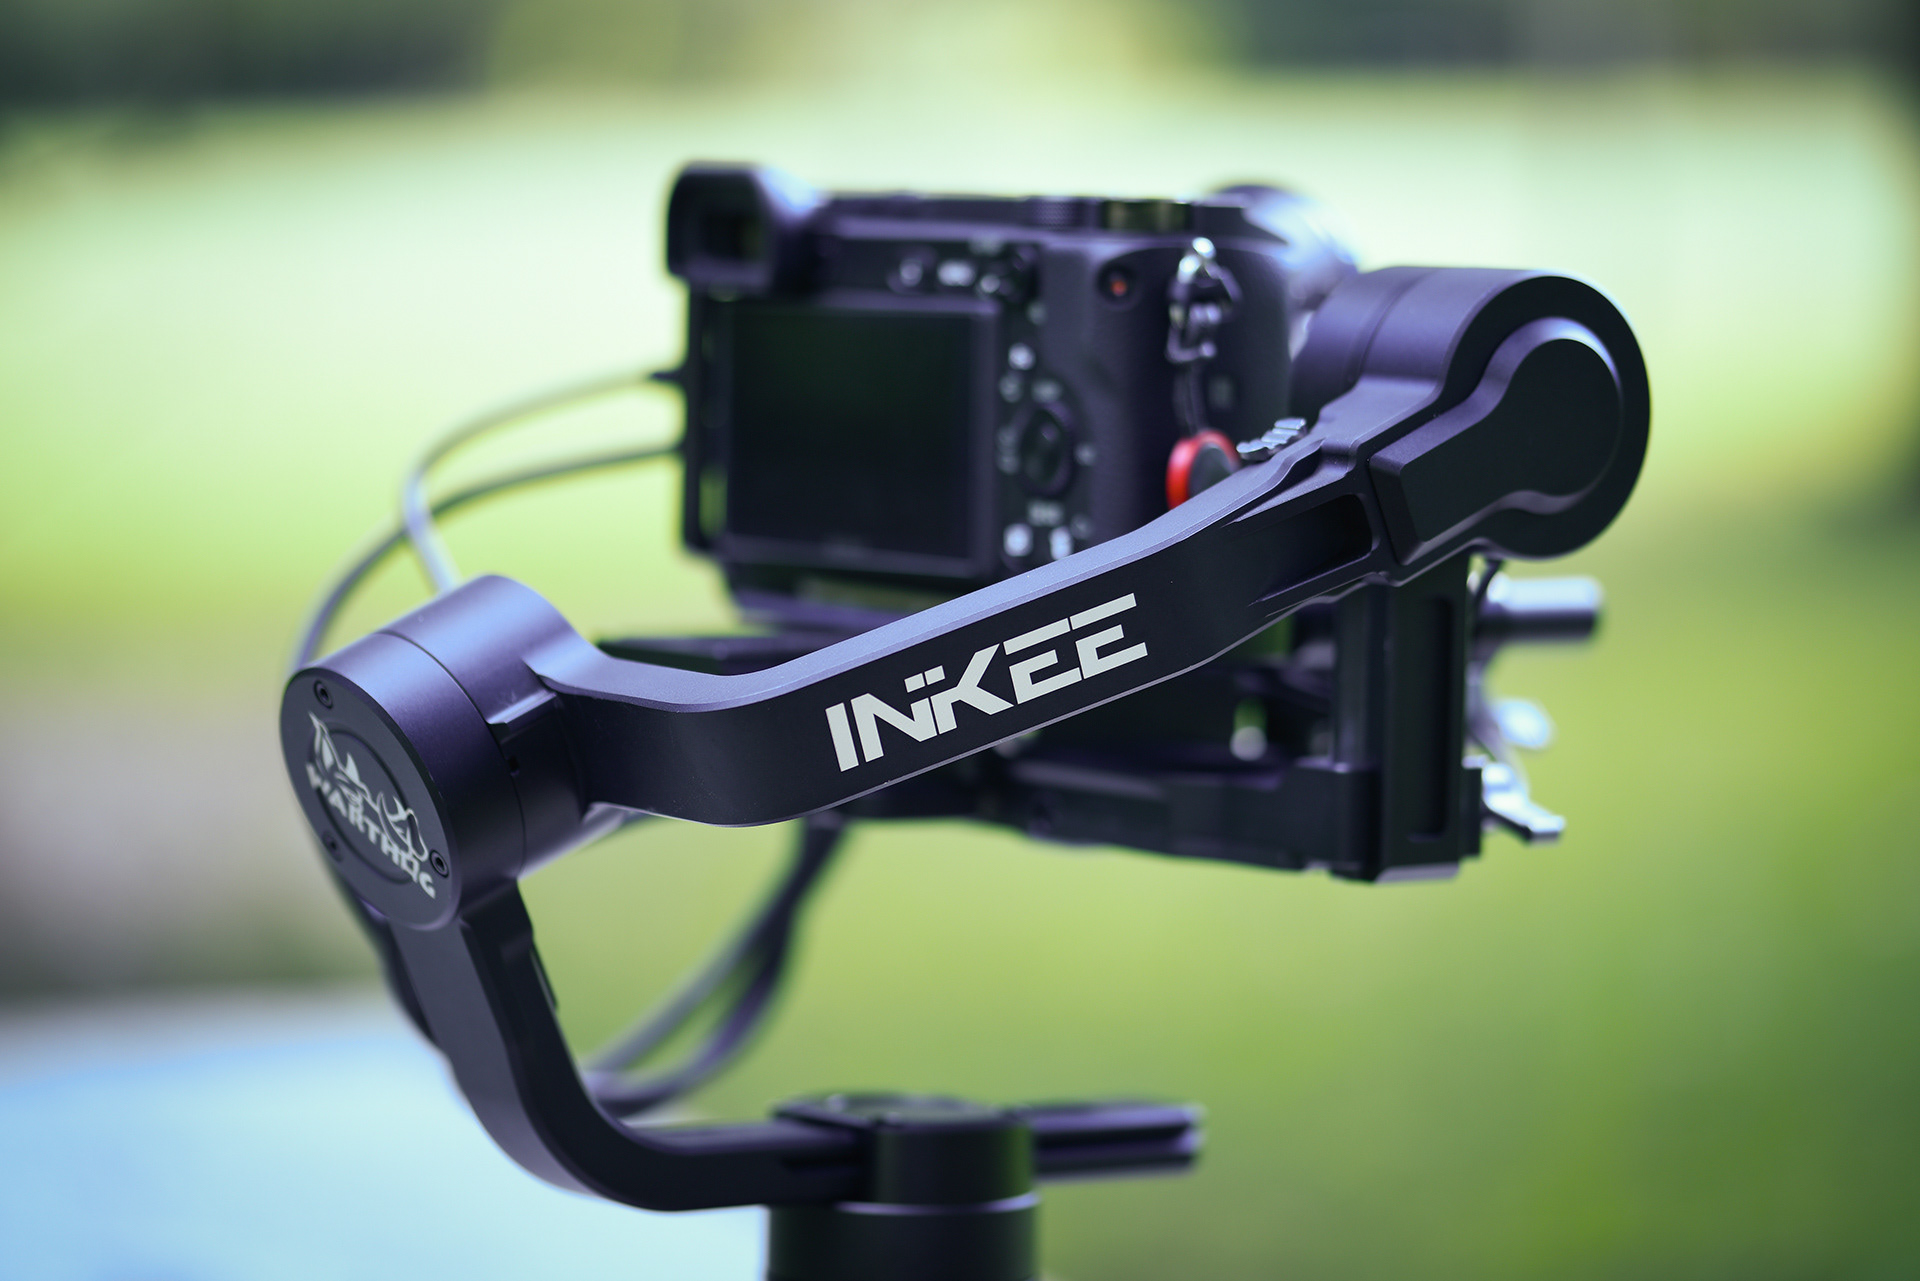
Much of the body is anodized black which gives it a stealthy look, though the handles on the version we have here has a rosewood patterned handle with silicone material for the hand grips.
When you want to store the warthdog or want to only lock certain parts of the arms, there are motor locks that can hold the arms in place. This allows for flexibility if you don’t need all the arms to move and also makes storage much more secure.

INSTALLATION OF CAMERA AND BALANCE
MOUNTING THE CAMERA
Supported Cameras and Lenses:
Warthog has been rigorously tested to support a payload of 2.0-5.0kg. Make sure the combined weight of the camera, lens and other accessories are within 5.0kg. Refer to the Warthog product page (www.inkee.com/Warthog ) for the most updated Warthog Camera Compatibility List.
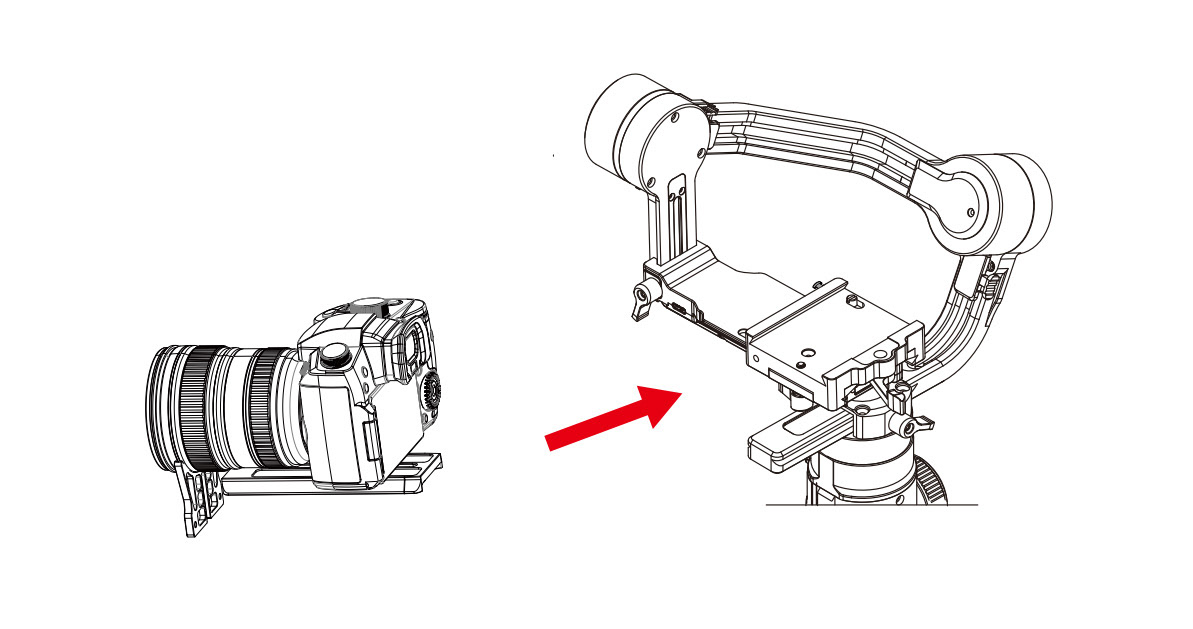
Mounting a Camera:
Make sure to prepare the camera before mounting it to Warthog . Remove the lens cap and make sure the battery of the camera and memory card are already inserted.
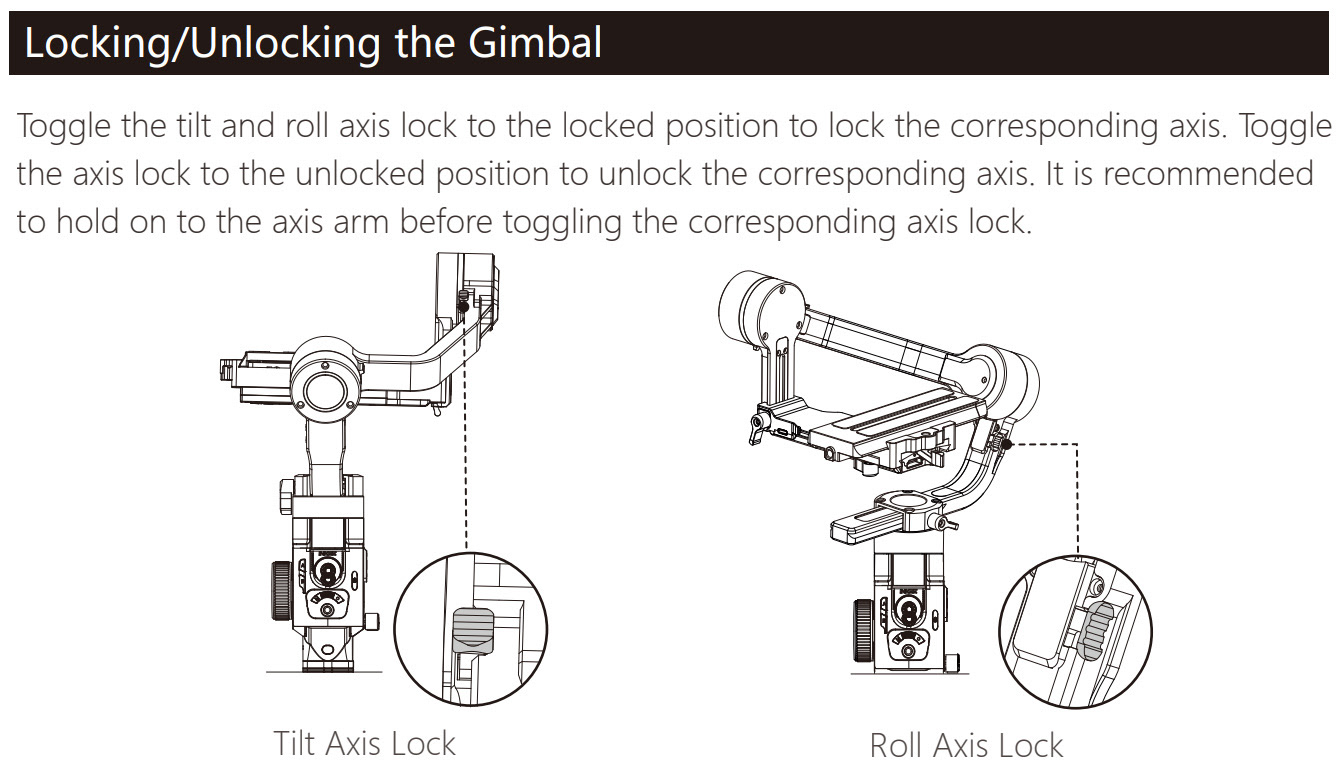
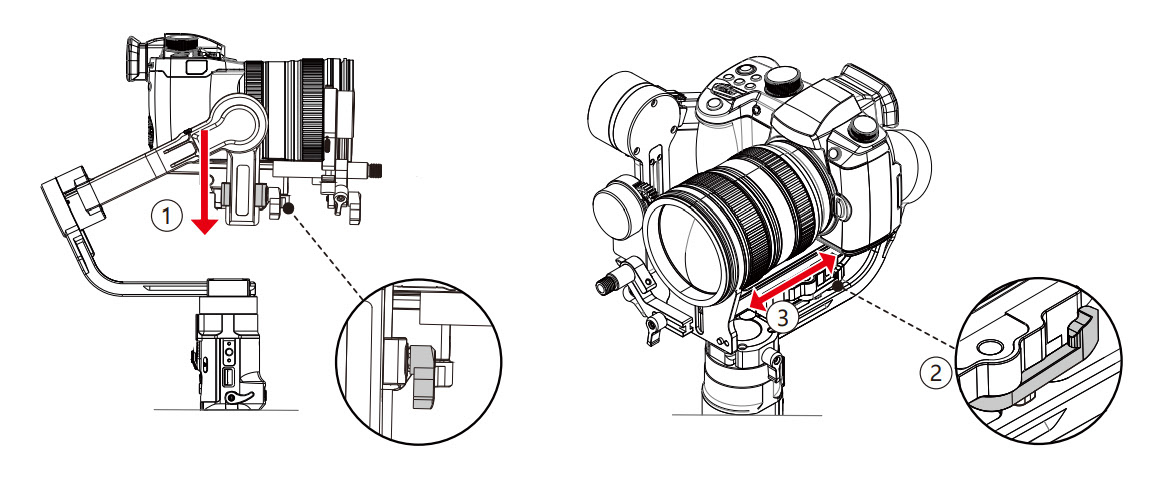
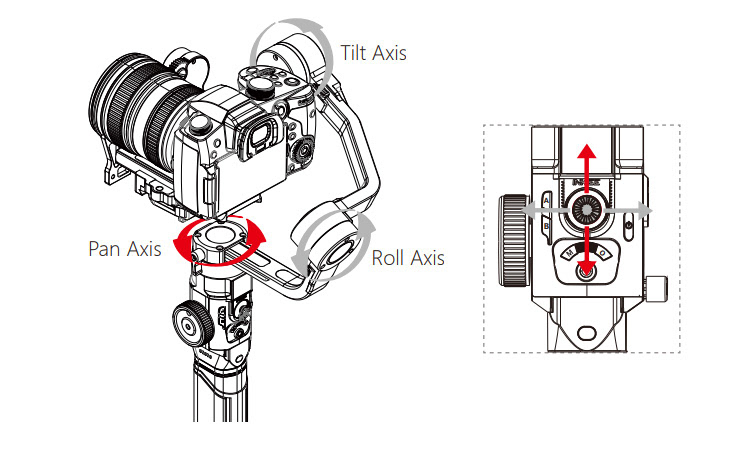
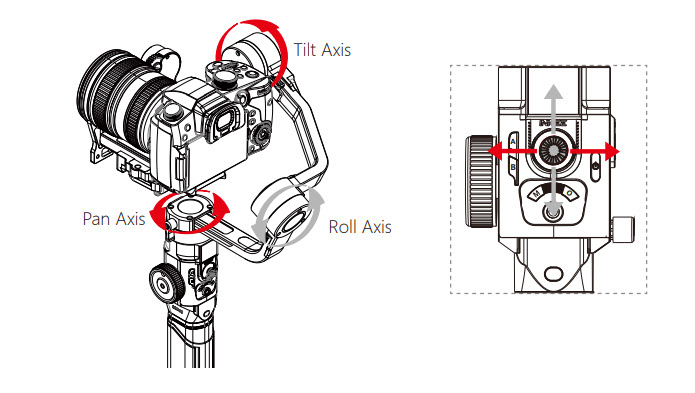
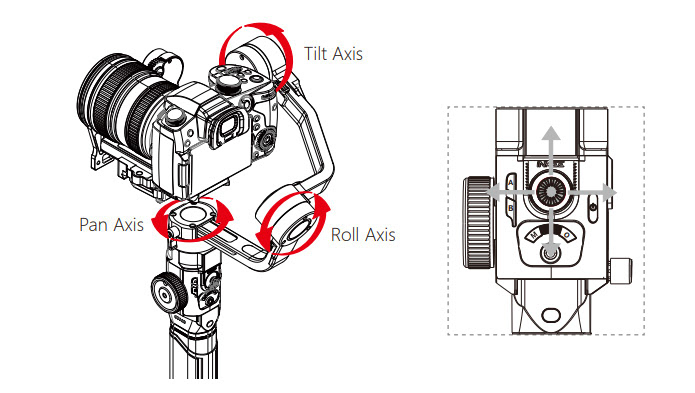
1. Tilt axis and Roll axis of the gimbal are locked by default. Unlock these two axes, adjust the gimbal to the position as shown, and lock the two axes again.

2. Attach the Quick Release plate and lens support. The camera lens and the lens support must face the same direction. Use the lens support for optimal performance.
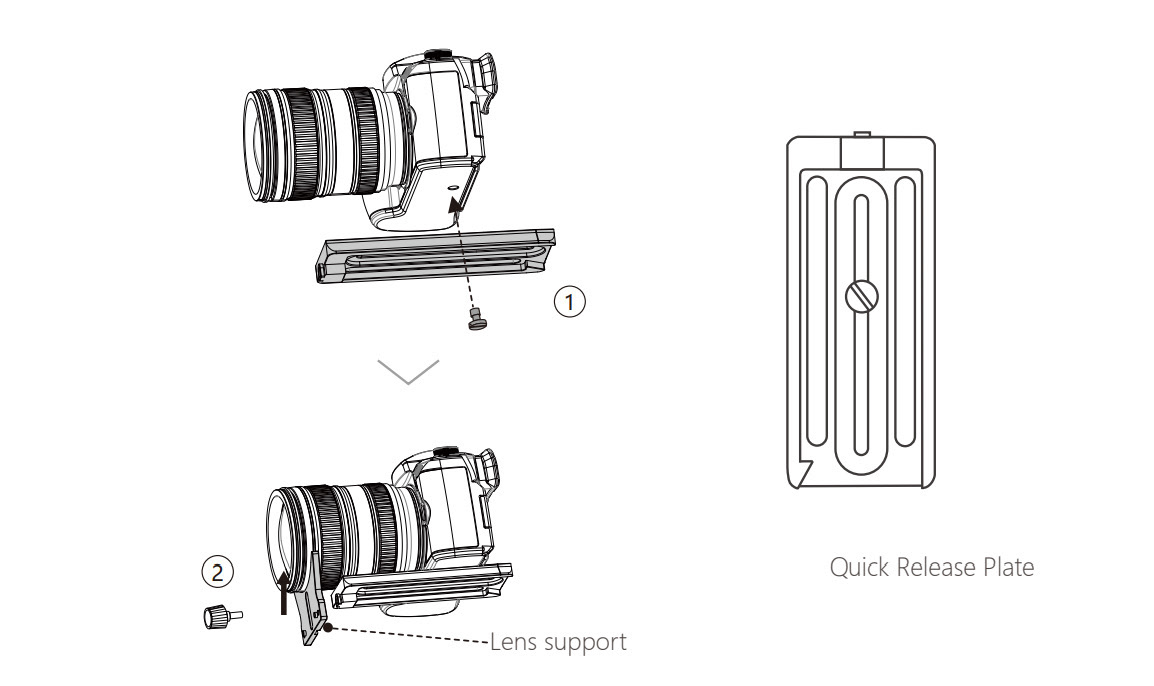
3. Slide the camera onto the middle of the plate.
BALANCING
The camera needs to be fully configured, with all accessories and cables connected, before installing and balancing the camera on the gimbal. If the camera has a lens cap, make sure to remove it before balancing.
Before balancing, make sure to power on the camera if using an optical zoom lens and select the focal length if using a varifocal lens. Make sure Warthog is powered off or in sleep mode before balancing.
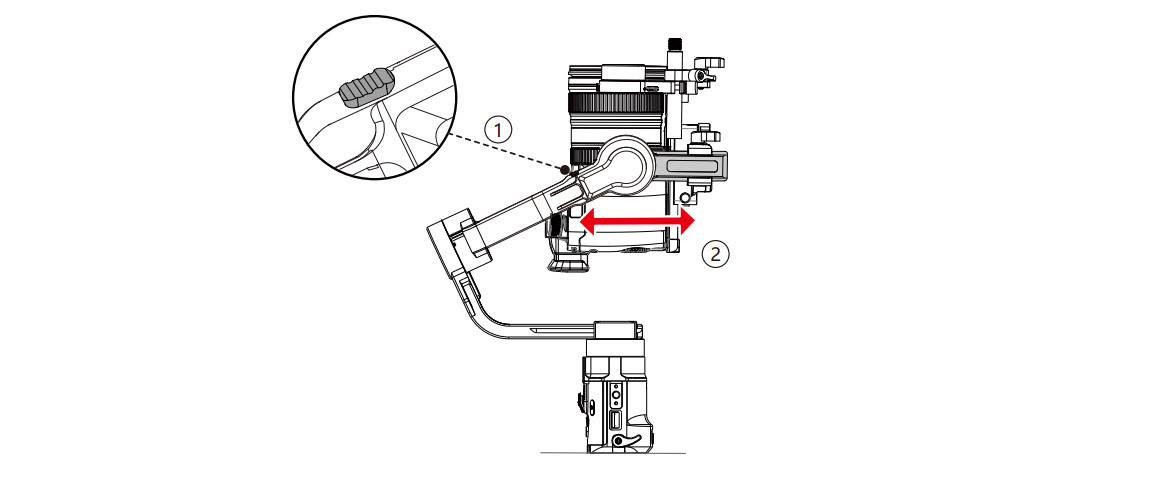
1 - BALANCING DEPTH FOR THE TILT AXIS
- Toggle the tilt axis lock to the unlocked position, then lower the camera by loosening the tilt axis knob①.
- Rotate the tilt axis so that the camera lens is pointing forward. Check to make sure the camera is not front or back-heavy. If front-heavy, move the camera backward. If backheavy, move the camera forward.
- Loosen the knob under the Quick Release Plate②, and adjust the camera balance③ until the camera is steady.
- Tighten the tilt axis knob.
2 - BALANCING THE VERTICAL TILT
- Rotate the tilt axis so that the camera lens is pointing upward. Make sure the camera is not top or bottom-heavy. If the camera is tilted to one side, pull the tilt arm towards the other side.
- Loosen the knob on the tilt motor① and adjust the balance of the camera② until the camera is steady without tilting up or down.
- Lock the tilt axis knob.
- Repeat Step 1 to balance the depth of the tilt axis for optimal performance.
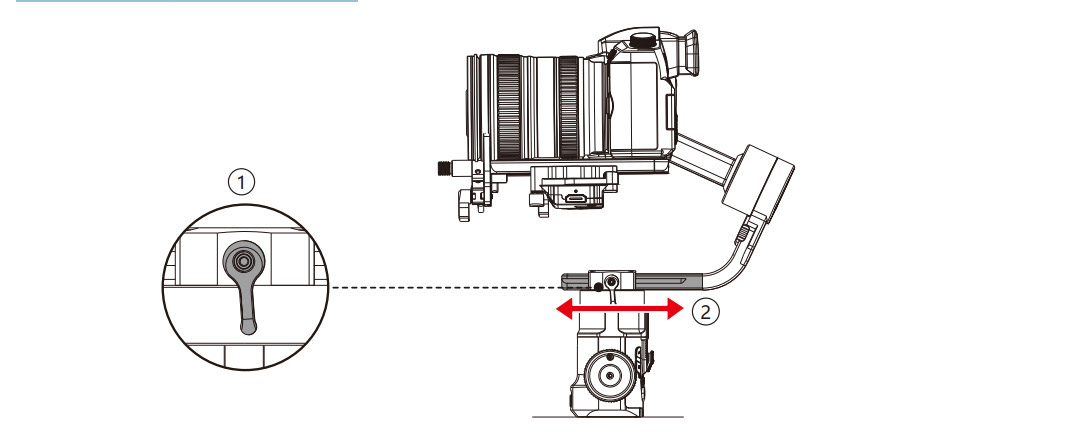
3 - BALANCING THE ROLL AXIS
- Lock the tilt axis and unlock the roll axis. Check the direction in which the roll motor swings. If the camera rotates to the left, move the camera to the right. If the camera rotates to the right, move the camera to the left.
- Loosen the knob on the base of camera mounting plate①,and adjust position of the plate② until the camera is steady.
- Tighten the roll axis knob.

4 - BALANCING THE PAN AXIS
- Hold and tilt the grip sideways, and check the movement of the Pan axis. If the camera ens rotates downward, push the pan axis back. If the camera lens rotates upward, push the pan axis forward.
- Loosen the Knob on the pan motor①. Adjust the camera balance② until the camera is steady when rotating the pan while lifting the grip.
- Tighten the pan axis knob.
The knobs on the gimbal can be pulled out and repositioned if the rotation of the knob is obstructed.
If mounting a longer camera system, it is necessary to use counterweights. Counterweights will be released soon and sold separately.
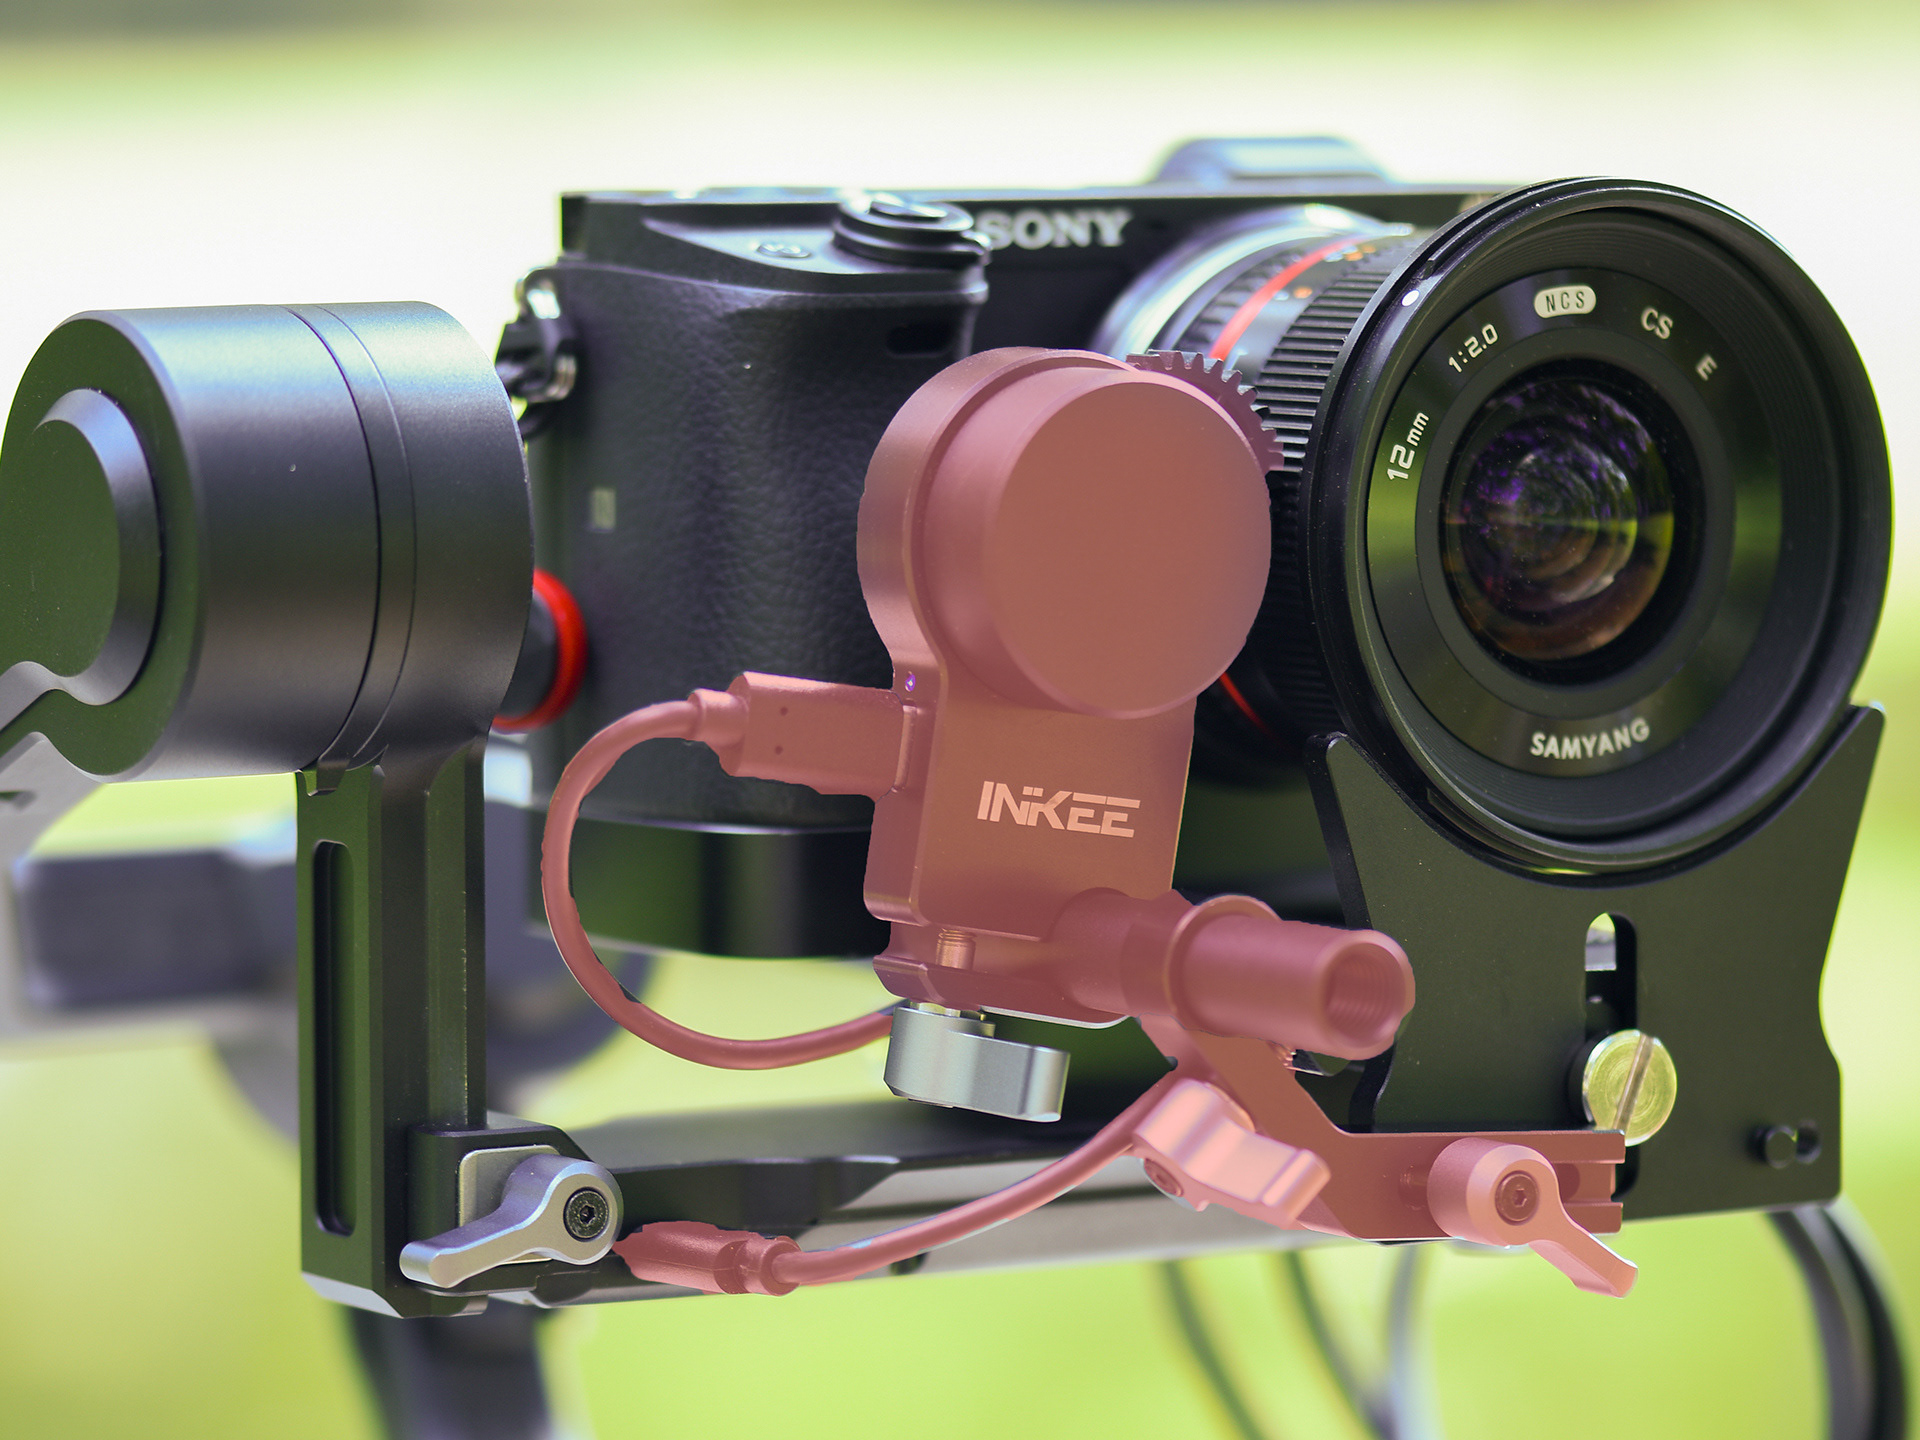
FOCOS MOTOR


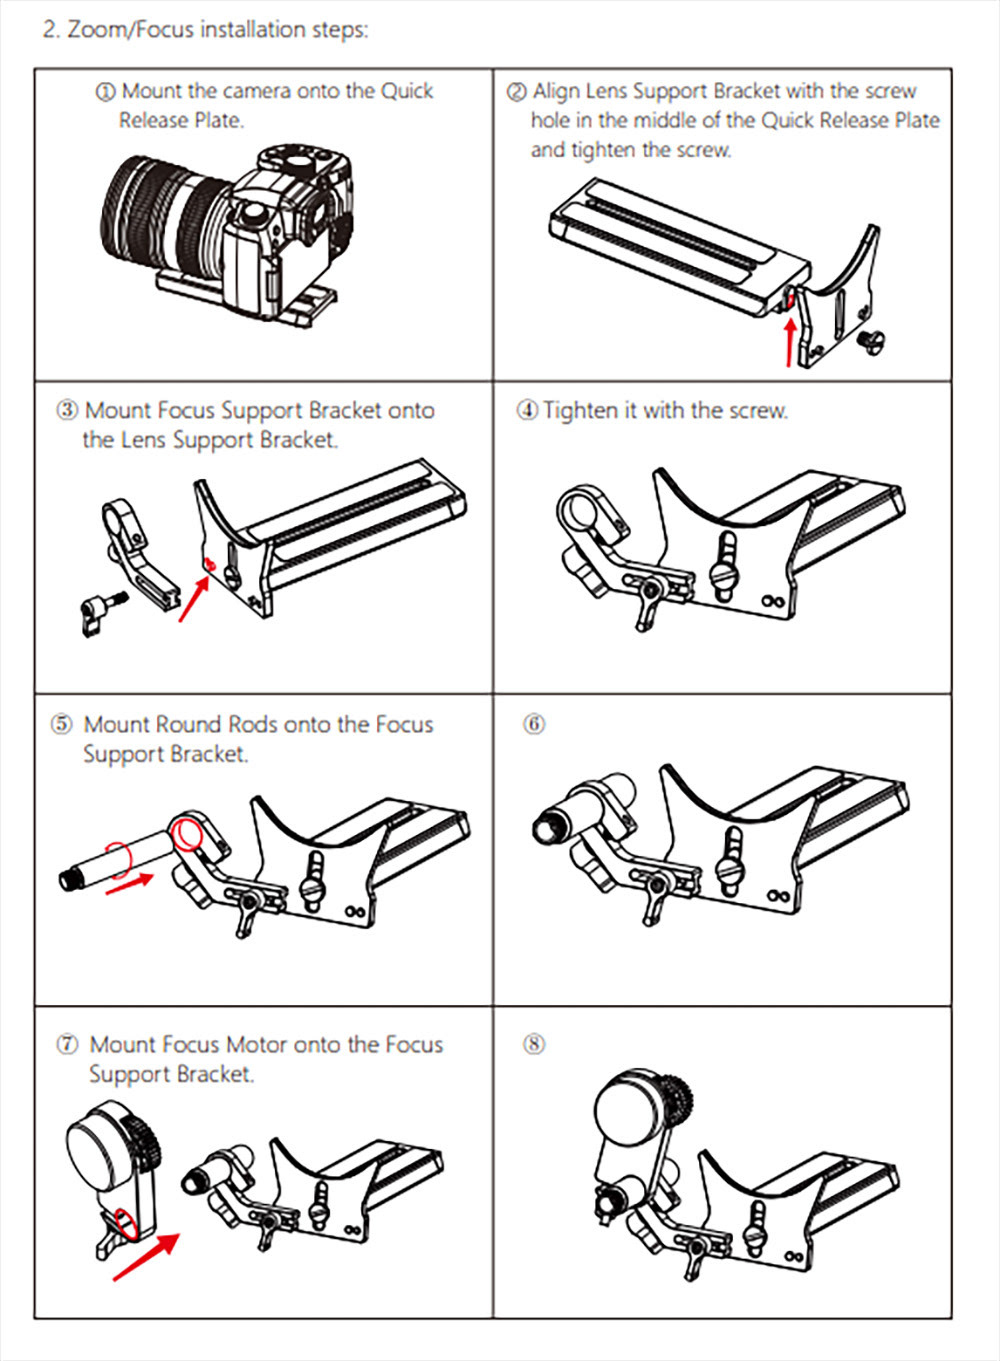
After installing Zoom/Focus, rotate the wheel on the grip and the Focus Motor to work. As shown in Fig.2, after Focus Motor is attached with the stabilizer, if the version of Focus Motor is too old then the tracker will automatically update the firmware. In the menu of the stabilizer one can also set the boundary of Focus Motor and Position of AB Point, after setting of AB point, Press Point A or Point B to quickly reach the set position of AB Point. After the focus tracker is connected with the stabilizer, as shown in Fig. 2, if the version of the tracker is too old, the tracker will automatically update the firmware. In the menu of stabilizer, you can also set the boundary of the focus tracker and the position of point ab. after setting point AB, click point a or point B to quickly reach the set position of point A - B.

INTERFACE

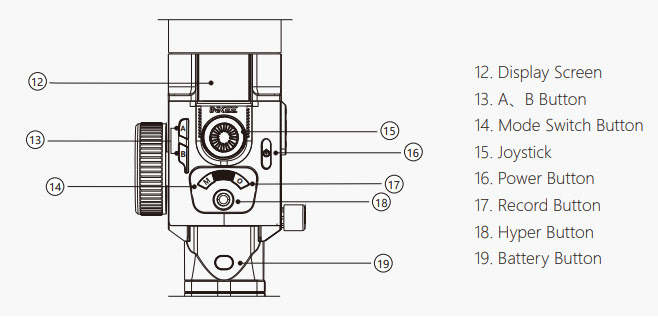

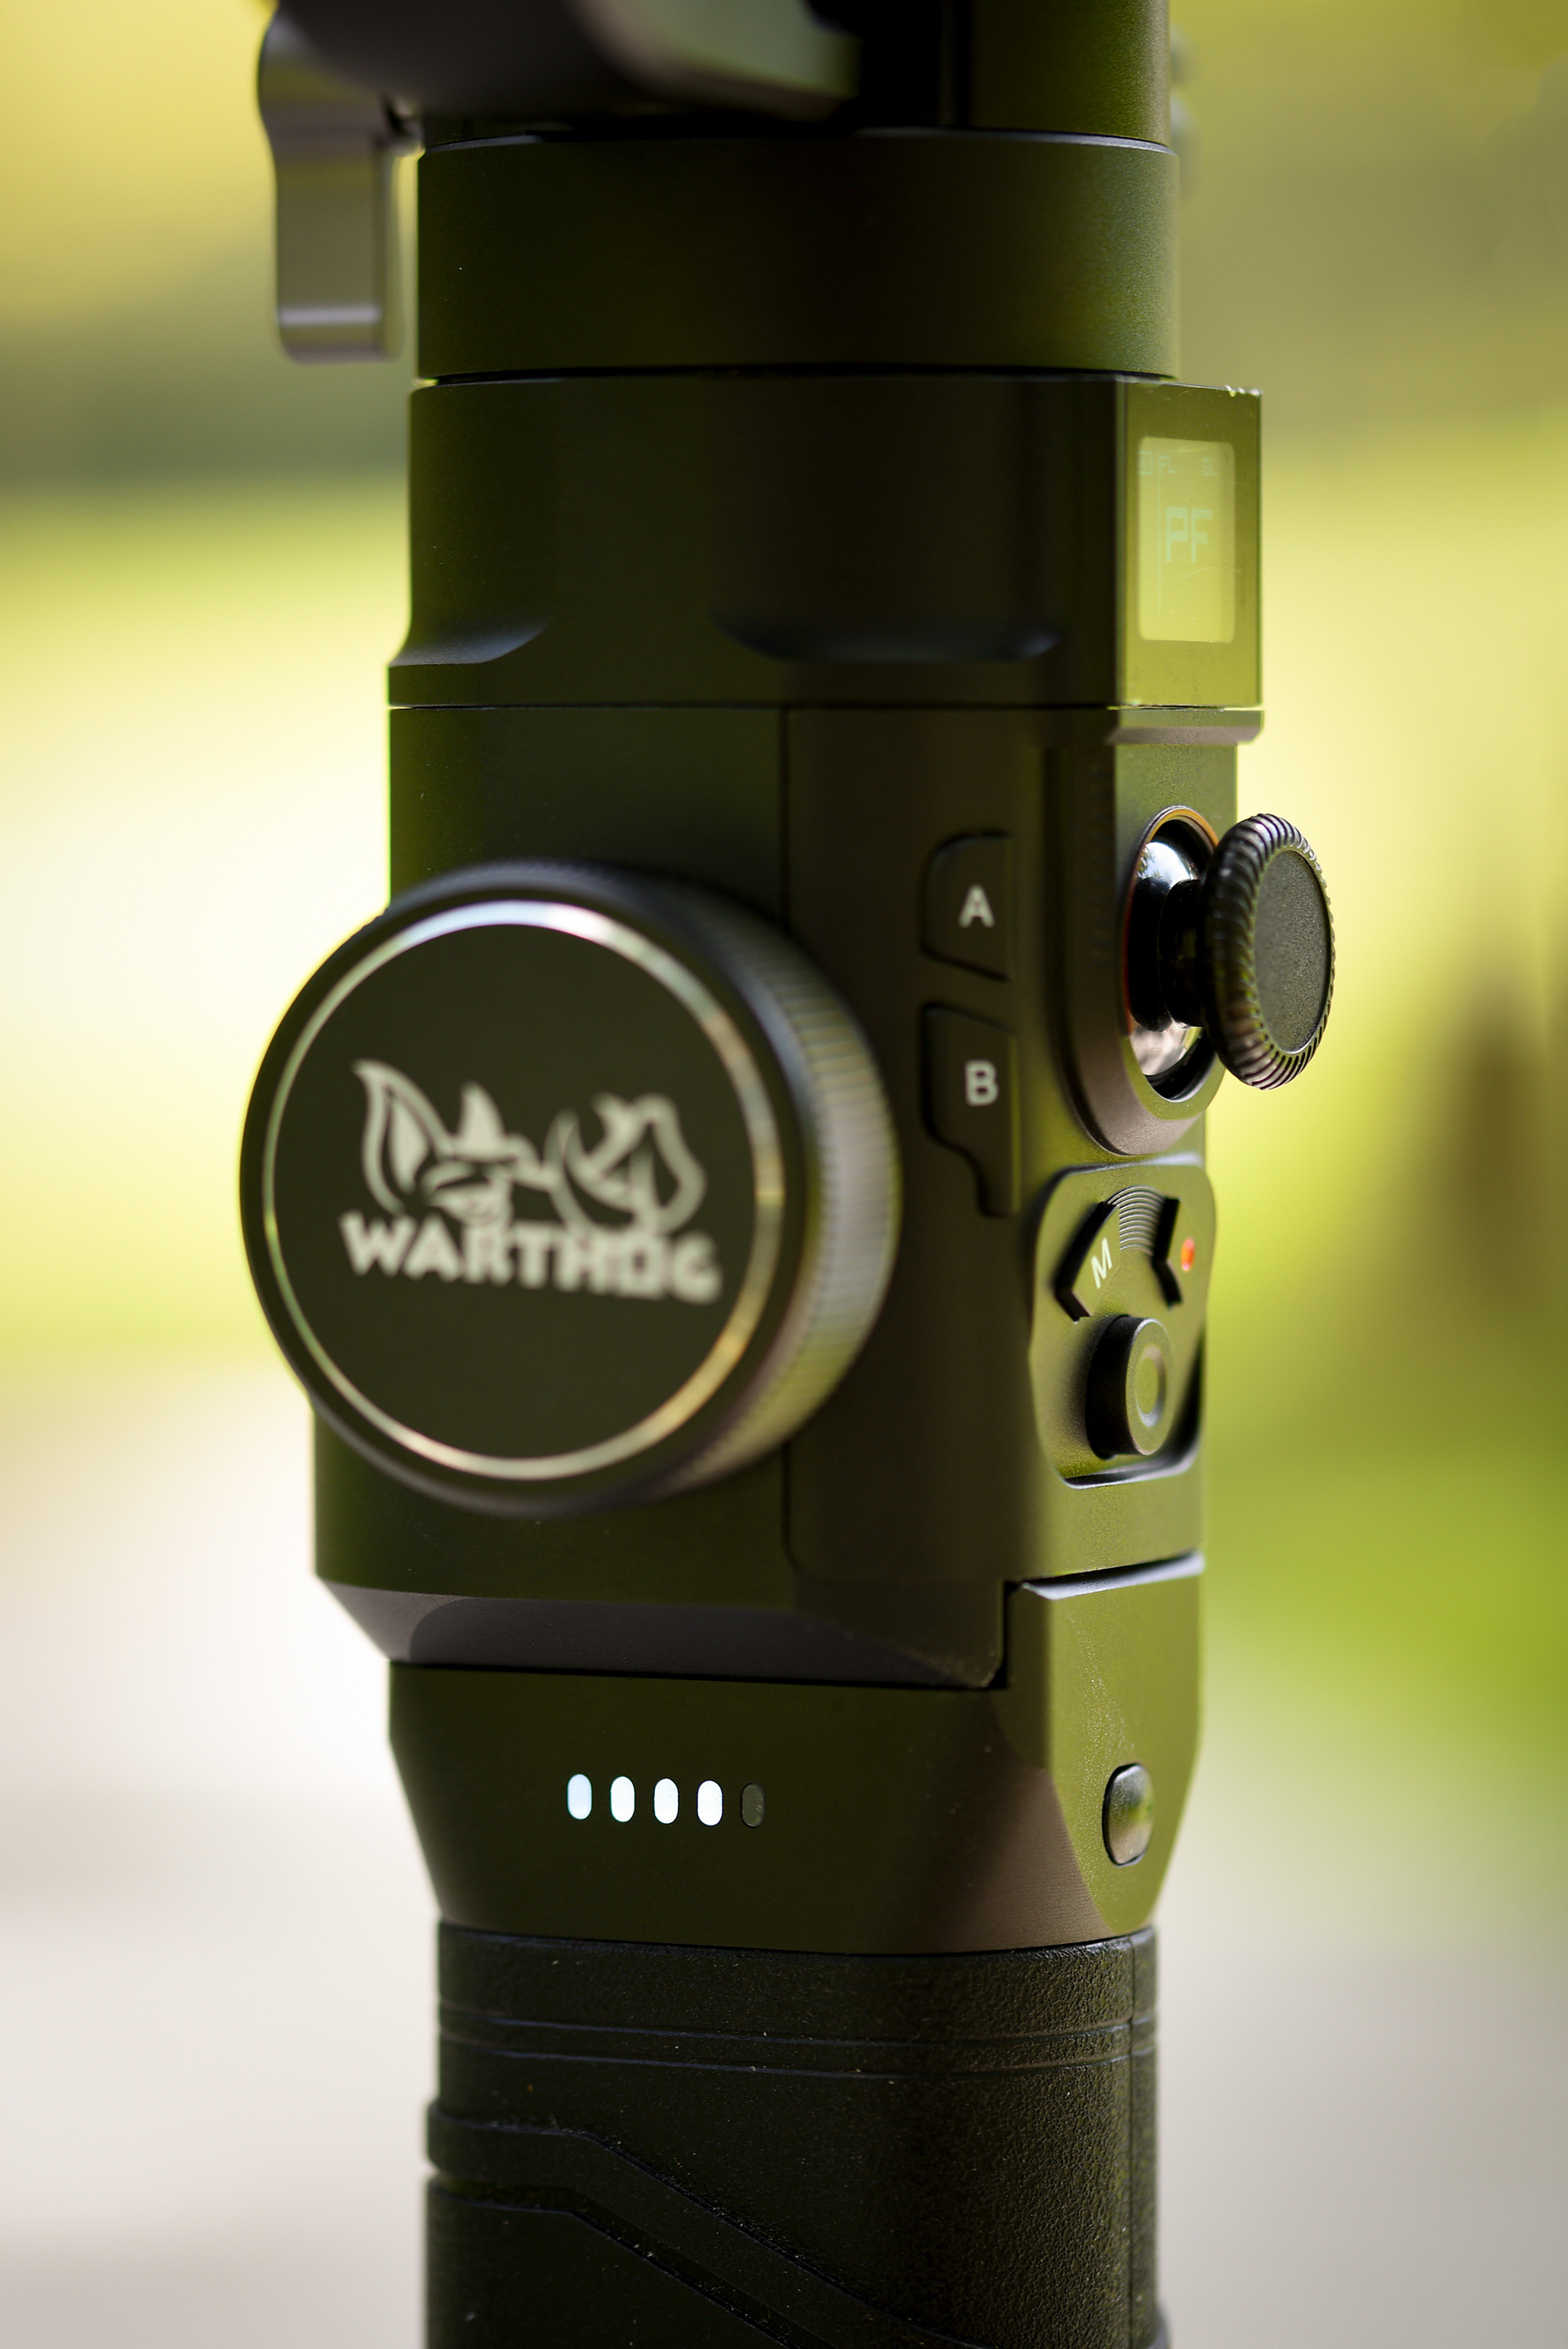
BUTTON FEATURES
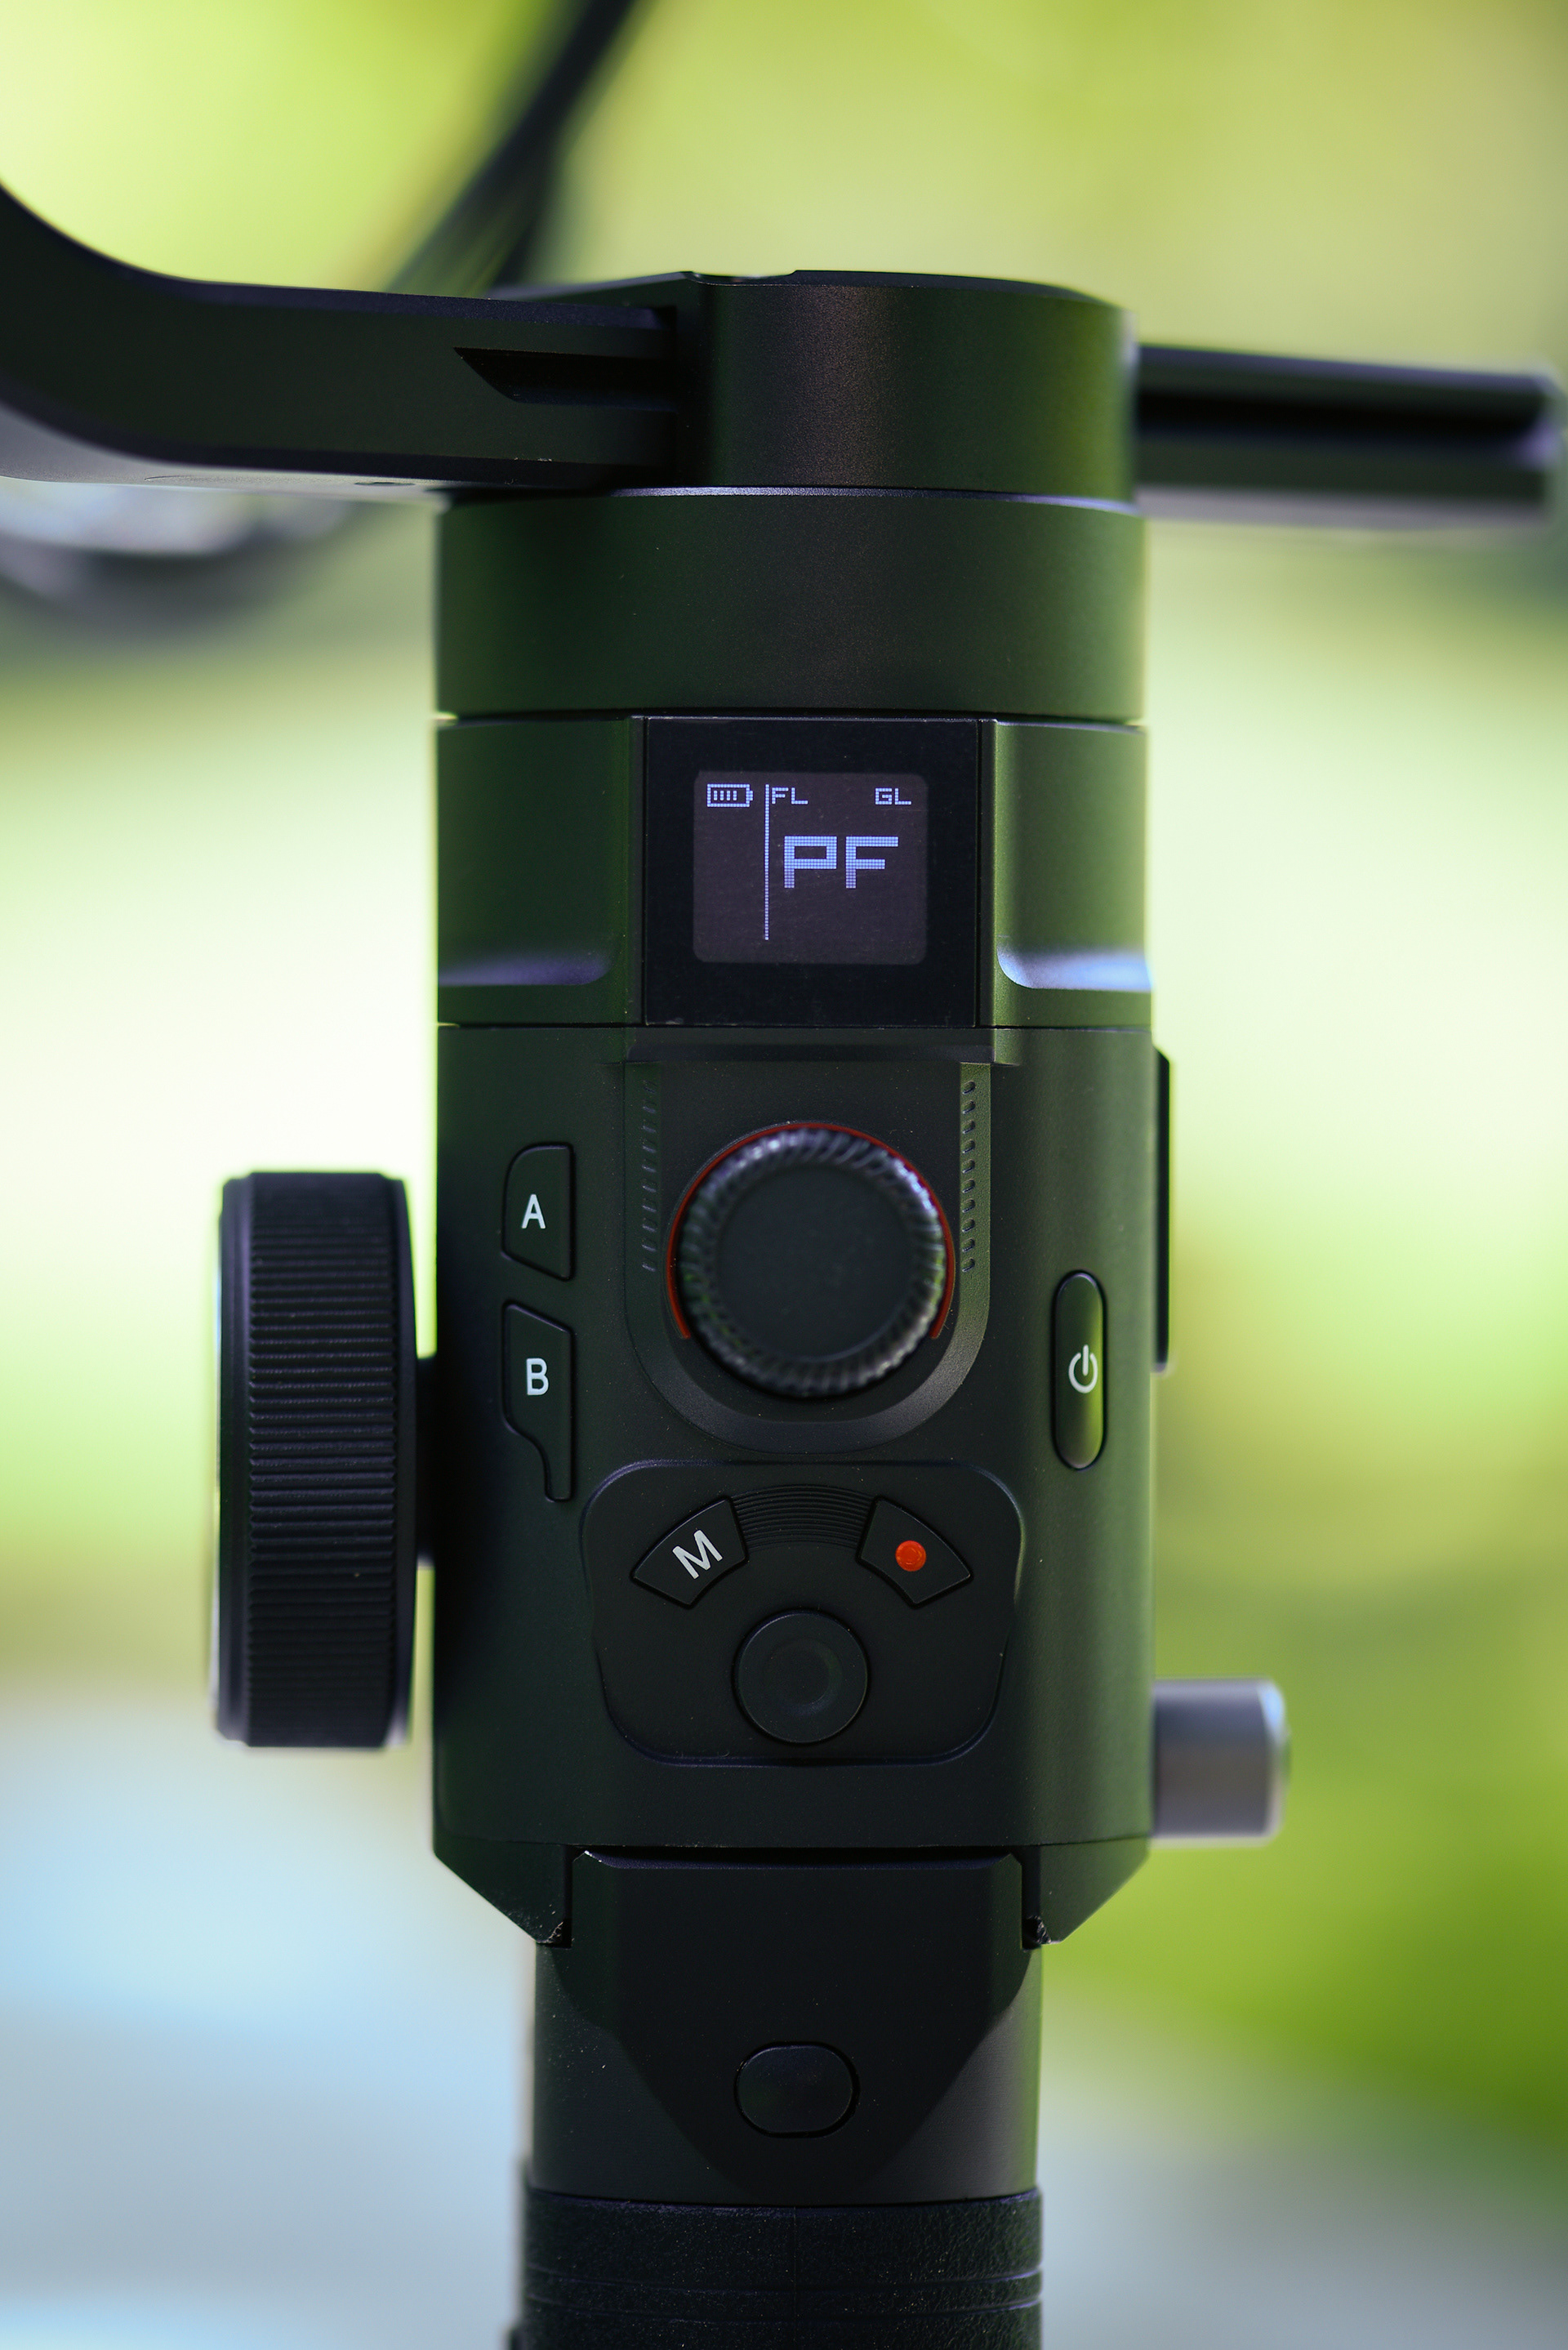
A\B BUTTON
Press and hold the Power button to turn on/off Warthog . Single press to enter the menu, the camera will exit the camera control mote in control mote. Tap A button to carry on the point A of the follow focus motor. Long press A button to enter or exit the setting of the point A of the follow focus motor. Tap B button to carry on the point B of the follow focus motor. Long press B button to enter or exit the setting of the point B of the follow focus motor.
JOYSTICK
1. Push the joystick up or down to control the movement of the tilt axis, and push it left or right to control the movement of the pan axis. 2. ap the joystick to enter the camera control interface.
OPERATION MODE
Pan Following Mode (PF): The camera pans left/right horizontally following the movement of the gimbal while the tilt and roll axes are locked. Push the joystick to control the camera to tilt or pan. Press and hold the hyper button to speed up. Press twice to recenter the gimbal. Press three times to turn the gimbal 180° so that the camera faces you. Hyper Button Single press the Hyper button to enter Hyper mote. Press twice to recenter the gimbal. Press three times to turn the gimbal 180° so that the camera faces you. Long press to maintain the Hype mote. General
Locking Mode (GL): This mode locks the movement of all three axes to keep the camera fixed on a shooting direction. Pushing the joystick up/down and left/right allows manual control of the tilt axis and pan axis. Press and hold the hyper button to speed up. Press twice to recenter the gimbal. Press three times to turn the gimbal 180° so that the camera faces you. Horizontal
Locking Mode (HL): The camera pans and tilts following the movement of the gimbal while the roll axis is locked. Pushing the joystick left/right allows manual control of the roll axis. Press and hold the hyper button to speed up. Press twice to recenter the gimbal. Press three times to turn the gimbal 180° so that the camera faces you.
FPV: All three motors move following the movement of the gimbal. Press and hold the hyper button to speed up. Press twice to recenter the gimbal. Press three times to turn the gimbal 180° so that the camera faces you.
Flashlight mode(FL):With the camera lens pointing upward, press and hold the hyper button to speed up. The tilt axis, roll axis and pan axis move following the movement of the gimbal, Pushing the joystick left/right allows manual control of the pan axis rotation.
MODE
Single press the Mode button to switch to the next mode (Factory default is lock/Half following up switch. In the change list of the app the basic mode can be set). Press and hold the Mote button and rotate the wheel can quickly switch to five modes (five mode cycles).

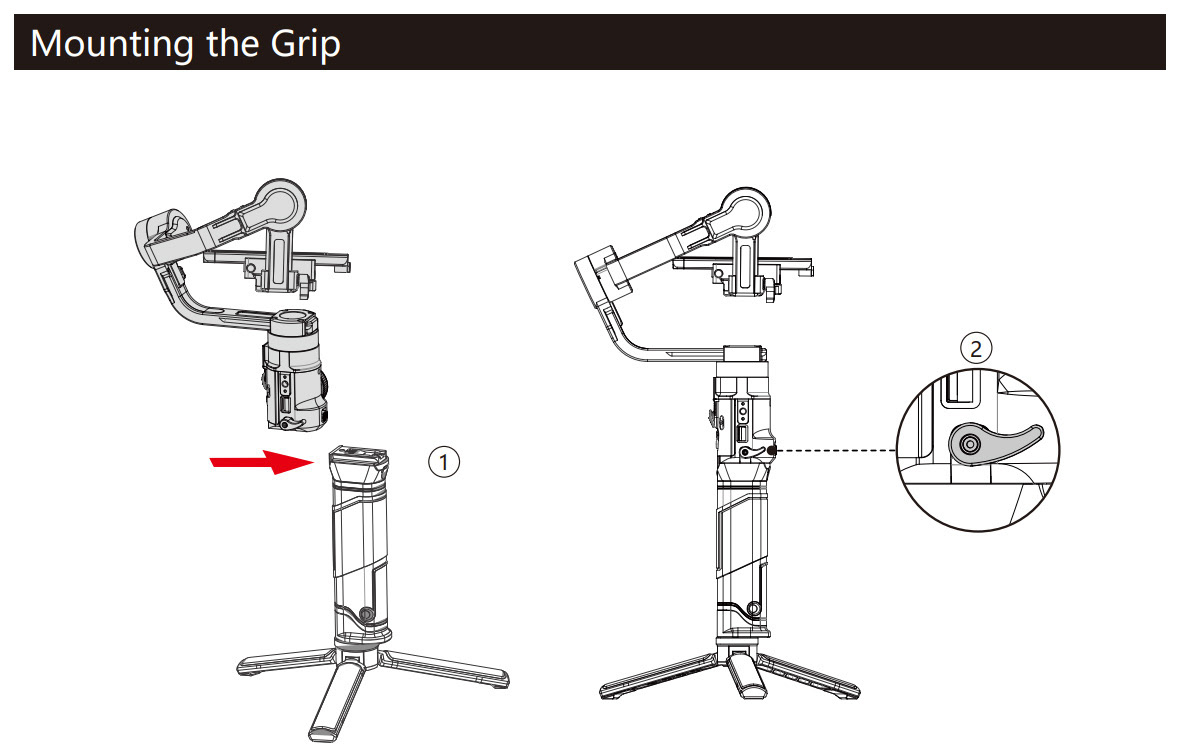
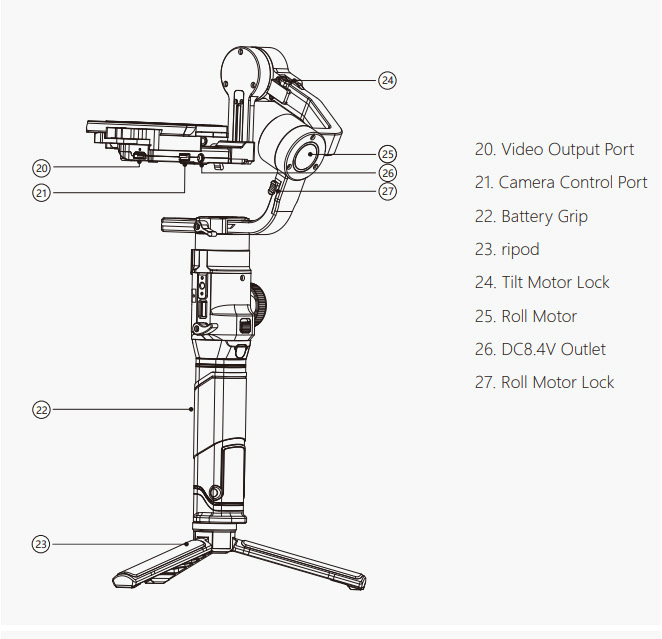
GRIP AND BUILT-IN BATTERY
The grip is for handheld use. The built-in battery within the grip has a capacity of 2500 mAh and the maximum standby time is 10 hours (when the Warthog is properly balanced).
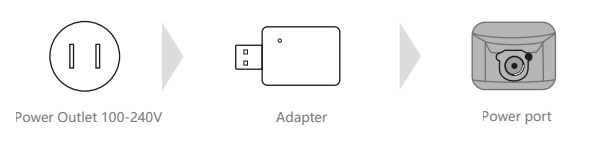
CHARGING
The battery must be charged to activate before using for the first time. Battery level indicators will light to indicate activation is successful. After attaching to the gimbal, charge the grip through the power port using a power cable(included) and a USB adapter (not included). It is recommended to use a 5V/2A USB power adapter.
USING THE GRIP
During charging, the battery level indicators indicate the battery level. When not charging, press the battery level button to check the battery level.

SMARTPHONE APPLICATION
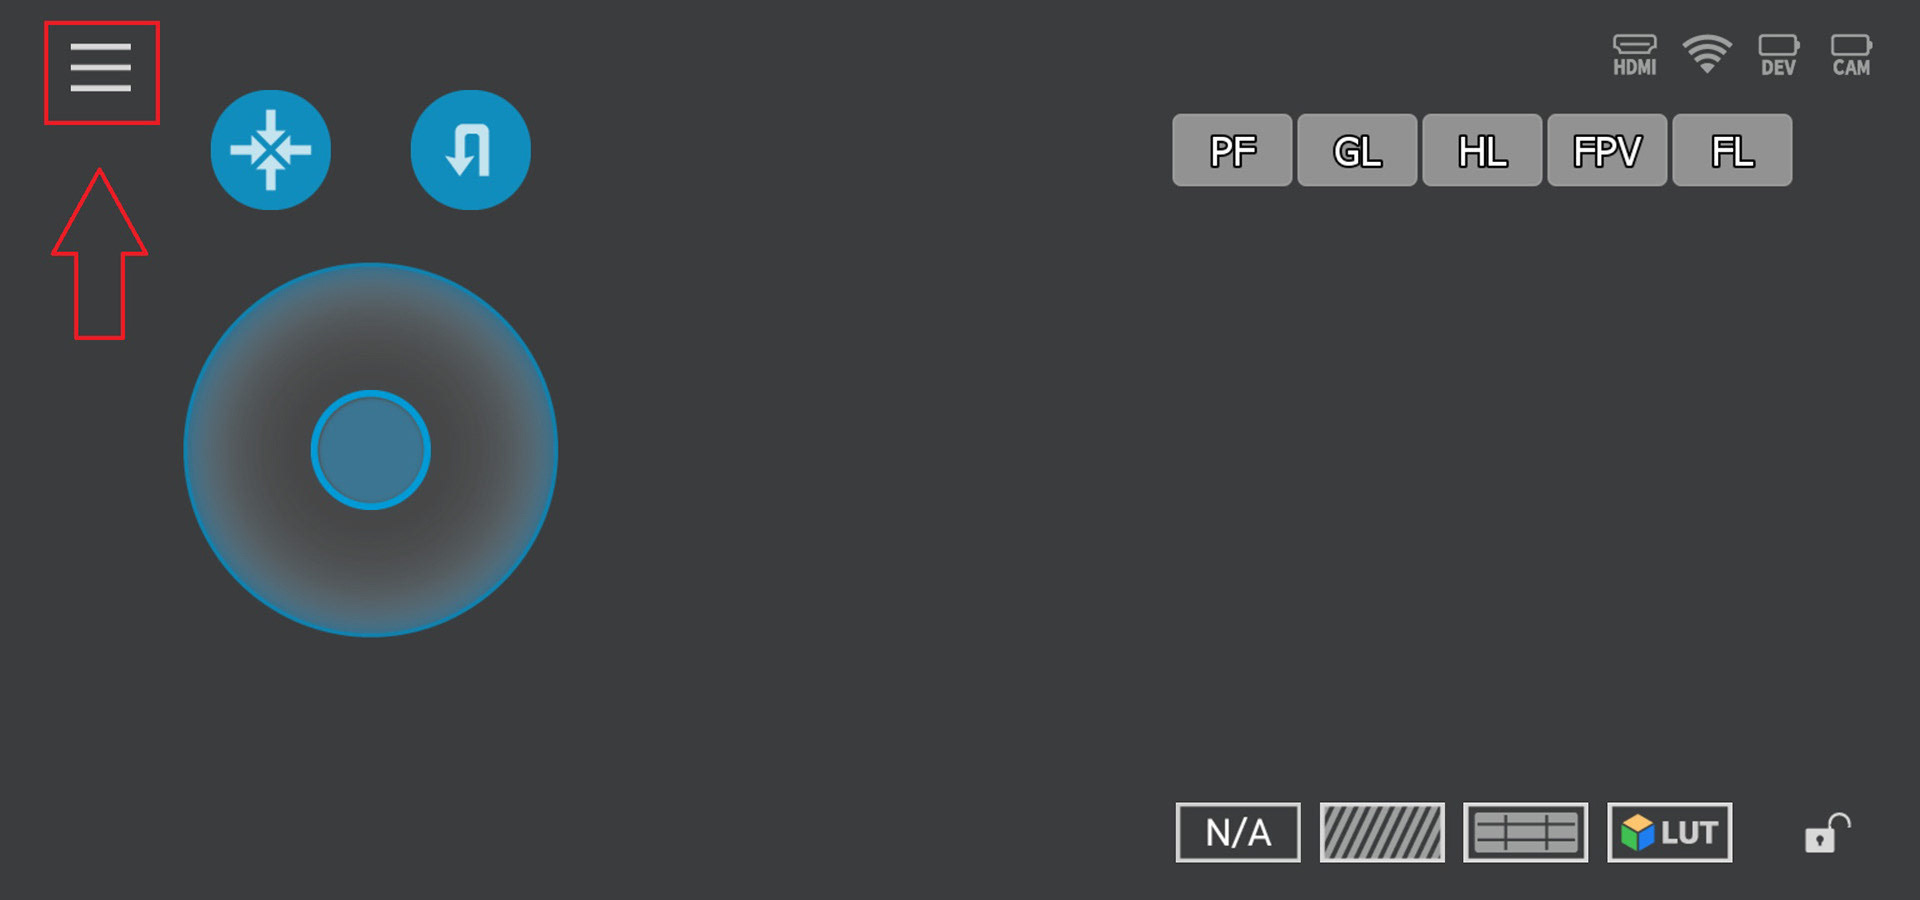
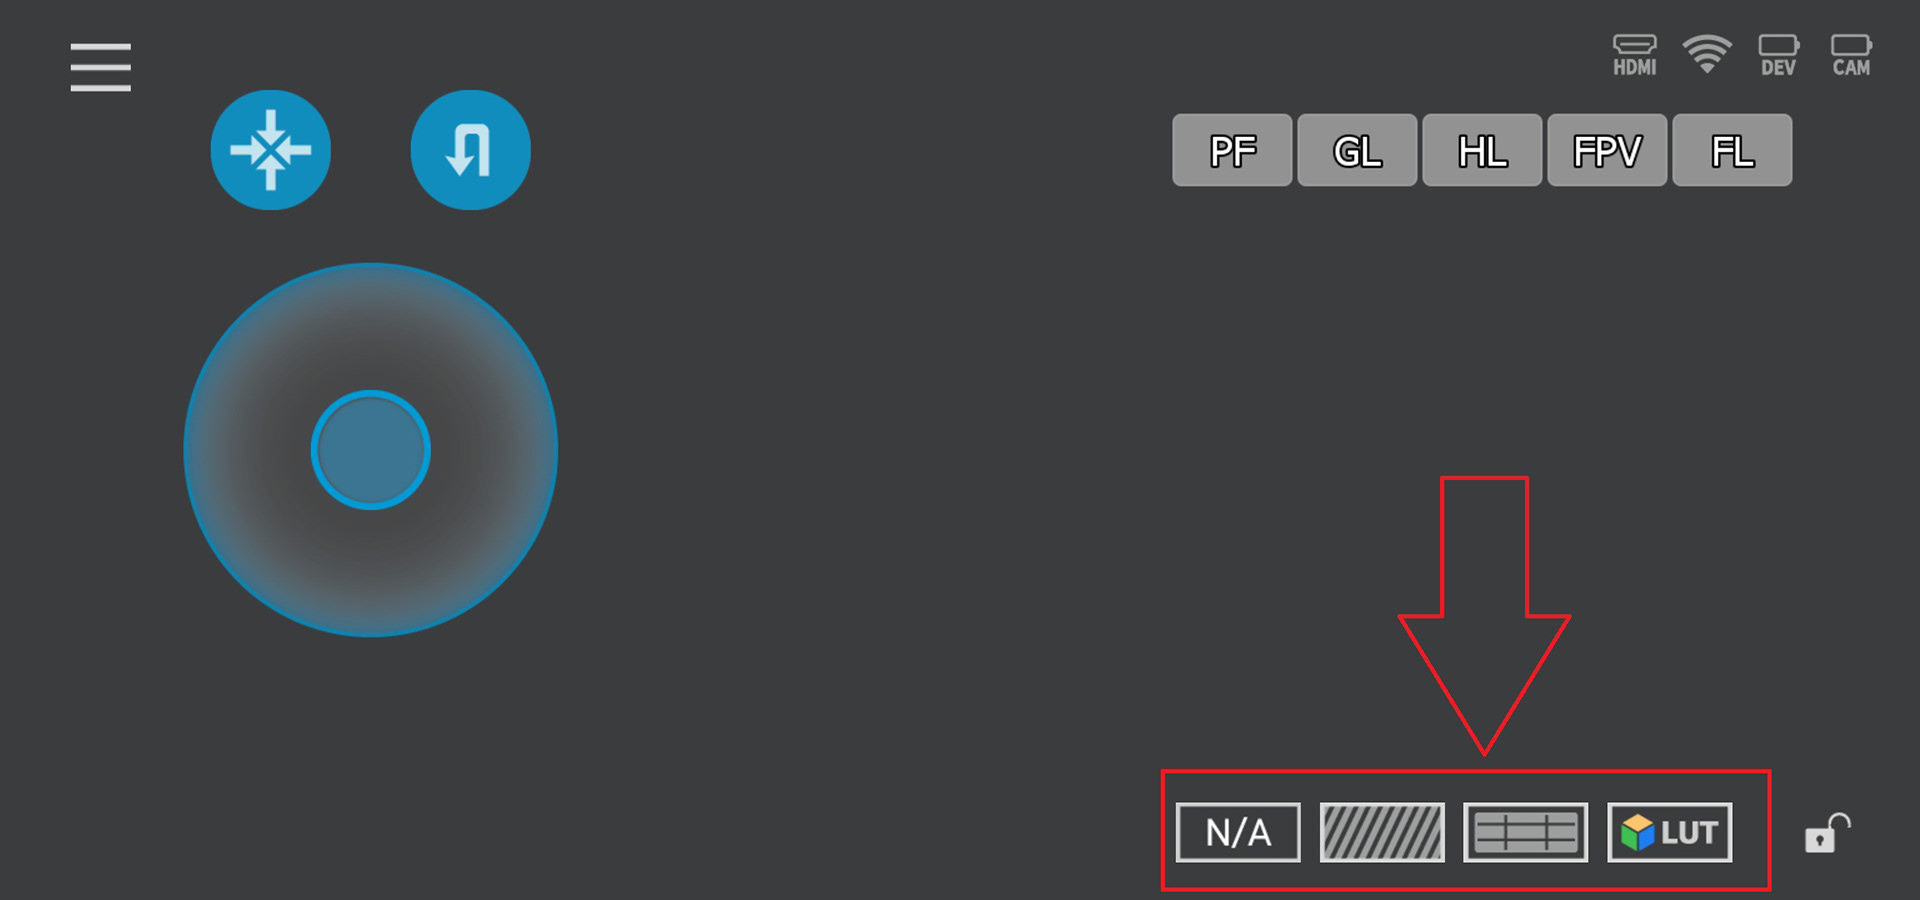
After installing the application, we have to search the WI-Fi network for our Warthog, and connect to it. The password required is 12345678. Then we open the app and the main screen appears
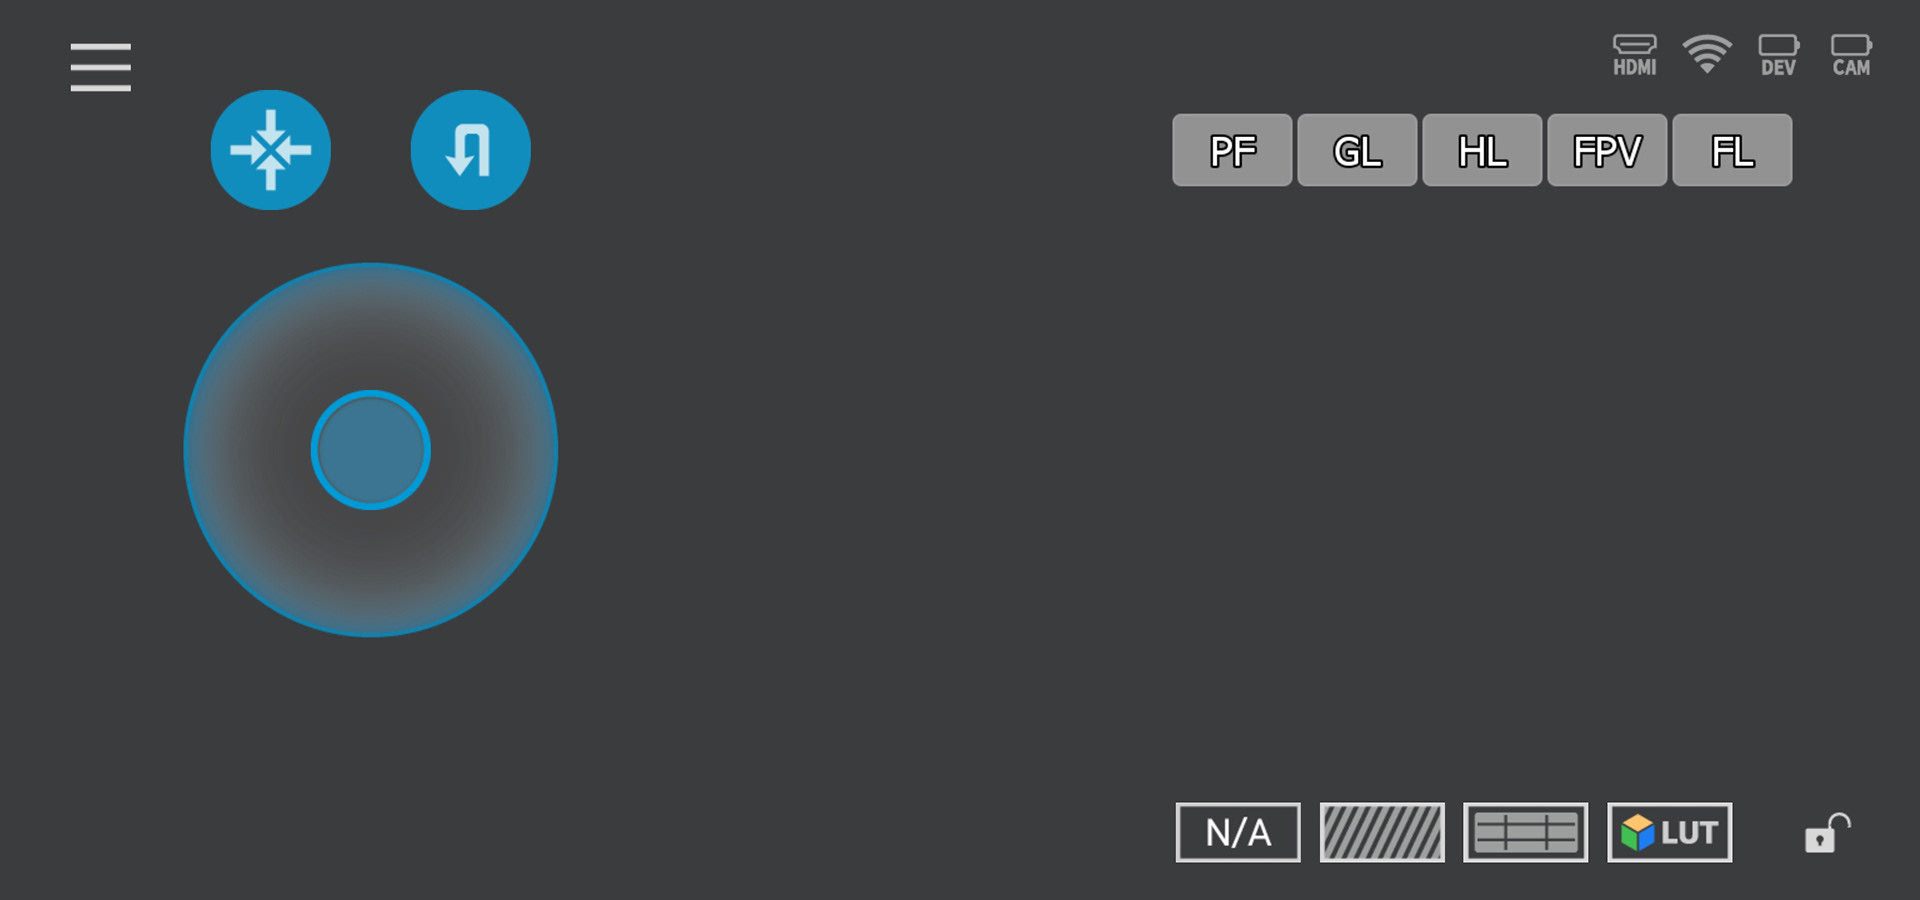
At the Top Left we find a icon that is the configuration Button

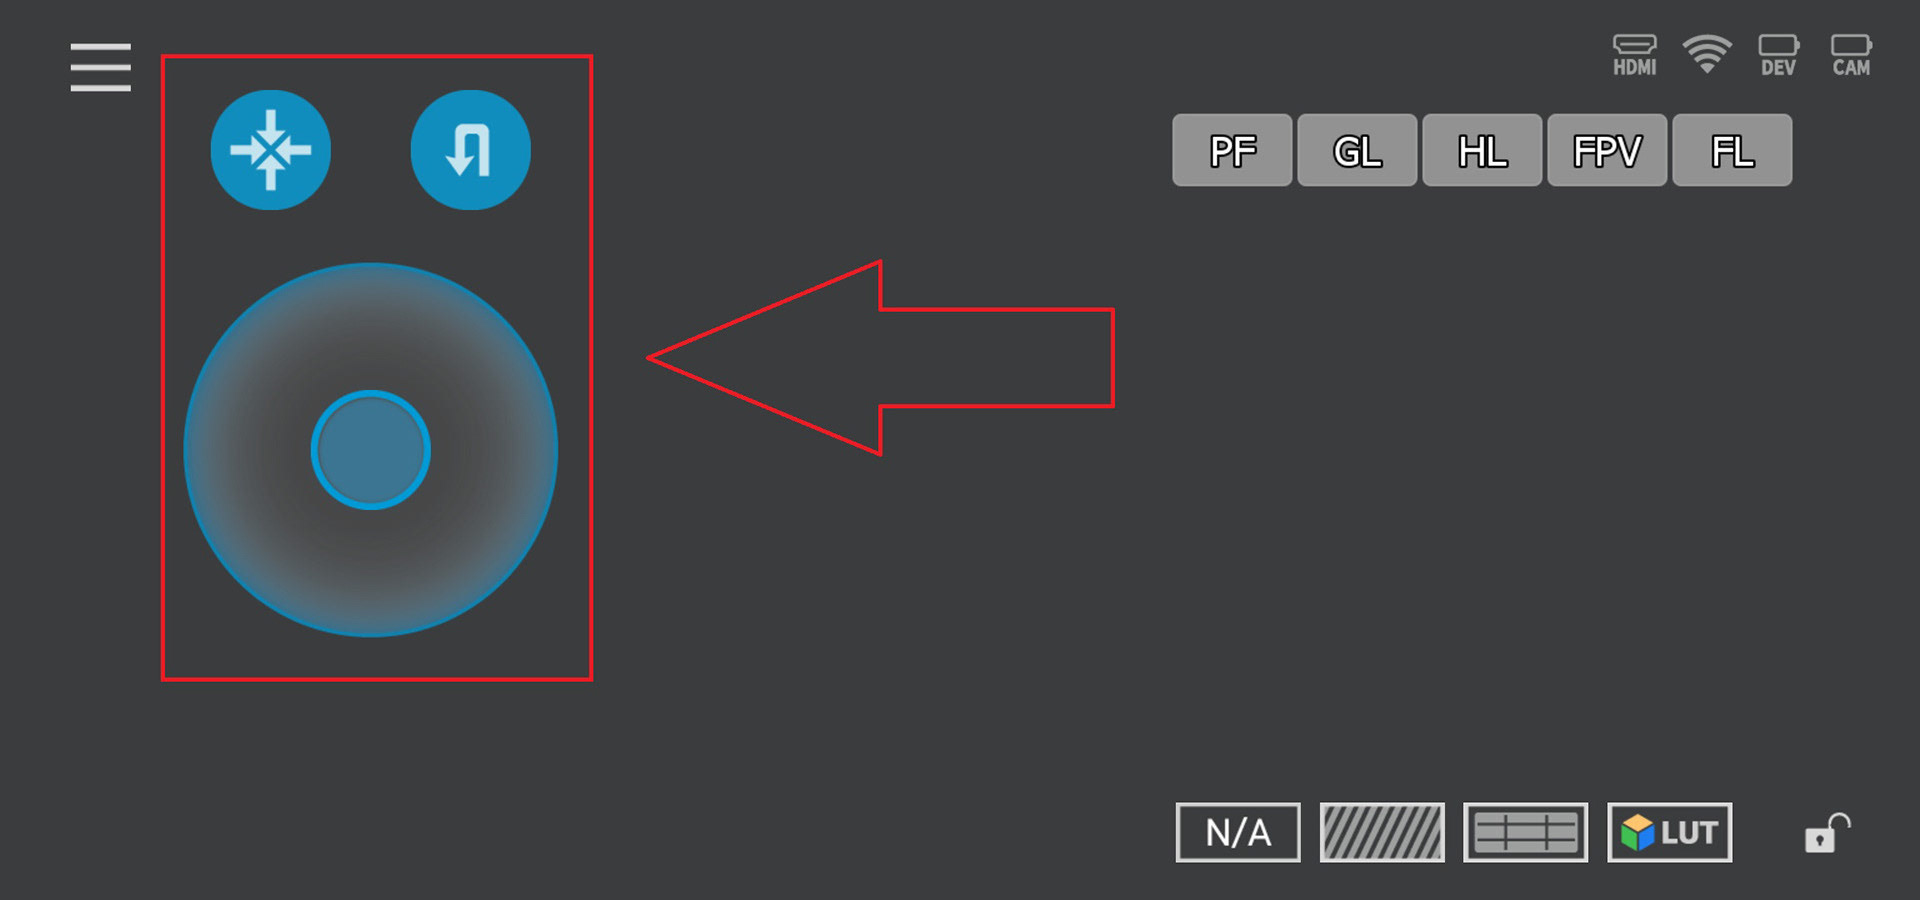
In the Center Left we find:
- A big circle that allow us to contro the movements of the gimbal like the Joystick;
- The Recenter button;
- The Flip button.
At the Top Right in the small tab we find the status
- HDMI Connectivity;
- WIFI Strength Signal;
- Battery of Smartphone;
- Battery of the Gimbal.

Right down of the Status Tab, we found de mode that we want to use.

In the bottom Right we find 4 options:
- The Resolution of the transmission;
- The Zebra Option;
- The Grid Option;
- The Lut Option.
GIMBAL MODES
PAN FOLLOWING MODE (PF)
Single press M Button to enter. The camera pans left/right horizontally following the movement of the gimbal while the tilt and roll axes are locked. Push the joystick to control the camera to tilt or pan.
GENERAL LOCKING MODE (GL)
Single press M Button to enter. This mode locks the movement of all three axes to keep the camera fixed on a shooting direction. Pushing the joystick up/down and left/right allows manual control of the tilt axis and pan axis.

Horizontal Locking Mode (HL)
Press three times to enter. The camera pans and tilts following the movement of the gimbal while the roll axis is locked. Pushing the joystick left/right allows manual control of the roll axis
FPV
Double press M Button to enter. All three motors move following the movement of the gimbal.
FLASHLIGHT MODE(FL)
Double press M Button to enter. Tilt axis motor rotates 90° angle upwards while tilt axis, roll axis and pan axis motor move following the movement of the grip. Push joystick to the left/right to rotate pan axis arm.
EXPERIENCE
The inkee Warthog is very simple to use and to set up as long as you follow the instructions. The first thing you will need to do is balance the camera you are using with the gimbal. You’ll have to do this each time you swap out cameras, but if you use the same camera each time, just remember what the settings are that you used and you should be good. The AK2000C makes it easy to remember settings because there are numbered measurements on each adjustment arm for more precise balancing.
Once balanced, just turn the Warthog on and the built-in motors will begin balancing everything on its own.
Now is necessary to sync to the app (if you want to use it) and then controlling the gimbal is just as simple as everything you need is on the face – a small joystick, buttons, and a screen.
When in use, the gimbal seems very solid and firm. The Warthog itself isn’t really heavy, but the camera you use could add some weight to it so I suggest using both hands to handle it. It helps if you use the tripod attachment to lengthen the handle.

PRICE VS PERFORMANCE
The Inkee Warthog Gimbal is an incredible rig for content creators. It stabilizes your camera movements as well and will be much kinder to you in price. IIt have two technology in one, it's a gimbal and have a wireless video transmitter.
You can find this gimbal on internet stores,and this gimbal can be purchased by approximately 450€

FINAL THOUGHTS
If you are looking for a gimbal and you are an amateur videographer, or even a professional videographer, this gimbal should be a great choice, this gimbal has unique features that makes this product one of the TOP gimbals, this gimbal as I said before is a two in one, a gimbal, and a video transmitter.
It also has a great feature that it can be divided into two, where it can easily be stored in a traditional backpack, and another great feature is the battery time, where we can easily use it for 10 hours.
It also has a great feature that it can be divided into two, where it can easily be stored in a traditional backpack, and another great feature is the battery time, where we can easily use it for 10 hours.
There really isn’t anything negative I can say about the Inkee Warthog and this should work with a wide variety of DSLR and mirrorless cameras. The universal base makes it easy and the array of accessories you can get to expand the functionality of the warthog is a big plus. With that said, the Inkee Warthog is a very good buy for anyone out there looking for a solid, well-designed gimbal to up their game.

WHAT I LIKED
- Wireless Video Transmiter included;
- The gimbal divides in two peaces;
- Battery Life;
- Quick Charge Time.