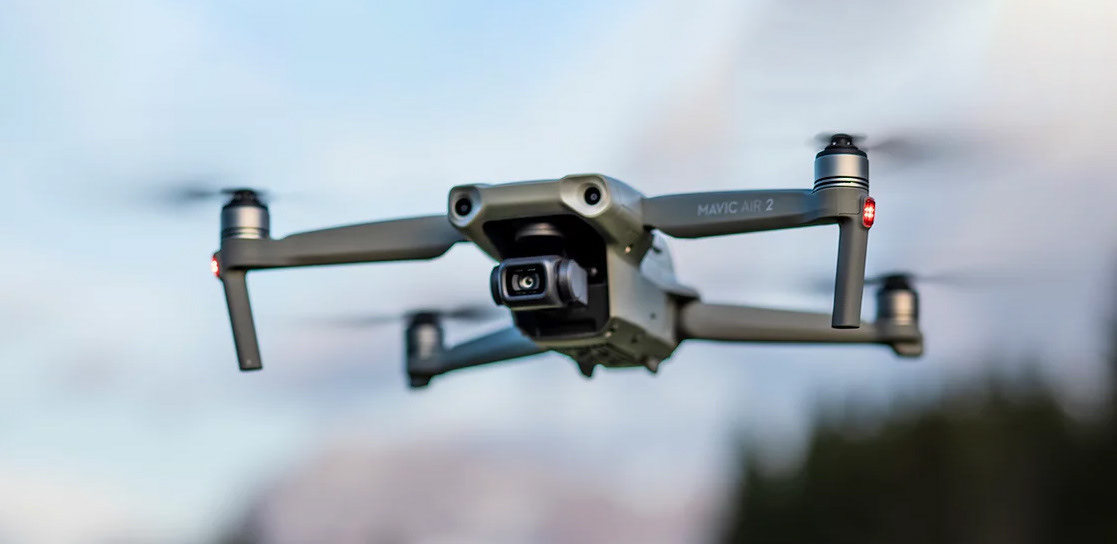
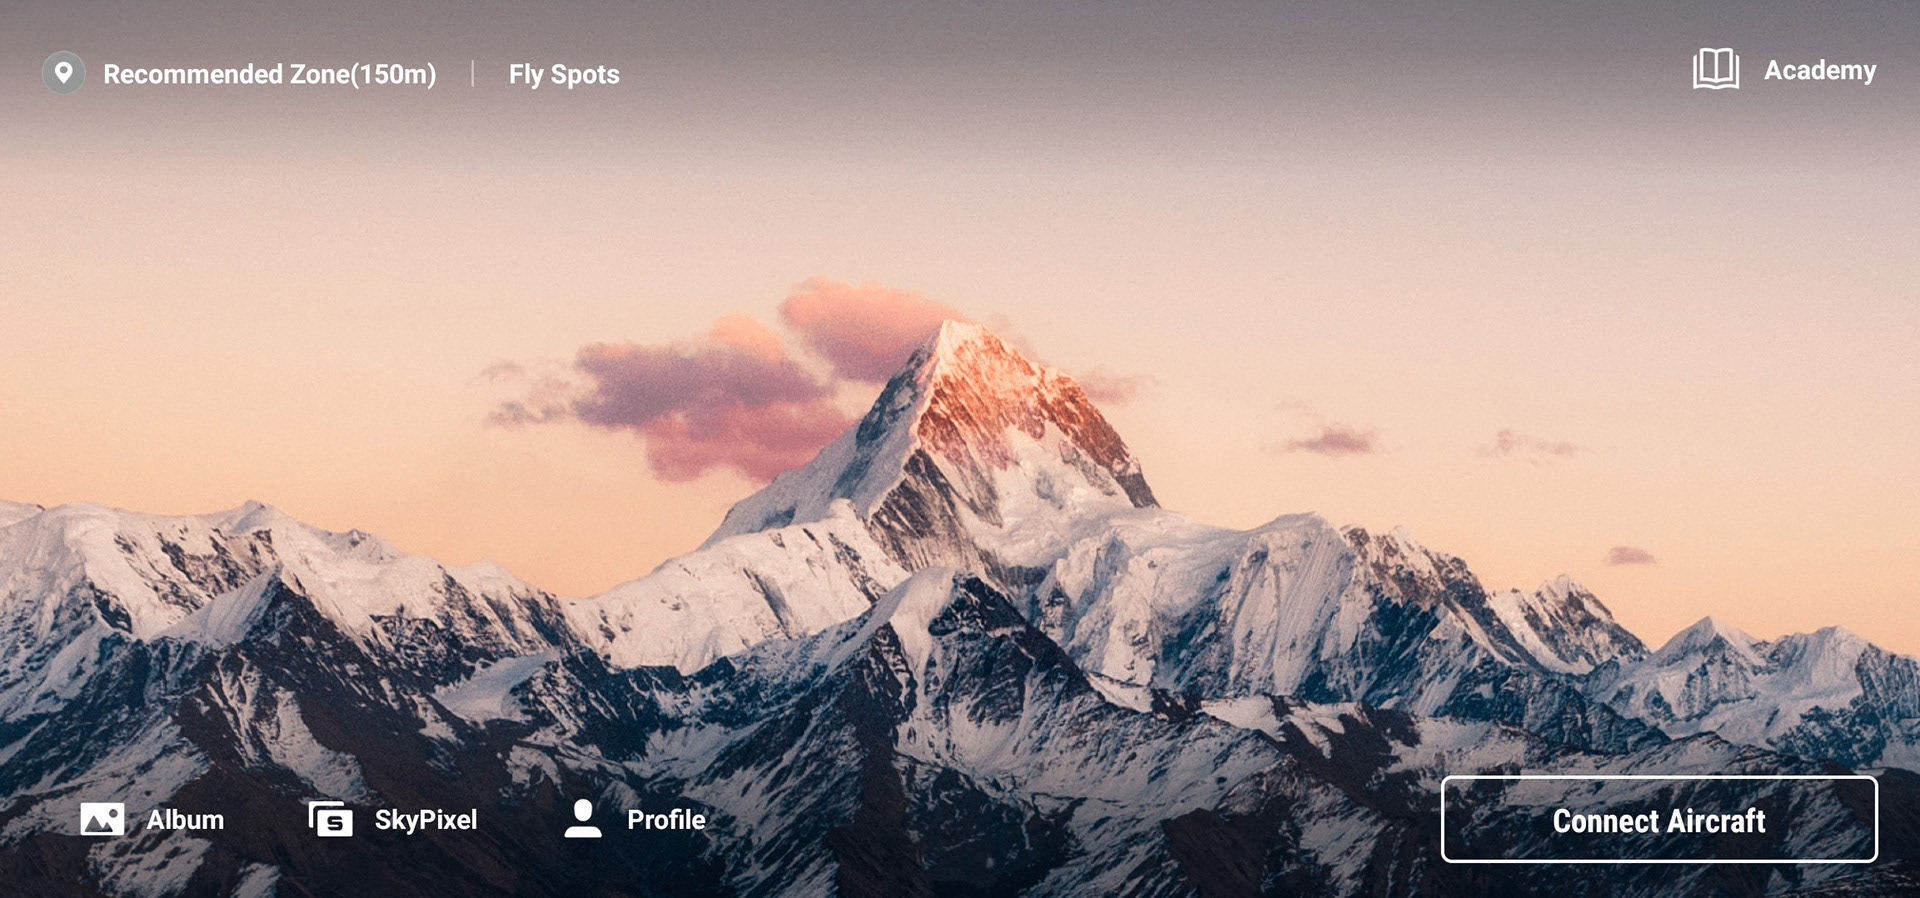
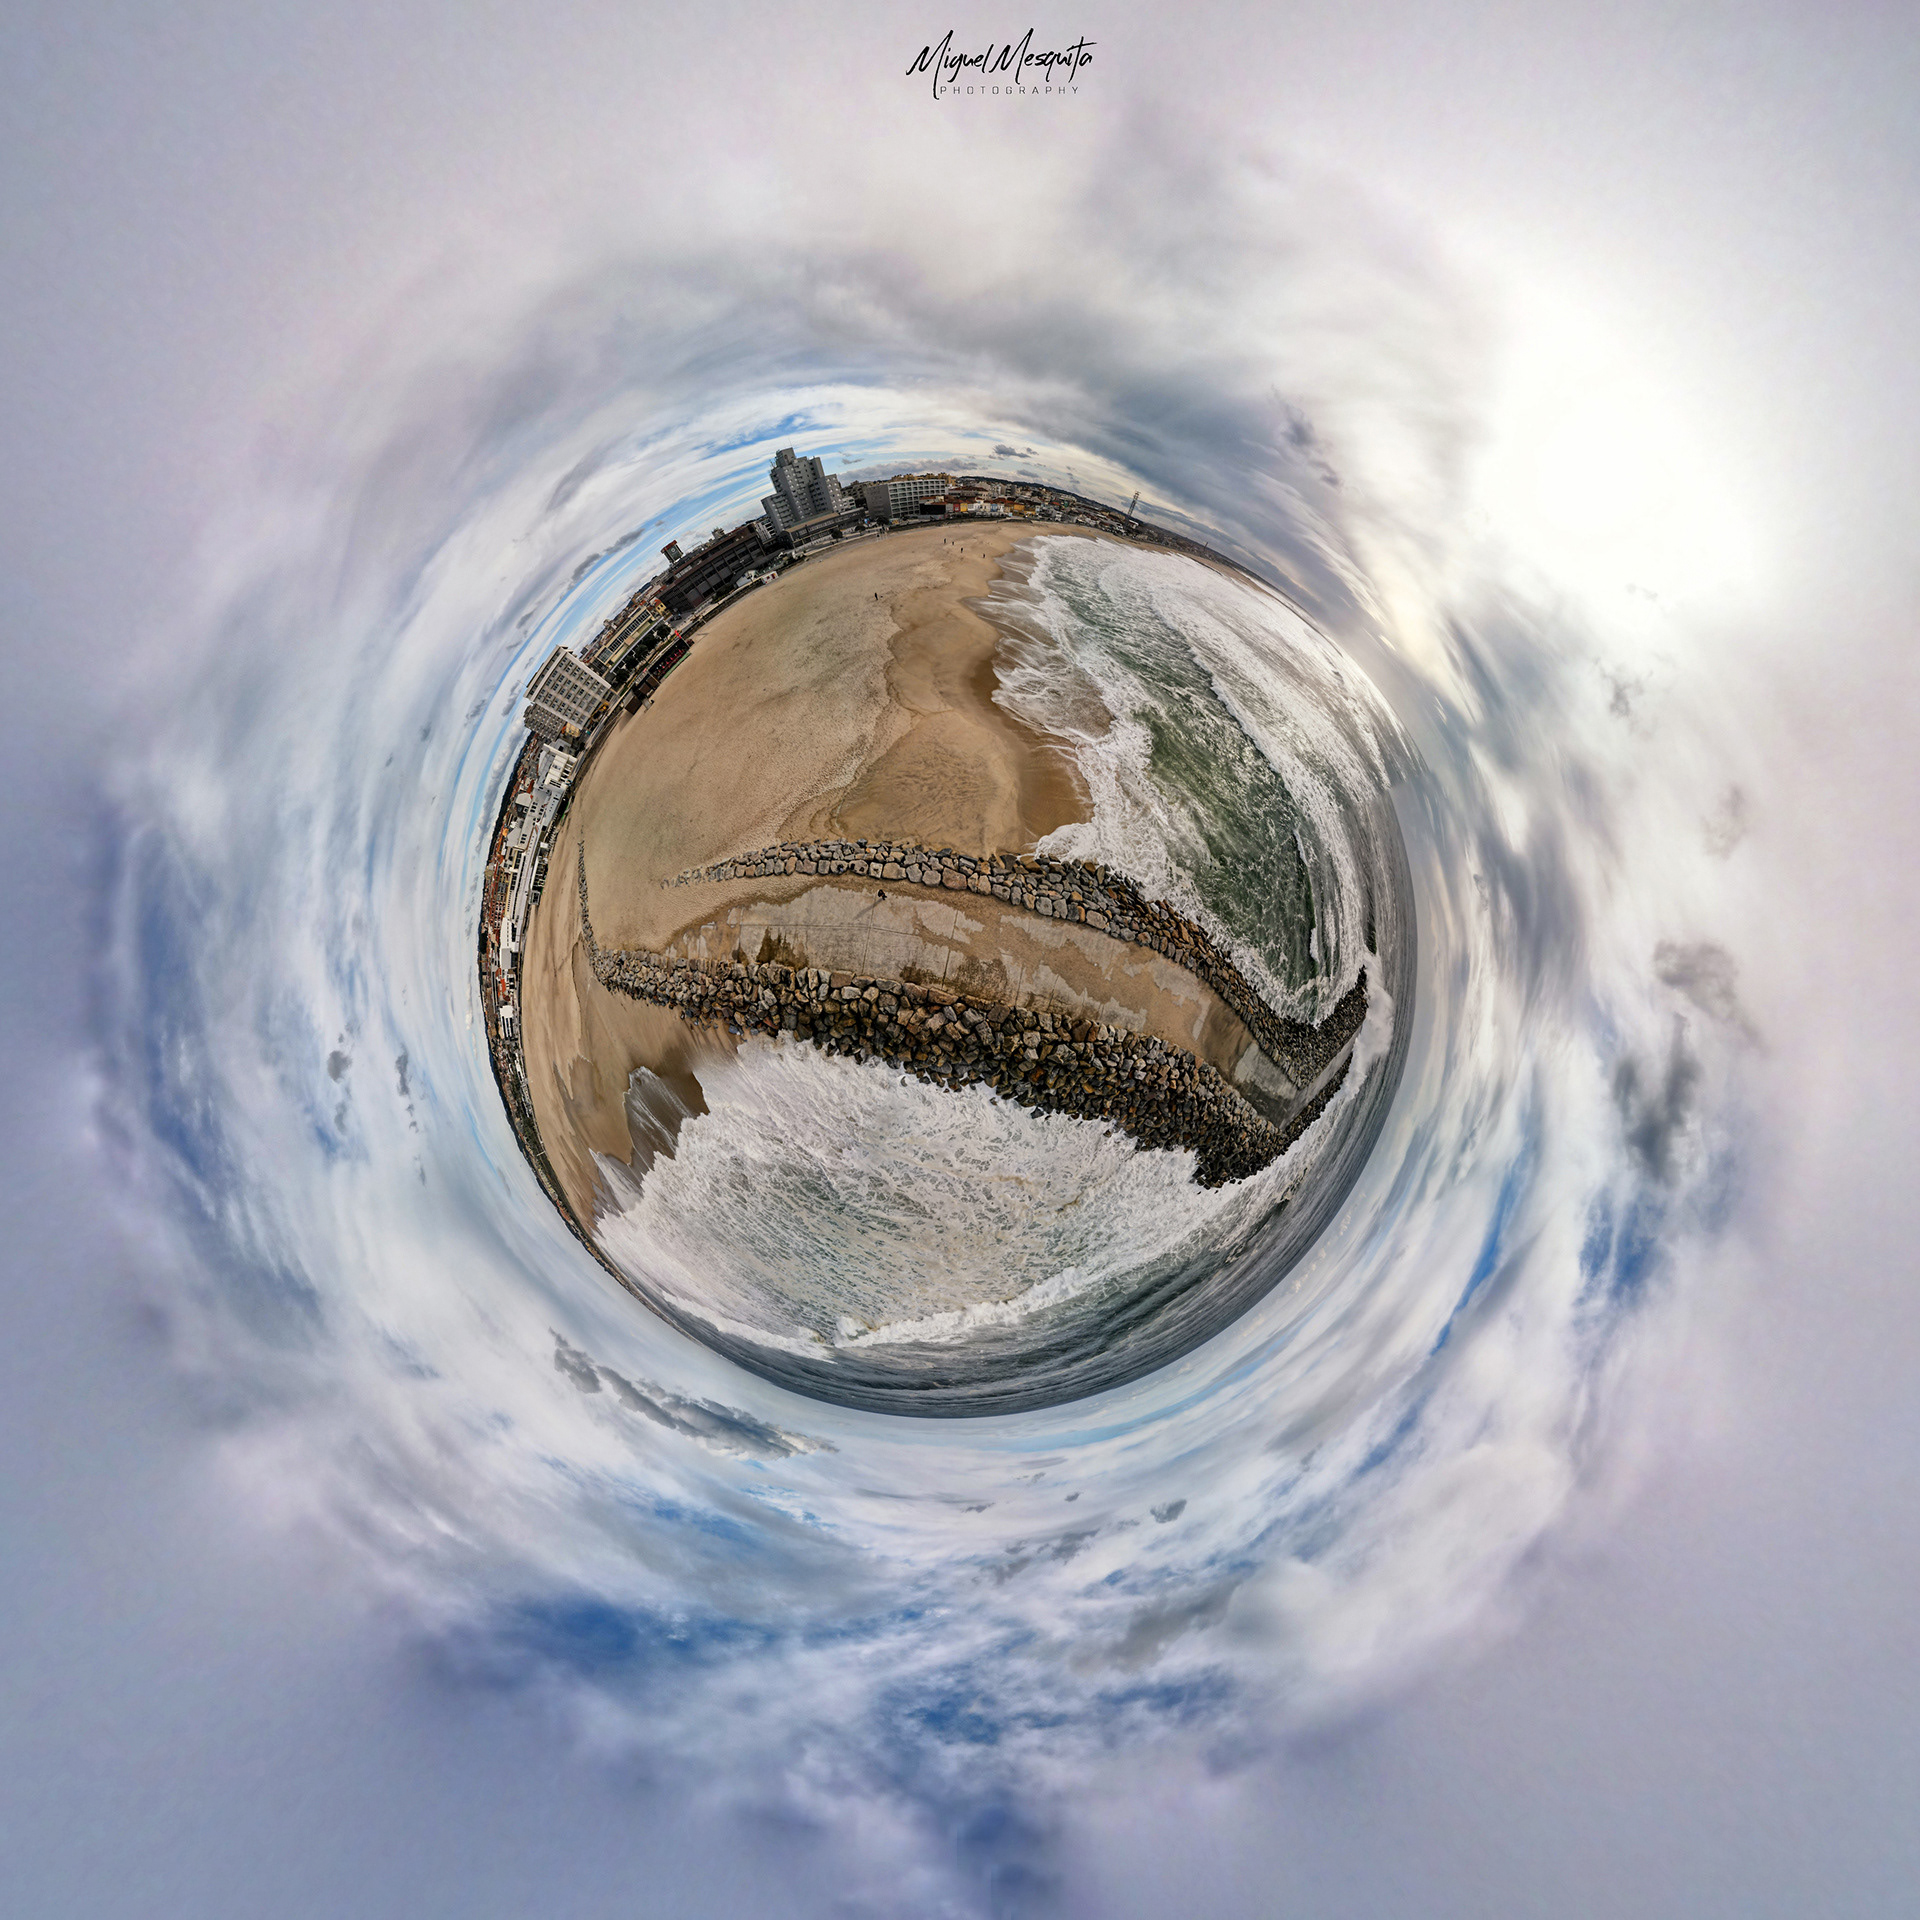
Dji Mavic Air 2 Review

INTRODUCTION
First of all i have to thanks to DJI Portugal for all the support they’ve given me.
I have the pleasure to had flyed almost all the mid-range drones of DJI, when Dji launched the new Mavic Air 2, i saw all the features, and i said to my self, I will buy that drone...
Now I'm here to talk you a little bit about it.
I have the pleasure to had flyed almost all the mid-range drones of DJI, when Dji launched the new Mavic Air 2, i saw all the features, and i said to my self, I will buy that drone...
Now I'm here to talk you a little bit about it.
For a long time, drones were seen as an expensive “toy”, a more appealing option for those who wanted to transform some video game controller experiences into pure reality, but with limitations of quality and duration of flight time. The most accessible models ended up resulting in experiences that were often frustrating, or even disastrous, for the user. It was not uncommon for drones to plunge into the waters of rivers and seas, or into ravines from which they were never recovered. But technology has evolved a lot and the integrated controls of drones, the increase in battery life, the quality of cameras and safety have transformed the way they can be used, even for those who are just getting started. DJI's Mavic Air 2 was designed to reinvent the experience of flying a drone, but also the creative ability, with navigation aids and smarter technology that makes the whole process safer. But the big improvement is in the quality of the images, and in the addition of new ways of creating bulletproof videos to create appealing and very “Instagrammable” content.
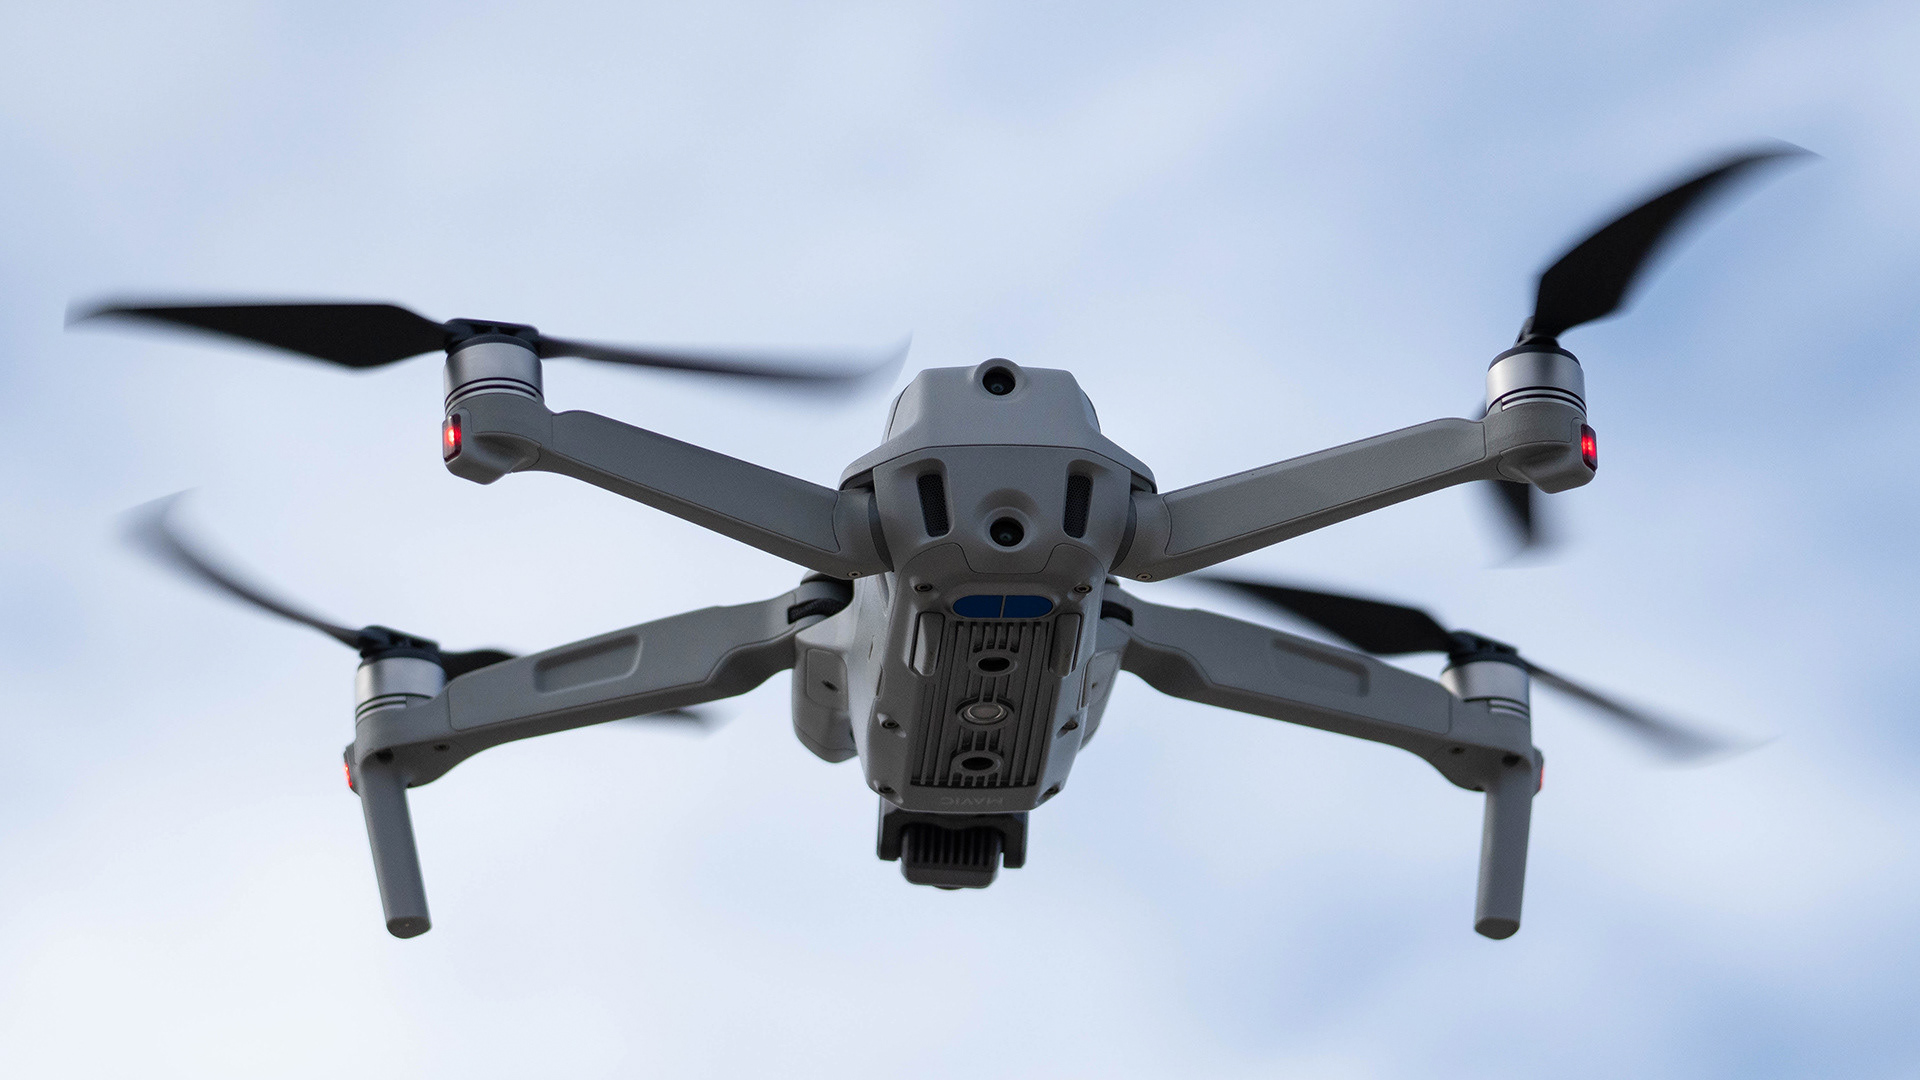
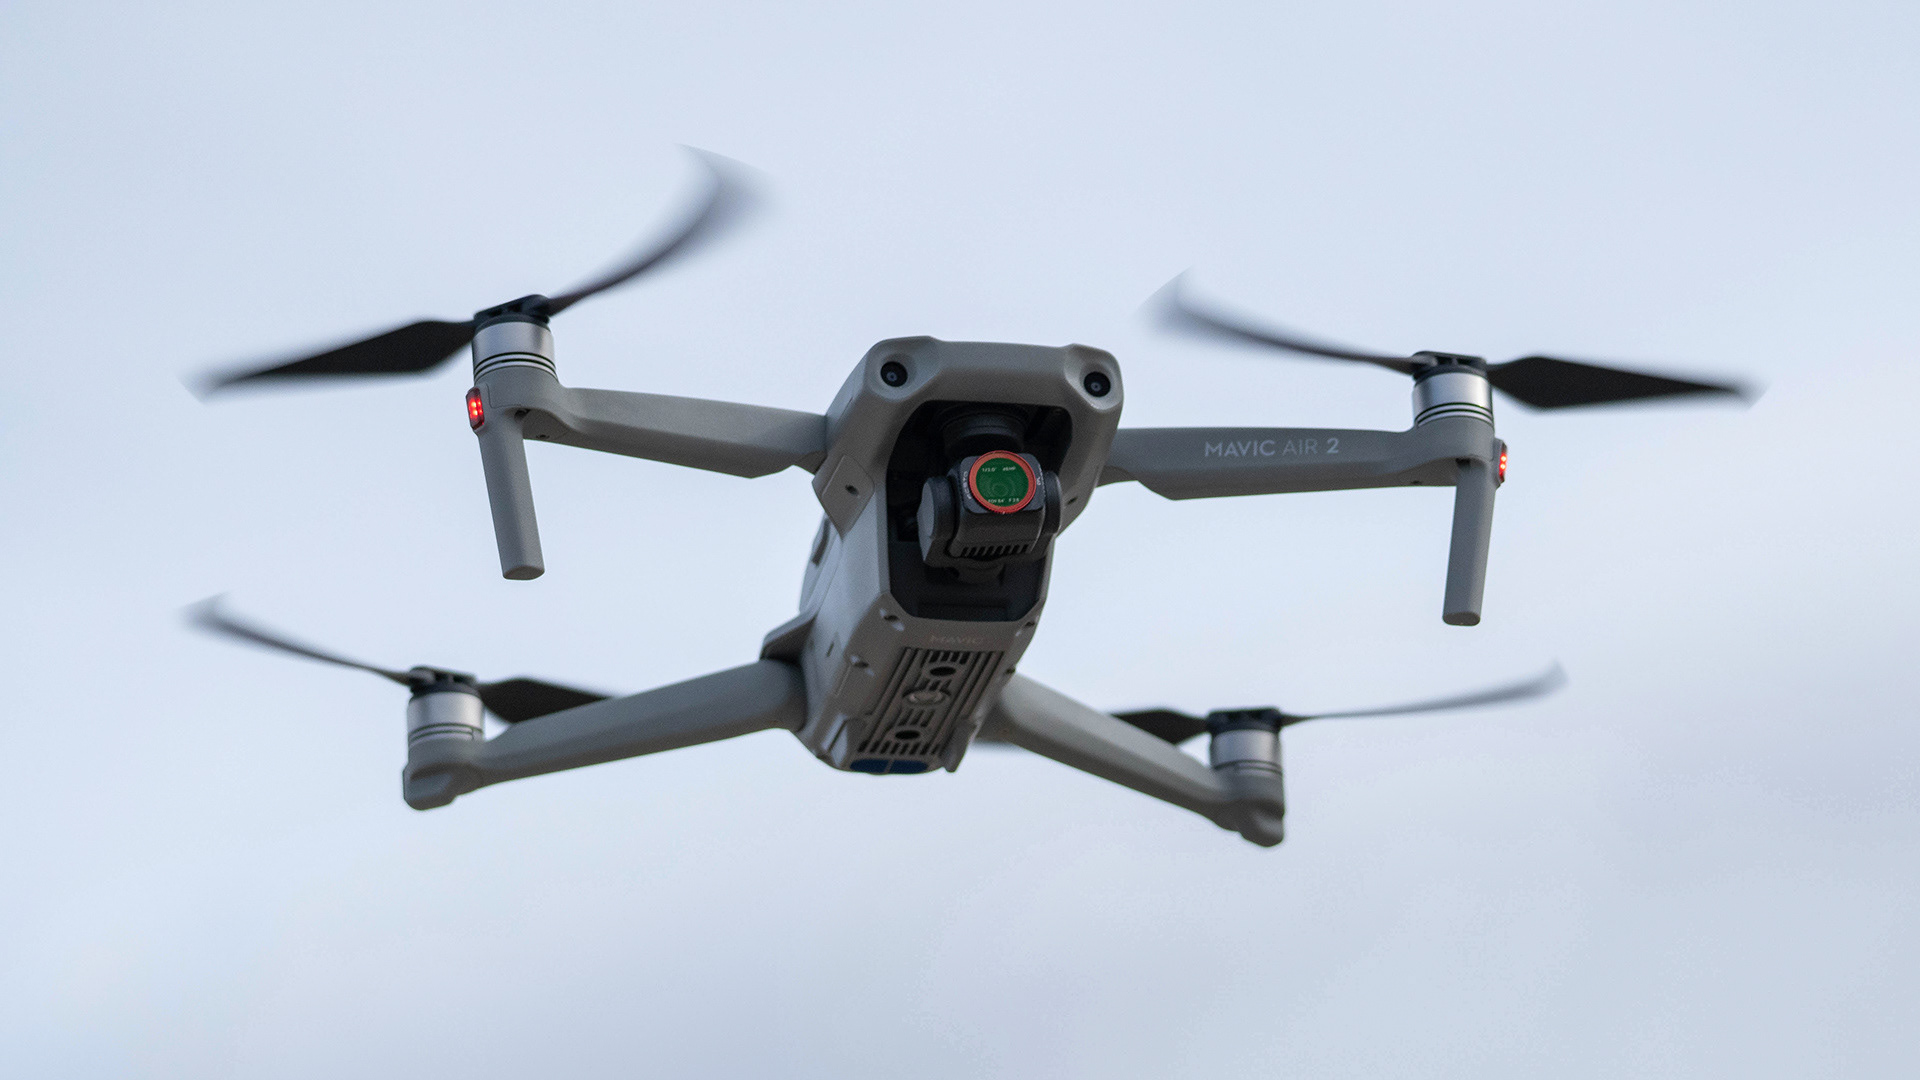
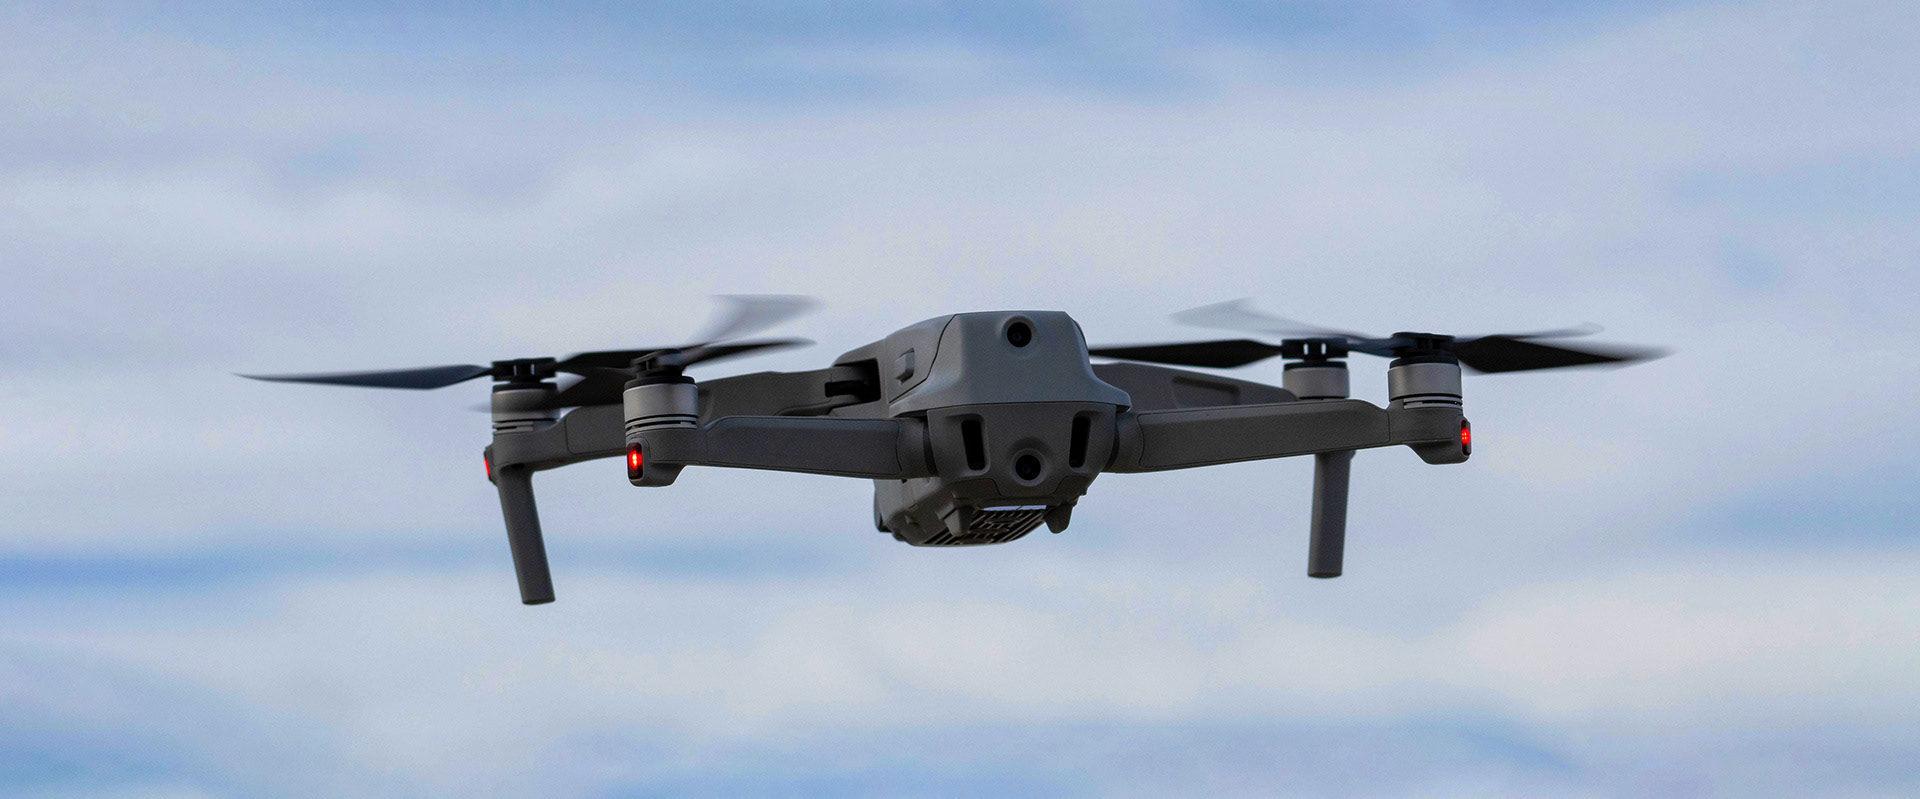
The Mavic Air 2 is the latest drone from DJI. The model arrives with image capture in resolutions of up to 8K and enough battery for about 34 minutes of flight time. This is the direct successor of the Mavic Air, the new model received several improvements, such as autonomy, a more ergonomic remote control and some functions for the professional user.
ABOUT DJI
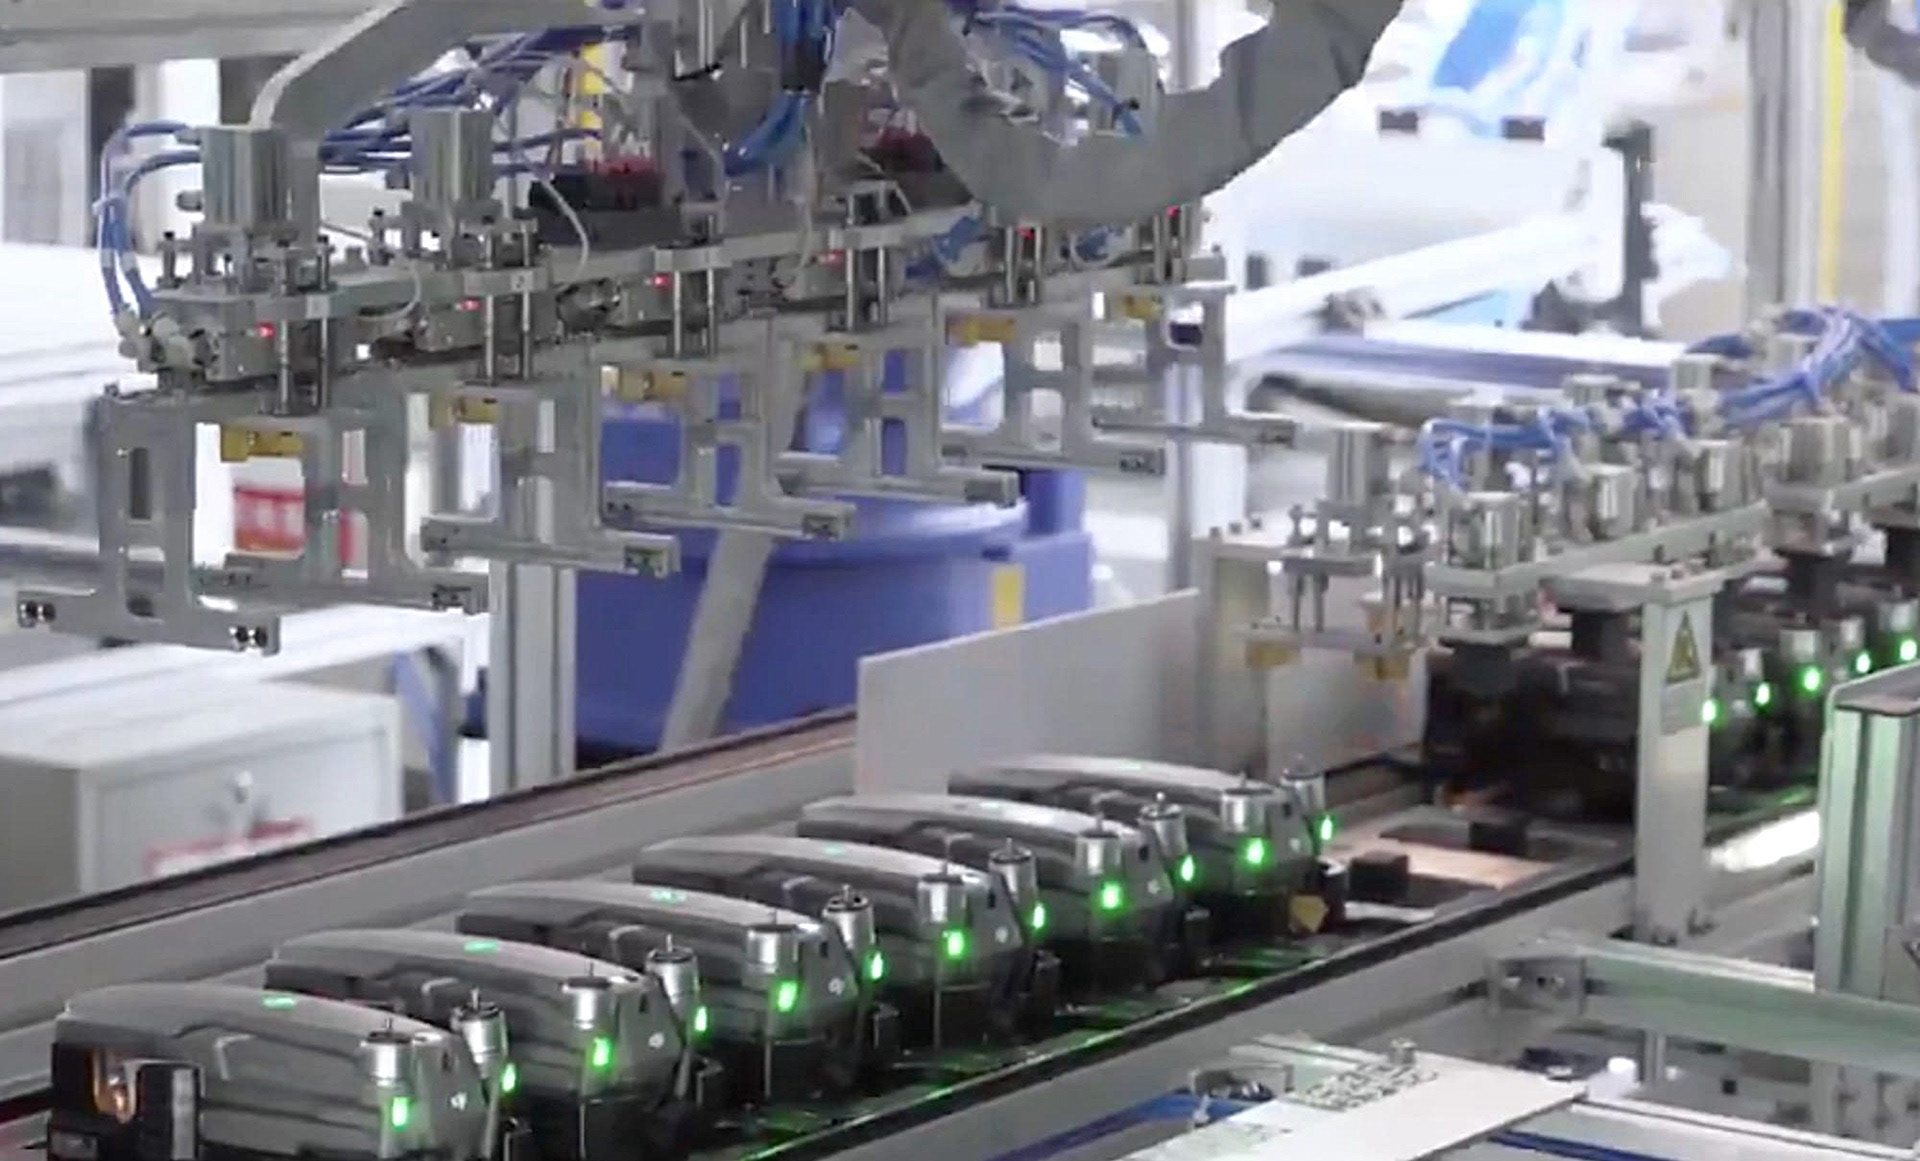
DJI was founded in 2006 by Frank Wang, a mainland-born student at Hong Kong University of Science and Technology. A plane model enthusiast, Wang started the company with the clear goal of making a flying toy that wouldn’t crash half the time. Instead of working out of a dorm room, Wang and two classmates rented a tiny office in Shenzhen just across the border. For several months, he skipped classes and poured all his energy into building his dream. At first, the company focused on making drone parts such as autopilot systems and gimbals. But their sights were set on building a complete drone that was ready to fly right out of the box.
DJI’s first mass market hit, the Phantom, arrived in 2013. It sold for less than 600€ (minus the camera) but brought serious hardware, setting it far above the flimsy toy helicopters already on the market.
While competitors were playing catch-up, DJI kept improving the Phantom, increasing flight time from around 10 minutes for the original to 28 minutes, adding a built-in camera to the drone and a screen to the remote.
DJI also turned to other segments of the market, building expensive drones for professional users, while churning out smaller and smarter models for hobbyists. Following the success of the Phantom series the company launched the foldable Mavic Pro in 2016 and the Spark in 2017. The latter is DJI’s smallest drone to date, approximately the size of a soda can.
GLOBAL DOMINANCE
DJI headquarters are in Shenzhen, widely considered China’s Silicon Valley, DJI benefits from direct access to the suppliers, raw materials, and young creative talent pool that’s necessary for their continues success. Drawing on these resources, DJI has grown from a single small office in 2006 to a global workforce. Their offices can now be found in the United States, Germany, the Netherlands, Japan, South Korea, Beijing, Shanghai, and Hong Kong. As a privately owned and operated company, DJI focused on our own vision, supporting creative, commercial, and nonprofit applications of our technology. Today, DJI products are redefining industries. Professionals in filmmaking, agriculture, conservation, search and rescue, energy infrastructure, and more trust DJI to bring new perspectives to their work and help them accomplish endeavors safer, faster, and with greater efficiency than ever before.
PACKAGING AND UNBOXING
I have the Fly More version, I think it's a more compelling option, with two more batteries and a charging hub. DJI, as usual, presented us this drone with a beautiful and smooth box. After opening we can find this inside the package:
- A shoulder bag with this inside:
- Drone,
- Remote Controller,
- 3 x Intelligent Flight Battery
- Battery Charger,
- AC Power Cable,
- 6 x Pair of Low-Noise Propellers,
- USB Type-C RC Cable,
- Lightning RC Cable,
- Micro-USB RC Cable,
- Gimbal Protector,
- USB Type-C Cable,
- Pair of Spare Control Sticks,
- ND Filter Set (ND16, ND64 & ND256),
- Battery Charging Hub,
- Battery to Power Bank Adapter,
- Limited Warranty on Main Controller, Gimbal & Camera, Vision Positioning System, Propulsion System (Excluding Propellers), Remote Controller, Charger & Battery Charging Hub.

DESCRIPTION
The DJI Mavic Air 2 Fly More Combo combines a foldable and portable frame, high-end camera system, and numerous accessories to get you up in the air quickly. The 3-axis gimbal sports a 1/2" CMOS sensor capable of capturing 8K Hyperlapse time-lapse shots, 4K60 video, 240 FPS slow-motion 1080p video, and up to 48MP stills. In addition, photos, panoramas, and video can be captured in HDR for more dynamic results. All your footage can be saved to 8GB of internal storage and on optional SD cards of up to 256GB in size.
Helping you to capture all this stunning footage is a host of built-in tracking technologies and intelligent obstacle avoidance. FocusTrack combines three different tracking features with abilities that include tracking of subjects and following predetermined flight paths. The Advanced Pilot Assistance Systems 3.0 (APAS) is aware of the Mavic Air 2 in 3D space and its proximity to people and objects to help avoid accidental collisions. Return to Home (RTH) and precision landing options are supported so you can easily and safely retrieve the drone when you finish filming
A robust 3500mAh battery can keep the Mavic Air 2 flying for up to 34 minutes at a time. While in the air, you can fly the drone at speeds of up to 43 mph and up to 11.5 miles away. The included remote controller supports OcuSync 2.0 technology to provide you with flight telemetry data and a live view of what the drone sees on your attached smartphone. It can transmit up to 1080p quality video from up to 6.2 miles away. Altogether, the Mavic Air 2 gives you the tools you need to expand your filmmaking with creative and professional quality aerial footage.
SPECIFICATIONS
PERFORMANCE
- Maximum Horizontal Speed: 59 Km/h / 19 m/s (S-Mode)
43 Km/h / 12 m/s (P-Mode)
18 Km/h / 5 m/s (T-Mode)
43 Km/h / 12 m/s (P-Mode)
18 Km/h / 5 m/s (T-Mode)
- Maximum Ascent Speed: 9 mph / 4 m/s
- Maximum Descent Speed: 11.2 mph / 5 m/s
- Flight Ceiling: 3.11 Miles / 5000 m
- Maximum Flight Time: 34 Minutes
- Maximum Hover Time: 33 Minutes
- Maximum Tilt Angle: 35°
- Hovering Accuracy: ±0.33' / 0.1 m Vertical with Vision Positioning
±1.64' / 0.5 m Vertical with GPS
±0.33' / 0.1 m Horizontal with Vision Positioning
±4.92' / 1.5 m Horizontal with GPS
±1.64' / 0.5 m Vertical with GPS
±0.33' / 0.1 m Horizontal with Vision Positioning
±4.92' / 1.5 m Horizontal with GPS
- Maximum Angular Velocity: 250°/s (Pitch)
250°/s (Yaw)
250°/s (Roll)
250°/s (Yaw)
250°/s (Roll)
FLIGHT CONTROL SYSTEM
- GNSS SupportGPS, GLONASS
- Vision System
- Vision System: Downward, Forward, Backward
Forward Field of View 71° (Horizontal)
56° (Vertical)
56° (Vertical)
Backward Field of View 44° (Horizontal)
57° (Vertical)
57° (Vertical)
REMOTE CONTROLLER / TRANSMITTER
- Operating Frequency - 2.4 GHz (2.400 - 2.484)
5.8 GHz (5.725 - 5.850)
5.8 GHz (5.725 - 5.850)
- Maximum Operating Distance: 6.21 Miles / 10 km at 2.4 G
- Transmitter Power: 26 dBm (2.4 G)
26 dBm (5.8 G)
26 dBm (5.8 G)
- Connectivity: 1 x Micro-USB
1 x USB Type-C
1 x Lightning
1 x USB Type-C
1 x Lightning
- Output Power: 38 W
- USB Output Power: iOS: 5 VDC, 2 A
Android: 5 VDC, 2 A
Android: 5 VDC, 2 A
- Mobile Device Compatibility: Devices up to 7.09" / 180 mm Wide and 0.4" / 10.16 mm Thick
- App Operating System Requirements: Android
iOS
iOS
- Operating Temperature: 0 to 40°C
CAMERA
- Sensor: 1/2" CMOS
- Effective Pixels: 48 MP
- Focal Length: 24mm (35mm Equivalent)
- Lens Field of View: 84°
- Aperture: F/2.8
- Minimum Focusing Distance: 3.3' / 1.0 m
- Photo ISO Range: 100 to 3200 (Auto)
100 to 6400 (Manual)
100 to 6400 (Manual)
- Video ISO Range: 100 to 6400
- Photo Resolution: 4:3: 8000 x 6000
- Photo Format: JPEG, DNG
- Video Format: 3840 x 2160p at 24/25/30/48/50/60 fps (MP4/MOV via H.264/AVC, H.265/HEVC, MPEG-4)
2688 x 1512p at 24/25/30/48/50/60 fps (MP4/MOV via H.264/AVC, H.265/HEVC, MPEG-4)
1920 x 1080p at 24/25/30/48/50/60/120/240 fps (MP4/MOV via H.264/AVC, H.265/HEVC, MPEG-4)
2688 x 1512p at 24/25/30/48/50/60 fps (MP4/MOV via H.264/AVC, H.265/HEVC, MPEG-4)
1920 x 1080p at 24/25/30/48/50/60/120/240 fps (MP4/MOV via H.264/AVC, H.265/HEVC, MPEG-4)
- Recording Media: SD (up to 256 GB)
- Photo Modes: Auto-Exposure Bracketing (AEB), Burst Shooting, Interval, Single Shot
GIMBAL
- Number of Axes: 3 (Pitch, Roll, Yaw)
- Control Range Pitch: -135 to 45°
Roll: -45 to 45°
Yaw: -100 to 100°
Roll: -45 to 45°
Yaw: -100 to 100°
- Angular Speed: Pitch: 100°/s
FLIGHT BATTERY
- Battery Chemistry: Lithium-Ion Polymer (LiPo)
- Capacity: 3500 mAh / 40.42 Wh
- Battery Configuration: 3 S / 11.55 V
- Maximum Charging Power: 38 W
- Charging Temperature: 5 to 40°C
- Weight 198 g
GENERAL
- Number of Rotors: 4
- Operating Temperature: 0 to 40°C
- Diagonal Size: 302 mm
- Overall Dimensions: 97.0 x 84.0 x 180.0 mm (Folded)
253.0 x 77.0 x 183.0 mm (Unfolded)
253.0 x 77.0 x 183.0 mm (Unfolded)
- Weight: 570 g
PACKAGING INFO
- Package Weight: 6.5 lb
- Box Dimensions (LxWxH): 24 x 23.8 x 13 cm
ERGONOMICS & HANDLING
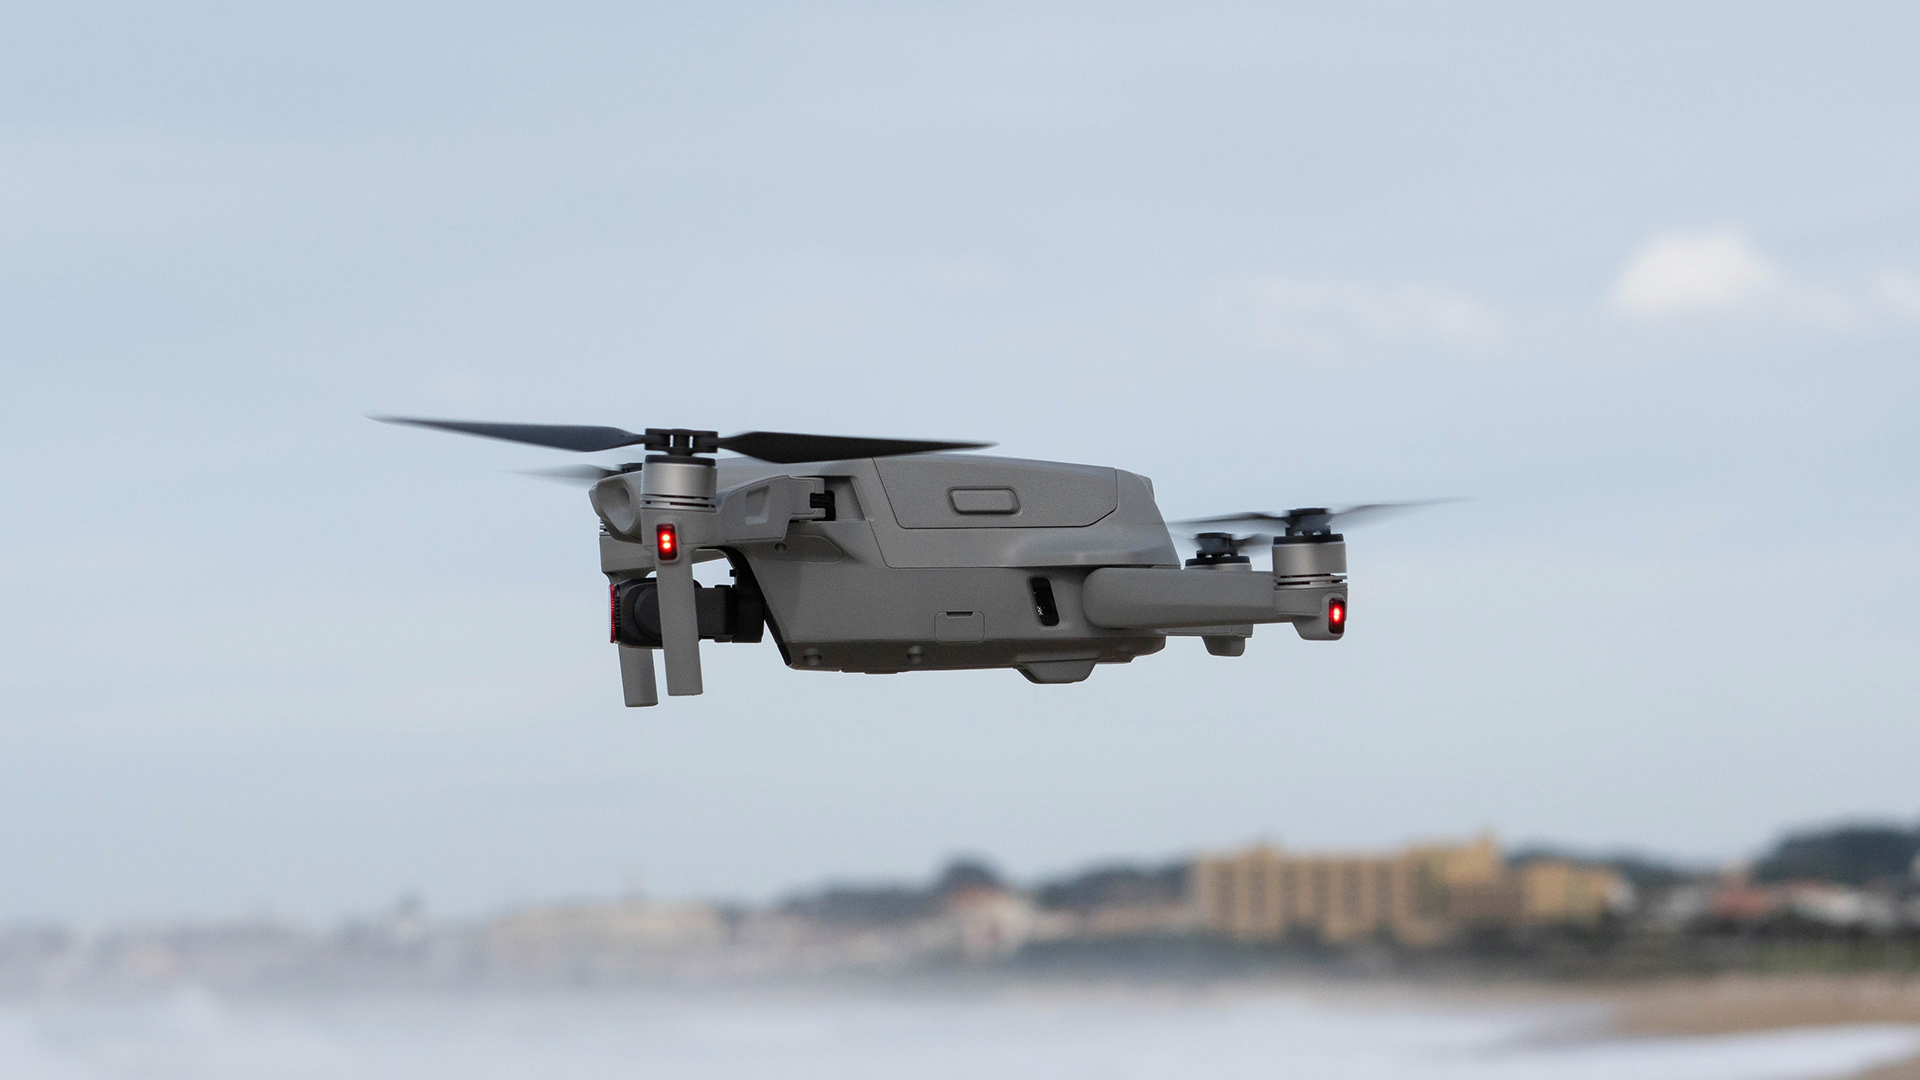
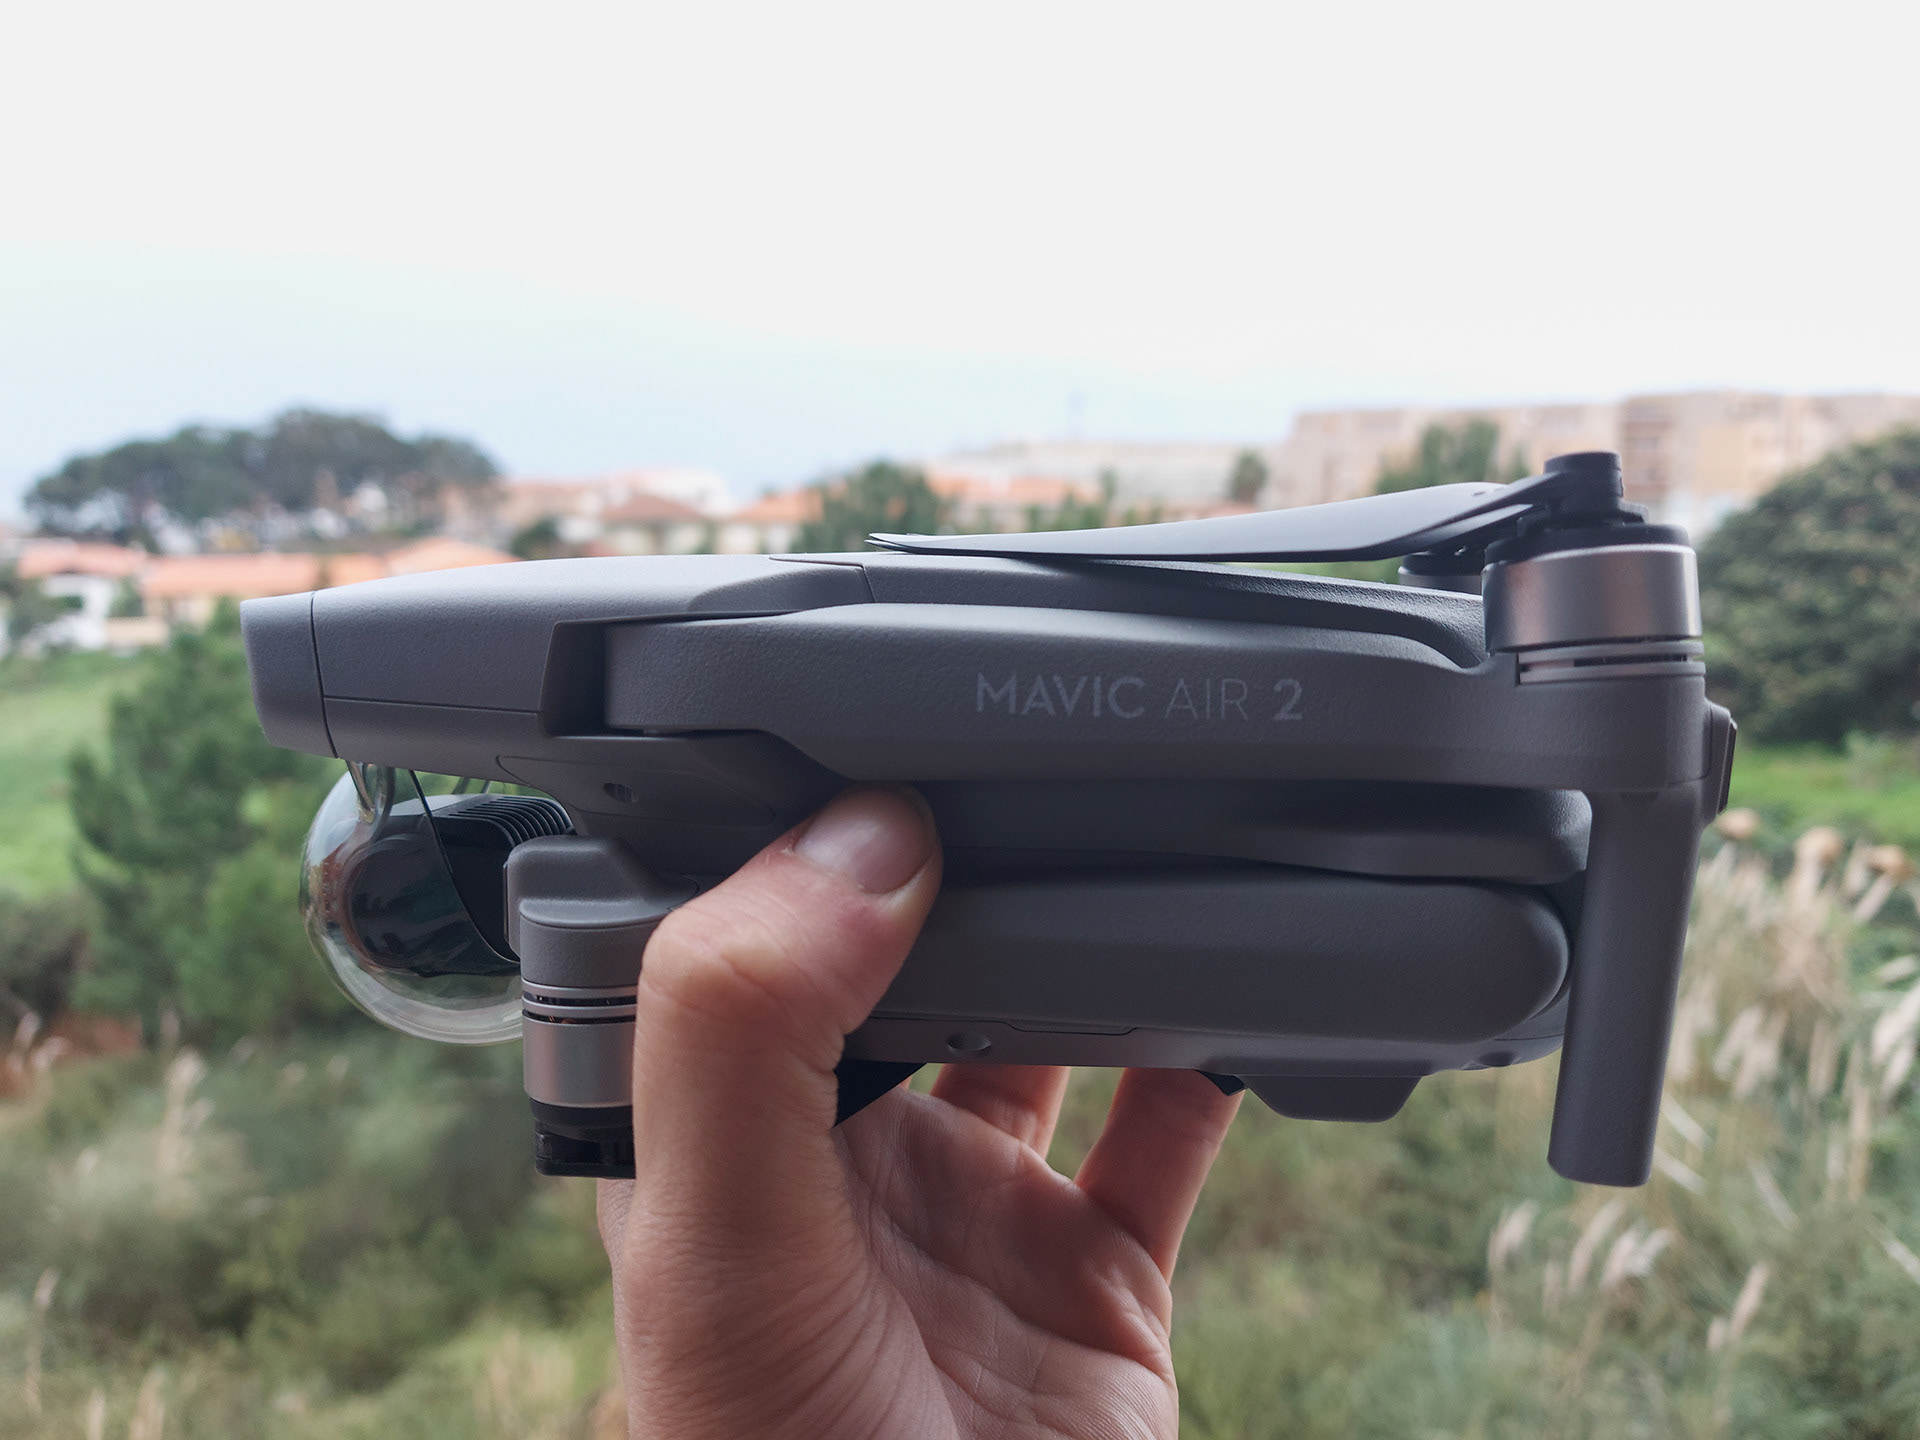
The Mavic Air 2 looks like a smaller Mavic 2 Pro and a bigger Mavic Mini. It’s also slightly bigger than the first Mavic Air, but it remains portable and easy to store in your backpack or a camera bag. I prefer the look of the first Air. It was a bit smaller, had a shorter wingspan, and came in three colors. It was simply a more fun design overall. The gray housing on the Mavic line is boring, but it fits better within DJI’s current lineup.
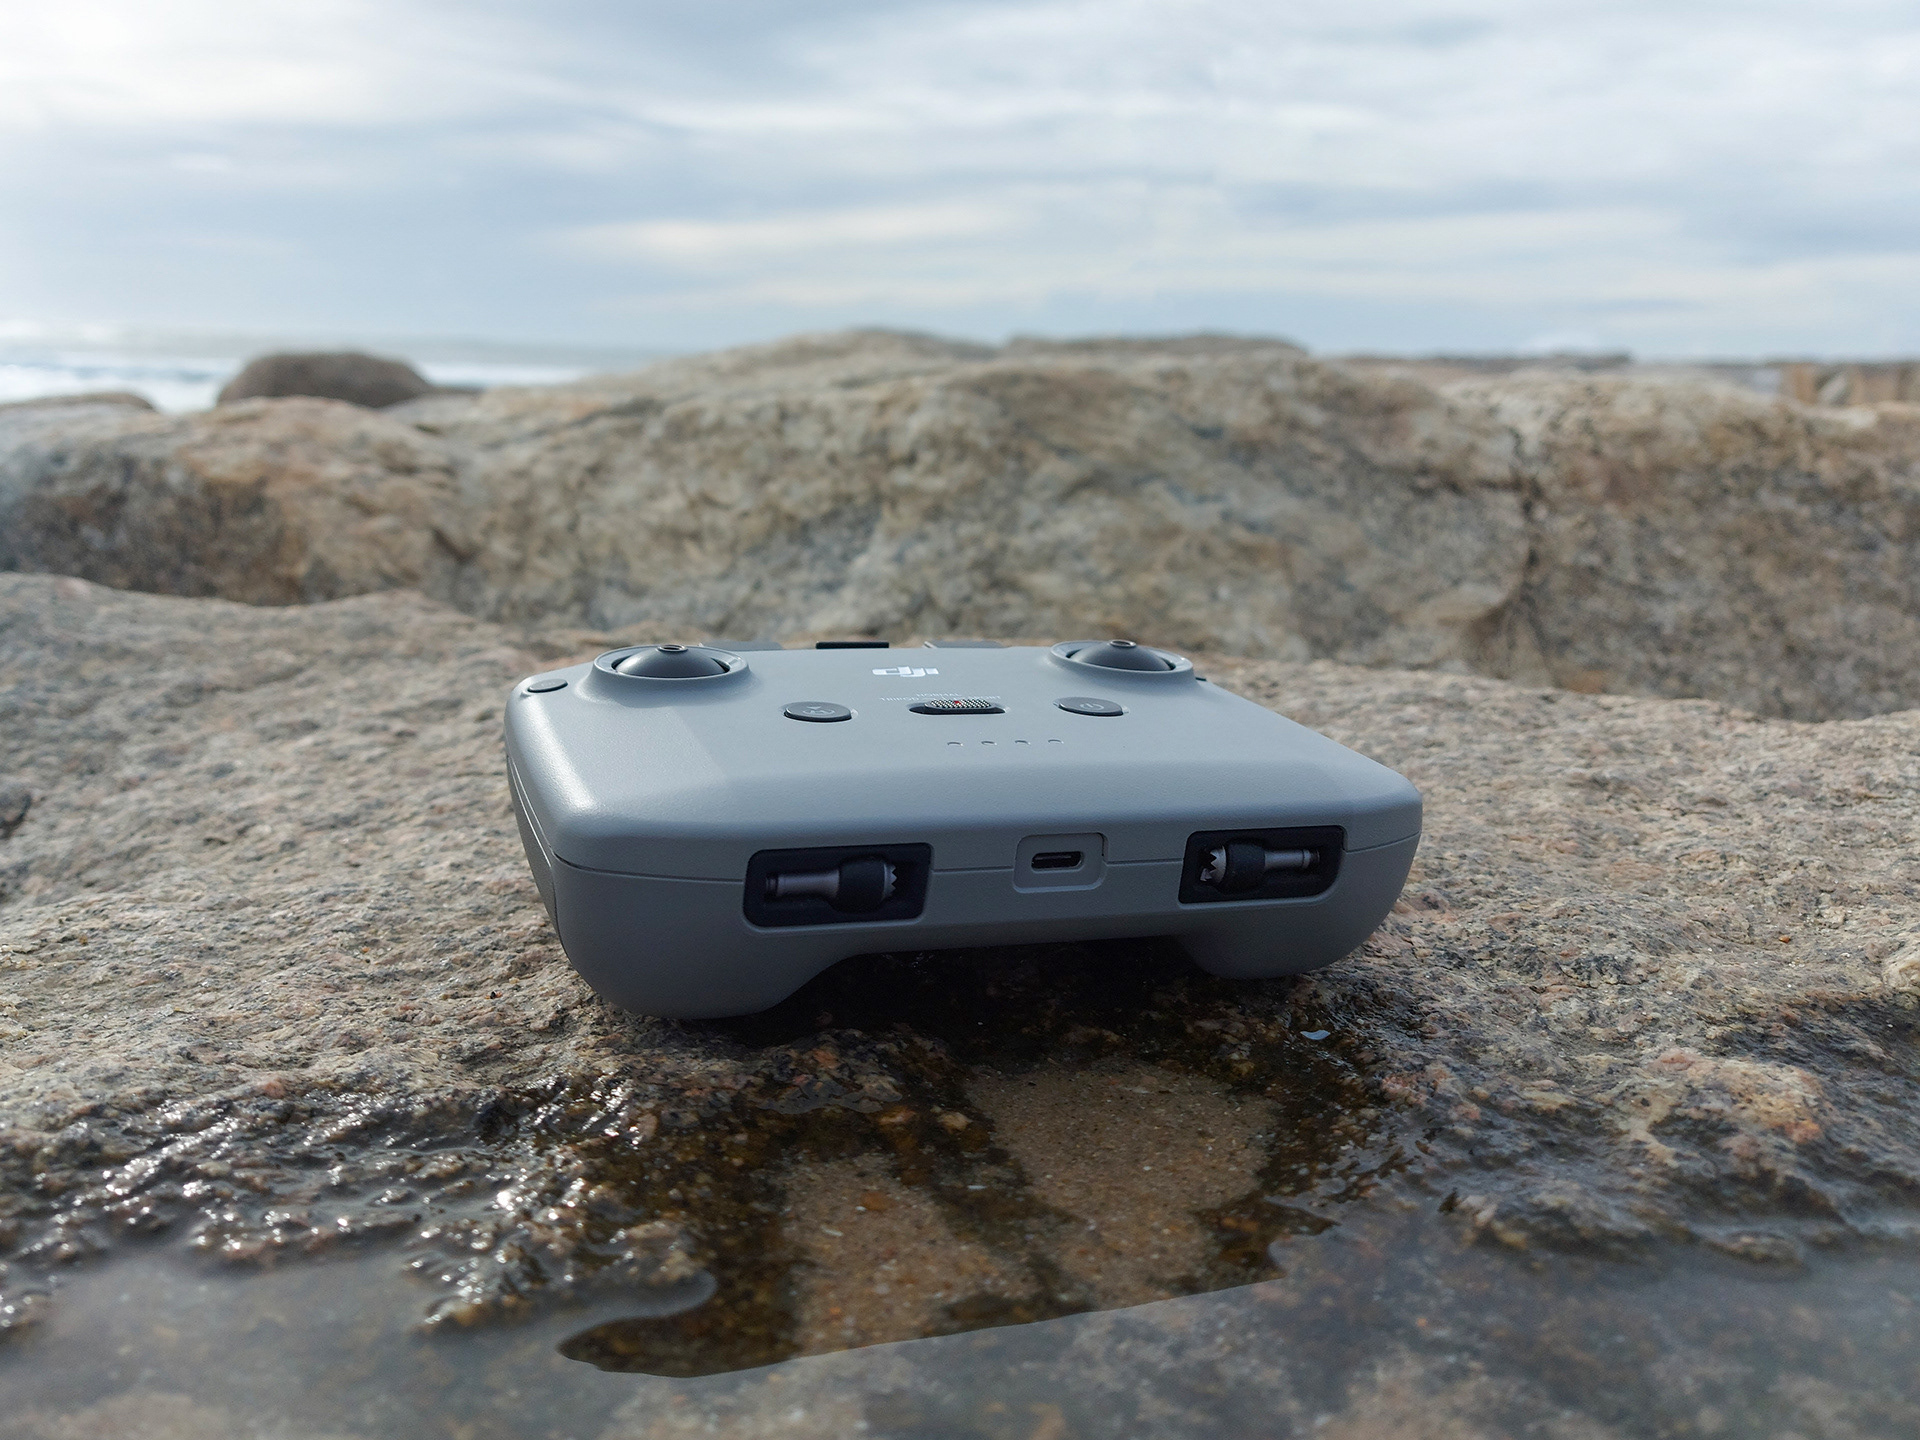
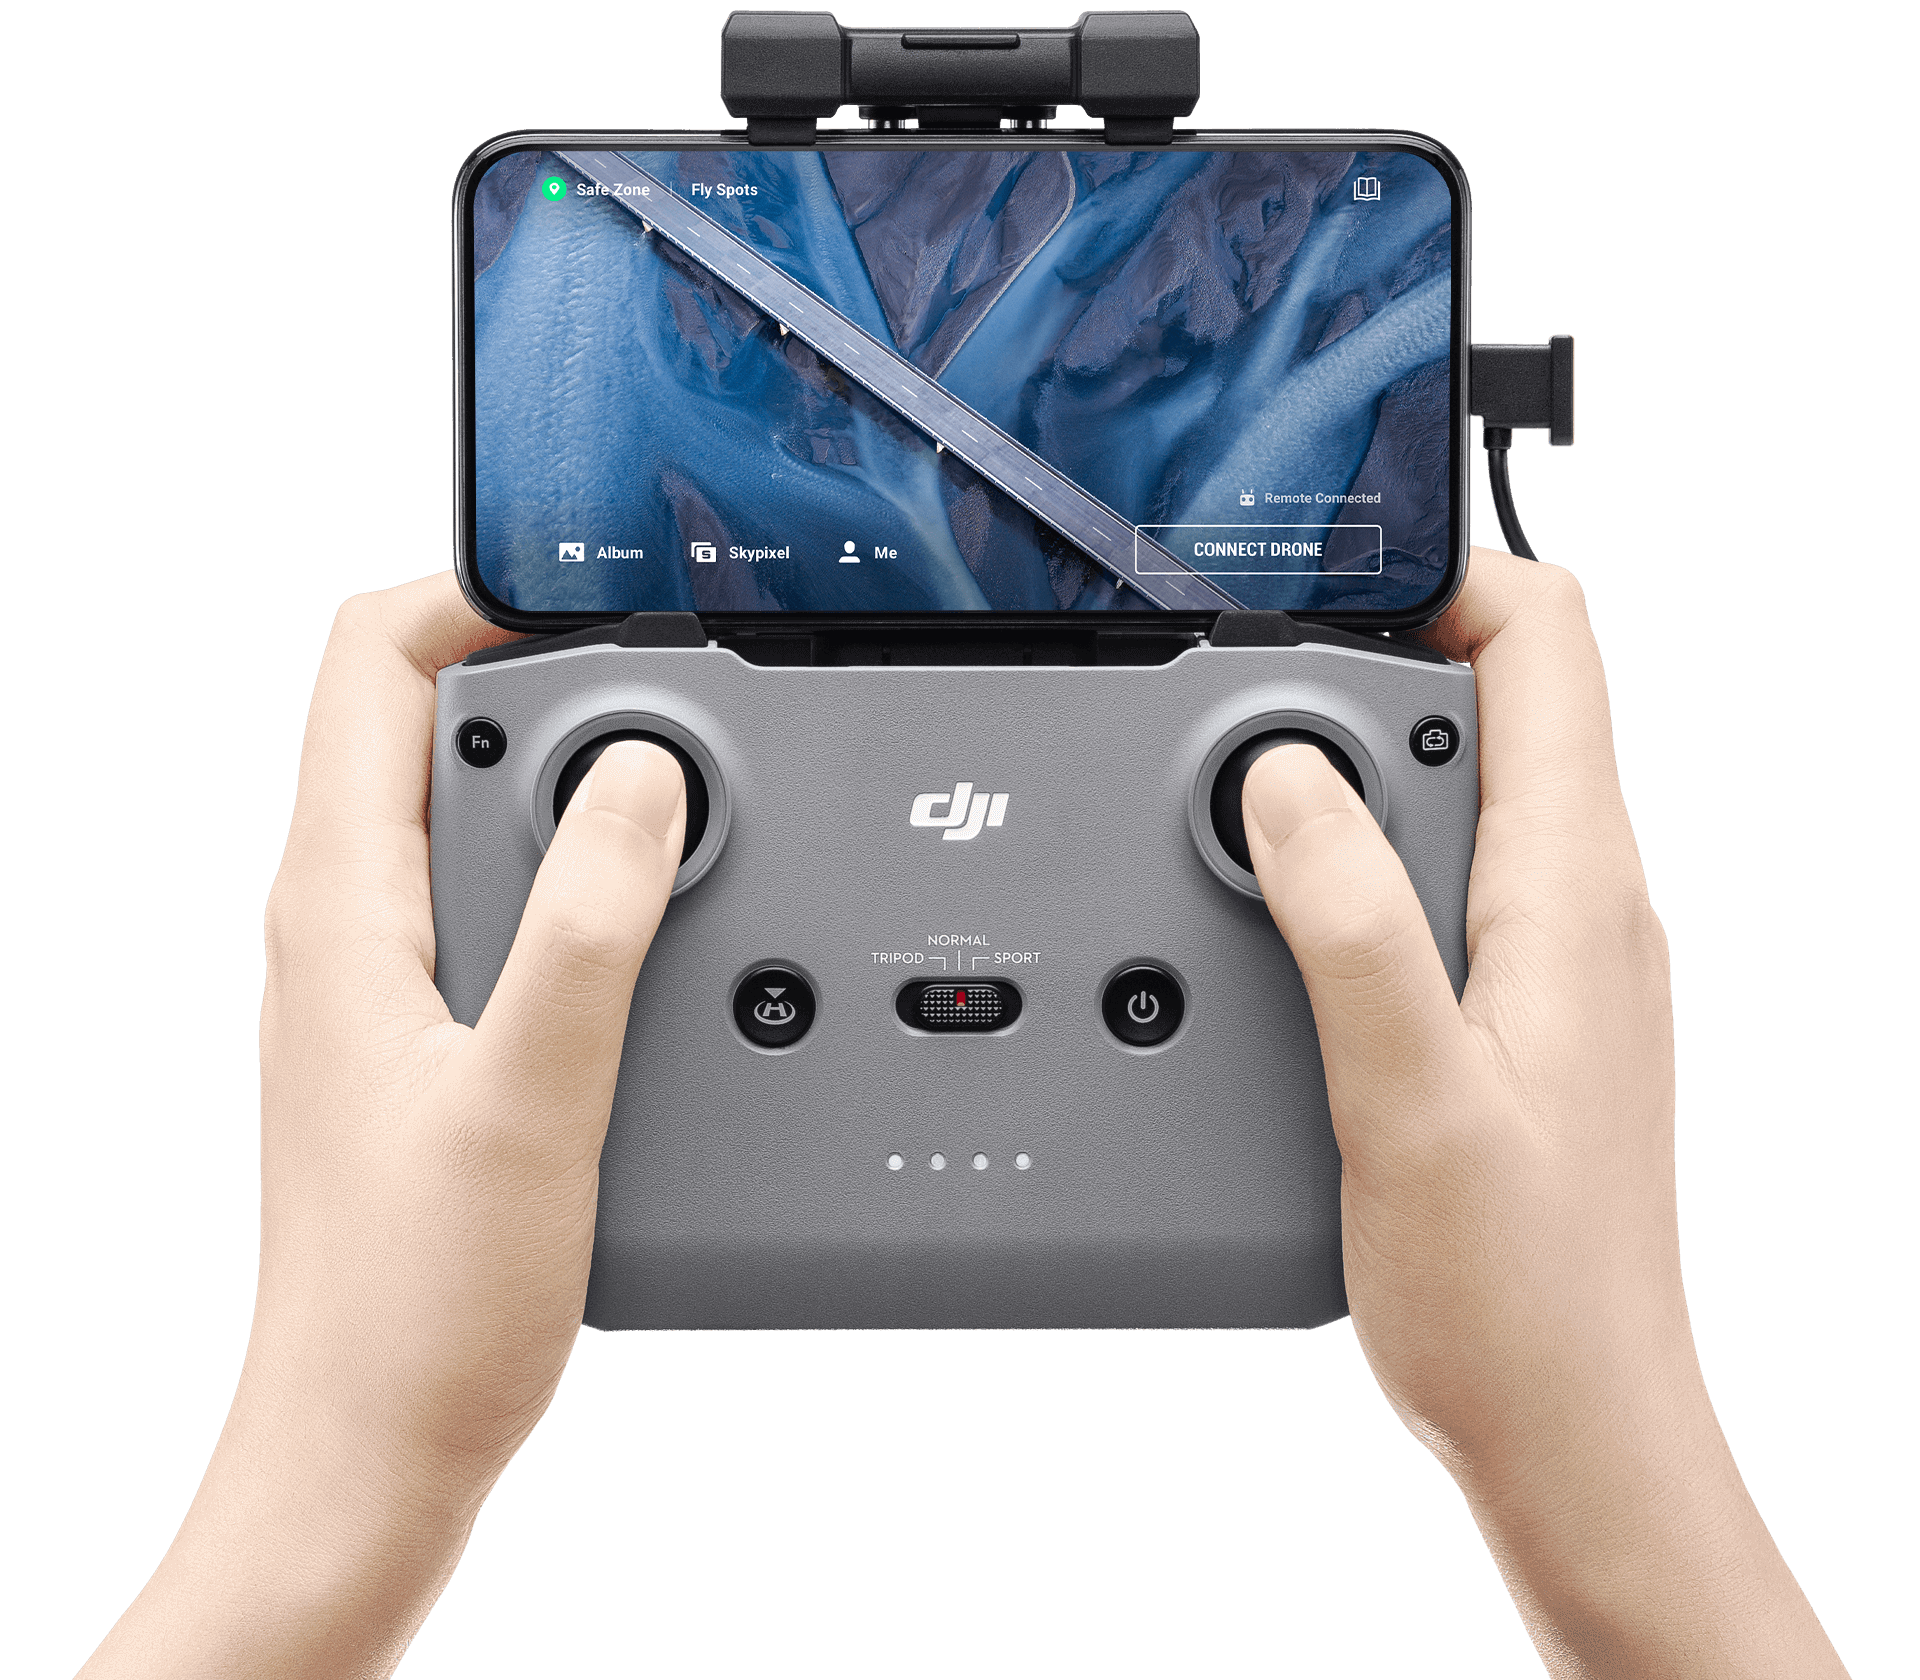
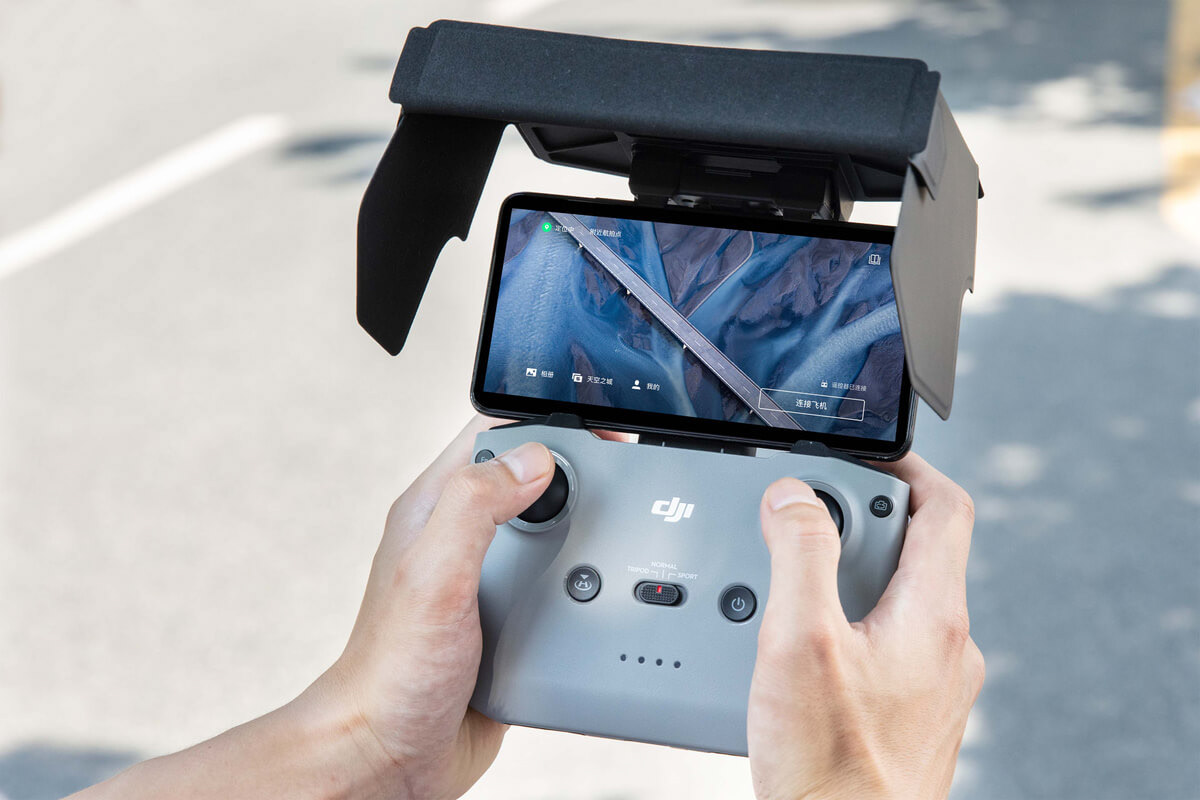
Another big change — and I do mean big — is the new controller. It’s almost twice the size of any other DJI, it doesn’t have a screen, and there are no visible antennas sticking out. The phone holder is moved to the top and is spring-loaded. I think the whole design makes a lot more sense. It’s much more comfortable to hold, too. If I were to nitpick, my only wish is for the custom function buttons to be at the bottom of the controller instead of on the side.
The ergonomics are a strong consideration when choosing a Mavic Mini; however, if you are looking for more capability while retaining portability, the Mavic Air 2 is a great option. It is capable enough to hold its own against higher-priced drones, yet it can fold up and tuck away into a pocket of a camera bag. Being able to have a drone wherever and whenever you want is paramount, especially for documentary filmmaking, journalism, event videographers and just about every professional video producer that wants a cheaper drone.
NEW CONTROLLER
The new controller design marks a change for the Mavic series and puts the screen where it’s most useful, became a huge fan of the new design.
It is comfortable in your hands, compact and easy to set up and tear down. To top it all off, the controller can now charge your phone! Lastly, we like that the phone now goes above the controller. It’s located in a better place for access and doesn’t get in the way like a controller with an underslung phone will.
Also, the way they incorporated the built-in phone connector is genius. It tucks away for storage and is quickly accessed when setting up. The new retractable phone clamp design is another nice improvement to the controller’s design. The integrated antennas are a welcomed improvement that lends to the overall improved ergonomics.
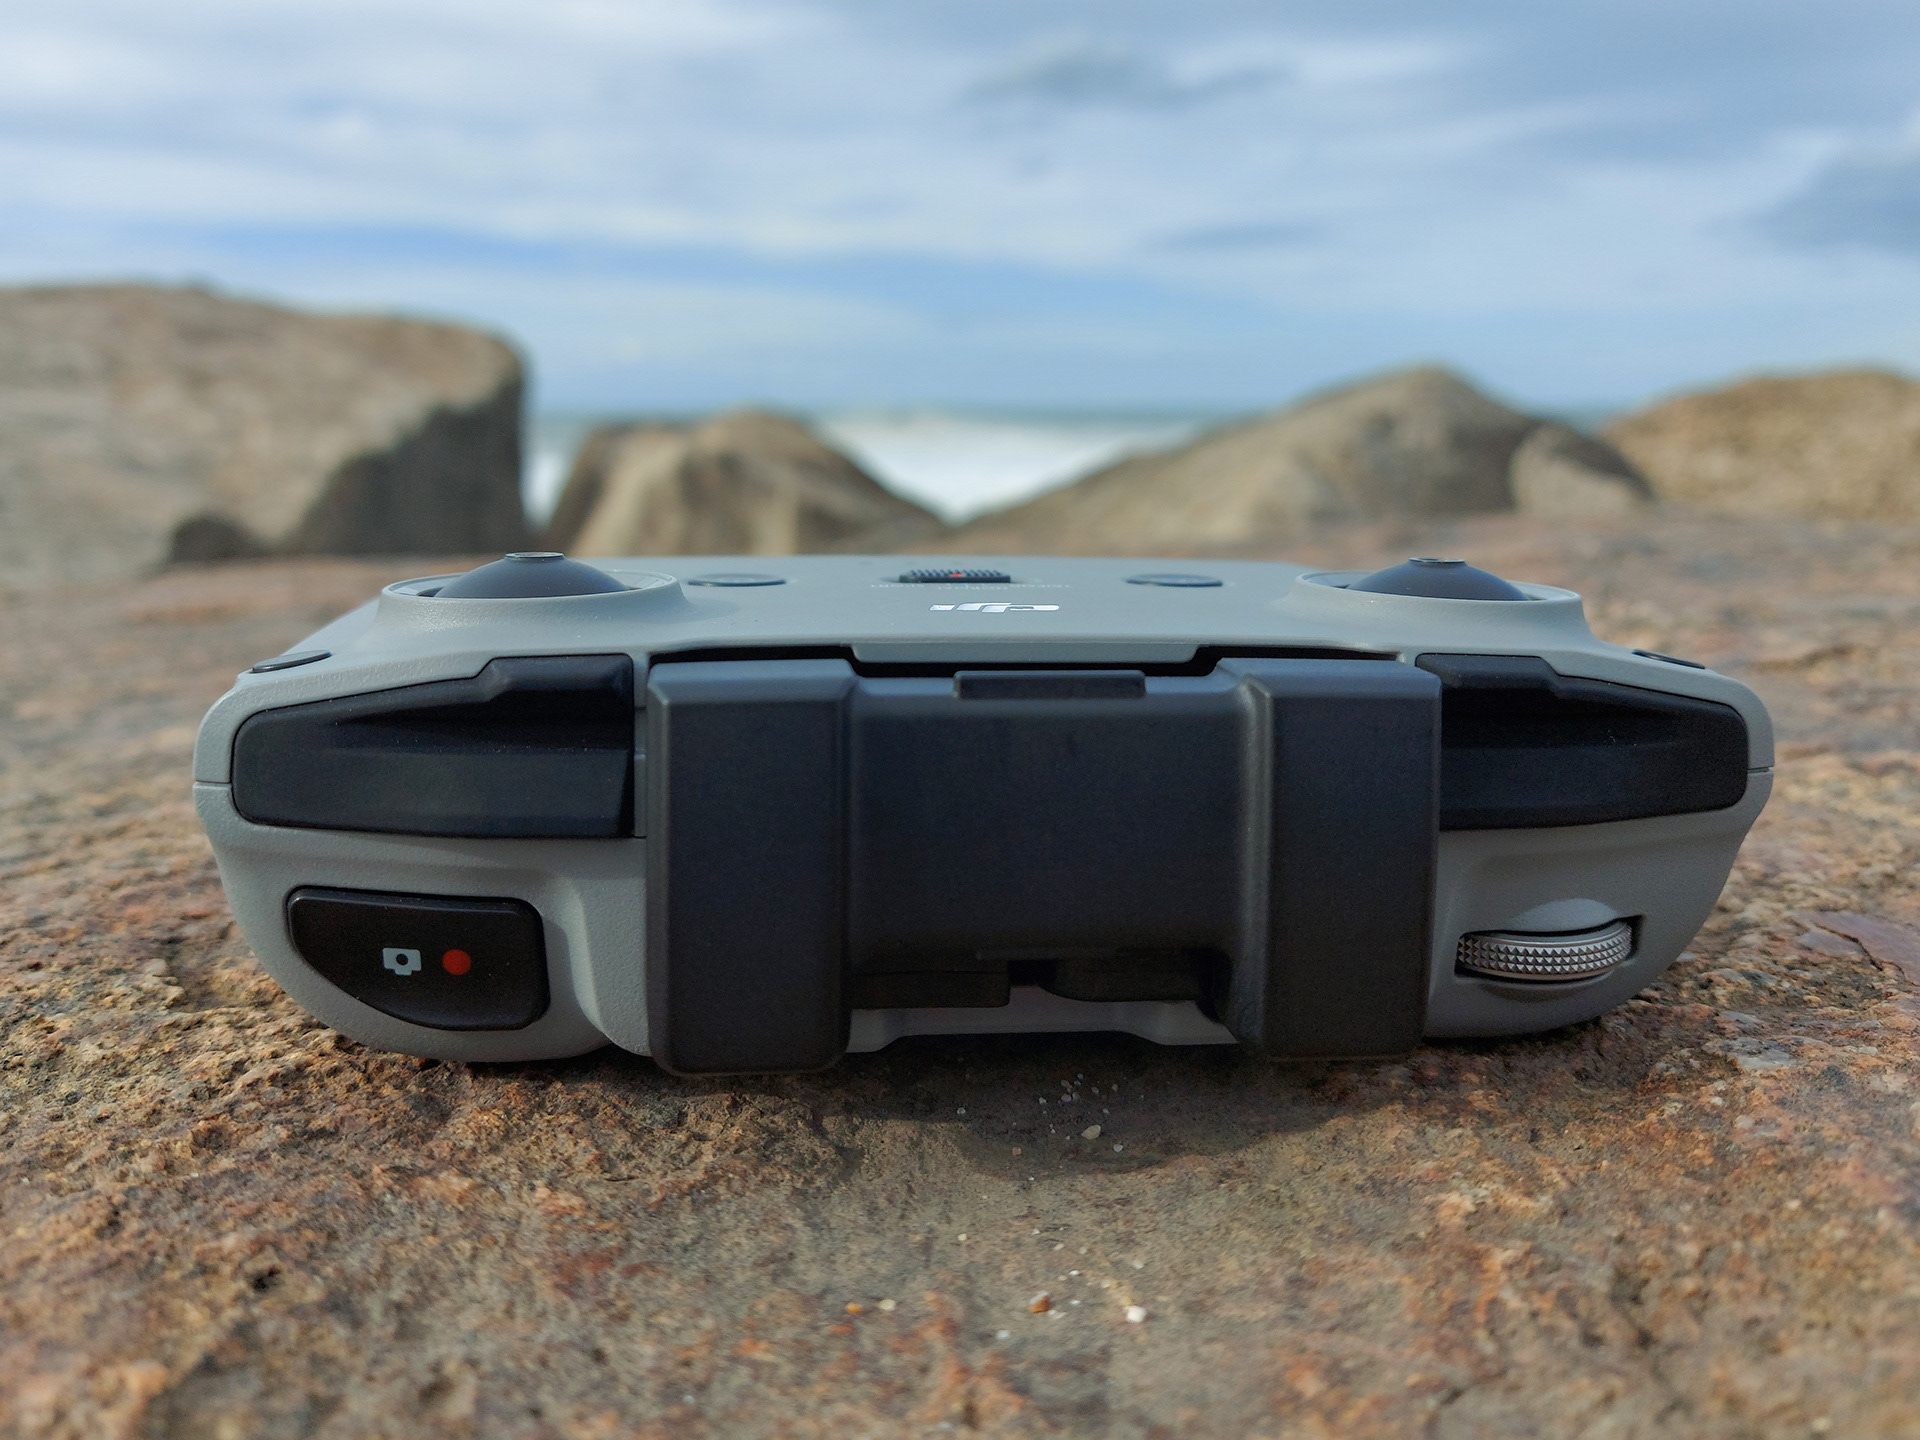
Buttons include Power—DJI's drones and remotes all require a short press followed by a long press to turn on or off—and Return to Home. You also get a programmable Fn button on the left and another to change between photo and video modes on the right.
Buttons include Power—DJI's drones and remotes all require a short press followed by a long press to turn on or off—and Return to Home. You also get a programmable Fn button on the left and another to change between photo and video modes on the right.
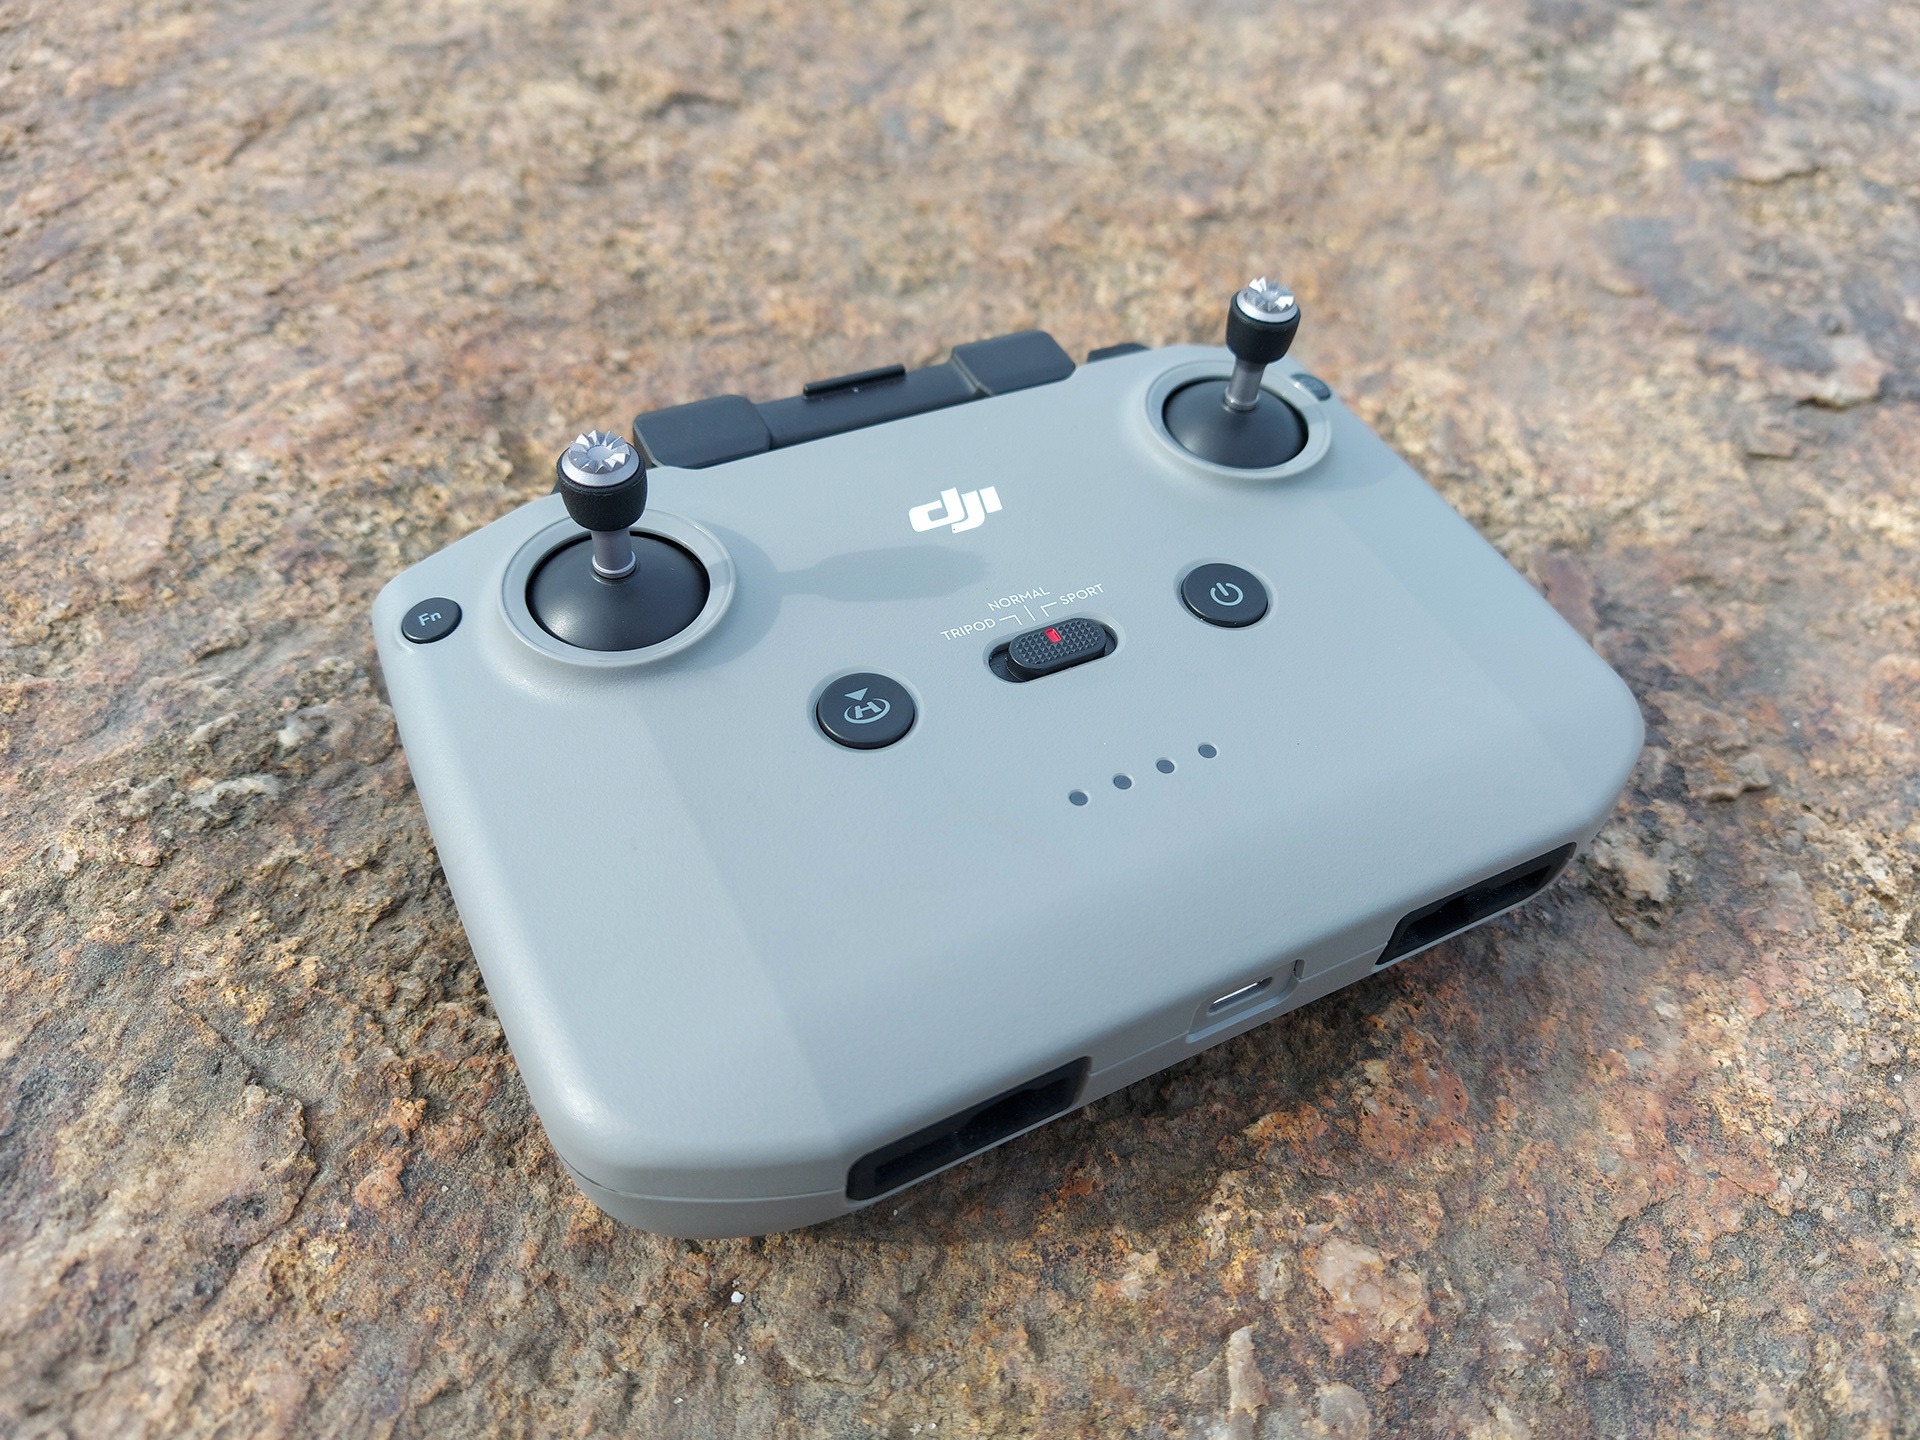
There's a toggle switch to change flight modes. You'll want to use Normal most of the time. Sport is available if you need to fly faster to get more sense of motion in your video, but obstacle detection is disabled and the drone won't be able to stop on a dime. The Tripod setting does the opposite—it moves the drone very slowly, ideal for framing a static shot or still photo.
There are some basic camera controls on the remote too. You'll find the control wheel on the left shoulder; it tilts the camera up and down. The Photo/Record button is at the right shoulder—use it to snap an image or start a video from the remote. If you prefer to control recording via the app, you can do that too.
Out with the fold-out controller which has been with the Mavic series since the start, in with a new slide-out antenna mechanism which doubles up as the phone grip. This puts the phone back at the top of the controller – as on Phantom, Inspire and other higher-end systems. Inside is OccuSync 2.0 which, like the Mavic 2, offers around 10km of range (in FCC-covered areas) or 6km elsewhere (where signal strength is more restricted). In either case, this technology effectively eliminates the risk of signal drop-out within a reasonable distance of the user (remember 500m is the limit in most places), and it really does work.
Most of my testing time was spent in designated flying fields that bordered urban areas. These generate a lot of electromagnetic interference, yet I never seemed to lose my video signal for a second – it seemed a shade more reliable than the Mavic 2 series and far more so than the Mavic Mini
Most of my testing time was spent in designated flying fields that bordered urban areas. These generate a lot of electromagnetic interference, yet I never seemed to lose my video signal for a second – it seemed a shade more reliable than the Mavic 2 series and far more so than the Mavic Mini
MEDIA
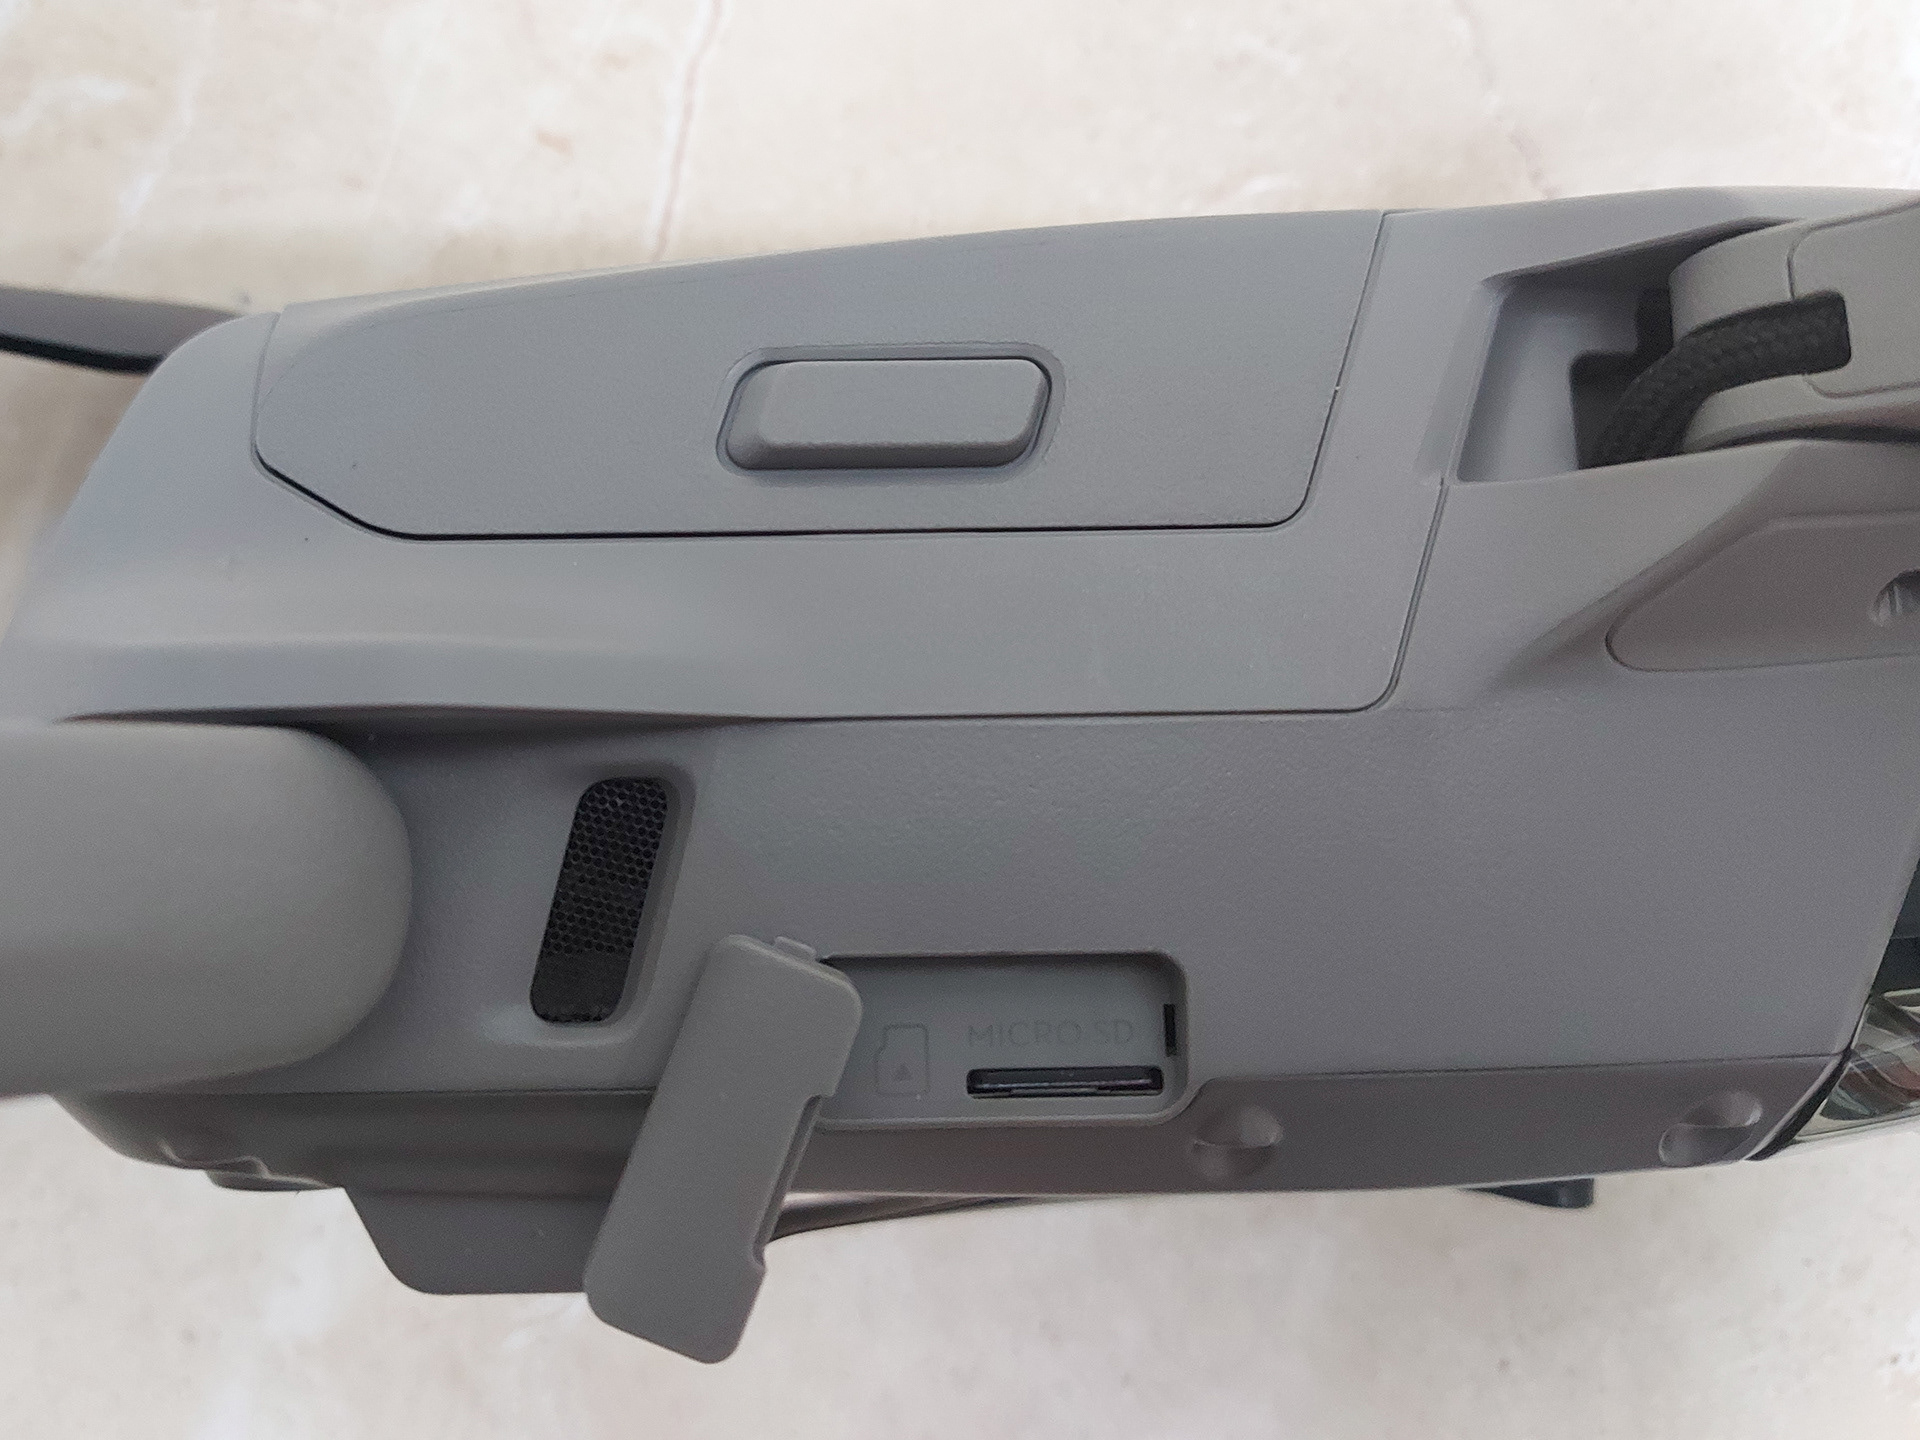
The Mavic Air 2 offers one SD card slot found on the chassis. The manufacturer requires a UHS-I Speed Grade 3 rating microSD card, but we recommend a minimum capacity of 32gb. They are relatively affordable and readily available. What you might not expect is that the Mavic Air 2 has 8GB of internal storage. This is a mighty handy feature!
When you run out of storage on your SD card, you will get a notification, at which point you can switch over to internal storage and begin to wrap up your filming. This also means that if you forget to bring media with you, you’ll have at least 8GB ready to use if you forget yours at home.
When you run out of storage on your SD card, you will get a notification, at which point you can switch over to internal storage and begin to wrap up your filming. This also means that if you forget to bring media with you, you’ll have at least 8GB ready to use if you forget yours at home.
CAMERA
1 - IMAGE QUALITY
As mentioned, the new camera is based around a half-inch CMOS sensor with a 48-megapixel quad-Bayer filter. This effectively means there are four pixels with different levels of sensitivity within each of the red, green, and blue that make up the 12-megapixel Bayer filter. The upshot is data which HDR processing can make more use of. I was prepared for this to be a marketing gimmick, but it has to be said that – although DJI already stretches a lot from their smaller image sensors – this does seem to stand out.
The Image quality is excellent, I am very impressed by the quality of the JPEG and RAW files. First off, the dynamic range is outstanding, especially with the HDR video function enabled.
It’s able to capture a bright sunset while still having enough detail in the shadows to create a balanced image. But when the sun go down i start to see a a little bit of noise, very easy to fix in post production.
When shooting still images, you have the choice to shoot standard 12 or 48-megapixel RAW or JPEG files.
It's also possible to shoot with 4:3 aspect ratio, and capturing images at the 16:9 aspect ratio will just digitally crop your photos, leaving you less resolution to work with.
2 - VIDEO QUALITY
I was quite impressed with the quality of the 4K/60p and even 4K/30p video. However, objects in my slow-motion clips were a bit more blurry than I expected, even at a 240p frame rate. Does the 120 Mbps bit rate make a difference here? Yes, for this particular camera. The quality of video footage I was able to gather in various lighting scenarios is exceptional.
DJI's normal color profile has been optimized for the ideal amount of saturation and detail, but its D-Cinelike profile is also included for more advanced shooters. 8K HyperLapse video is available in firmware update.
Lower resolutions, like 1080p video, look good straight from the drone too. There are none of the sharp line-binning effects seen on some other system. That said, lowering the frame rate (especially to 24p) on a bright day will lead to a judder unless you fit an ND filter to compensate; DJI include these with the “Fly More” kit and the market might well provide alternatives soon – there is no standard fitting.
The HDR video is not excessively exaggerated. The output is 8-bit, and this is also true of the D-Cinelike flat profile option, which gives creators the chance to exaggerate things when grading. If you need a little more flexibility with your raw video, the Mavic 2 Pro offers 10-bit. For most purposes though you’ll likely be happy with the drone’s HDR processing.
3 - SHOOT ASSISTS
The Mavic Air 2 offers some basic shoot assists, but with little customization. Things such as histogram, overexposure warning, and gridlines are available to toggle on or off, but that is about all.
Other very good feature is the the shoot modes in the Mavic Air 2
- FocusTrack
The Mavic Air 2 offers some basic shoot assists, but with little customization. Things such as histogram, overexposure warning, and gridlines are available to toggle on or off, but that is about all.
Other very good feature is the the shoot modes in the Mavic Air 2
- FocusTrack
- ActiveTrack: Follows a target while avoiding obstacles and works to reidentify targets if lost, such as when going behind a tree
- Spotlight: Fly freely while locking the camera on a subject; just tap a subject on the remote and fly
- POI: Creates an automated path to fly around a target while keeping the camera centered; works with flat surfaces and can dynamically track objects such as people, cars, and boats.
- Spotlight: Fly freely while locking the camera on a subject; just tap a subject on the remote and fly
- POI: Creates an automated path to fly around a target while keeping the camera centered; works with flat surfaces and can dynamically track objects such as people, cars, and boats.
- Hyperlapse Time-Lapse Shots
With a single tap, you can use your Mavic Air 2 to capture stunning time-lapse shots in Hyperlapse mode, processing everything automatically without the need for post-processing. You can even simultaneously save photos in JPEG and raw on a microSD card (not included). Hyperlapse shots can be captured with four distinct modes; simply select the mode and shooting location in the DJI Fly app
With a single tap, you can use your Mavic Air 2 to capture stunning time-lapse shots in Hyperlapse mode, processing everything automatically without the need for post-processing. You can even simultaneously save photos in JPEG and raw on a microSD card (not included). Hyperlapse shots can be captured with four distinct modes; simply select the mode and shooting location in the DJI Fly app
- Free: Move the Mavic Air 2 where you want with total freedom
- Circle: Lock onto a subject and the Mavic Air 2 will circle it while continuously capturing footage
- Course Lock: This locks the gimbal onto a subject, automatically turning to keep it in the frame as you fly towards and past the subject
- WayPoint: Set a specific, savable flight path (up to 5 points) in 3D space for a single time-lapse, or for multiple shots at different times to edit together later
4 - SMARTPHOTO
Integrated scene recognition works with DJI's HyperLight and HDR technologies to adjust the camera's parameters and deliver optimal results. Scene recognition can detect five different categories: sunset, skies, grass, snow, and trees.
Integrated scene recognition works with DJI's HyperLight and HDR technologies to adjust the camera's parameters and deliver optimal results. Scene recognition can detect five different categories: sunset, skies, grass, snow, and trees.
5 - QUICK SHOTS
The Mavic Air 2 is loaded with all the newest and best quick shots available:
- The Dronie, or drone selfie, where the drone fixates on a subject and then flies up and away from the subject to reveal the surroundings.
-Circle, the drone rotates around a subject in a basic circle.
-Helix, a variation of Circle, but adds more dynamic movement by flying upward and outward as well as rotating around its subject.
- Boomerang, which is similar to Helix except once it’s reached a designated distance and altitude it will begin to swoop back in towards the subject.
- Rocket, which is a sort of pedestal type shot in which the drone rises up while tilting the camera down — all the while keeping its subject well framed.
- Asteroid starts at ground level trained on a subject and the rockets backward up into space while warping the image into a “tiny Earth” type result.
The expected automated shot modes are here. You get different types of reveals, including a straight pull back and a Boomerang function that flies around your subject in an expanding arc, before returning to the original view. There's also an Orbit mode—it can be combined with tracking to circle around moving subjects. The Air 2 doesn't have obstacle sensors on its sides like the Mavic 2 Pro, so you'll need to take some care using it.
6 - LOW LIGHT CONDITIONS
The low-light performance is much as you might expect on a small sensor with a high pixel density: imperfect. Certainly in video mode dim evening light coupled with motion leads to blurring, which is to be expected. When reviewing stills, pixel peeping will reveal plenty of noise, yet when you’re taking in the whole scene, all those extra pixels can come in handy, especially when shooting JPEGs.
7 - HDR AND D-CINELIKE
The closest you get to Log with this drone is D-Cinelike. It’s the flat-shooting profile that expands flexibility in post-production. We found this mode can produce similar results to the HDR mode, except you will need to spend more time color grading in post. It is worth a mention that the D-Cinelike profile has the advantage of manual exposure settings over HDR mode.
HDR [High-Dynamic Range] is a new picture profile offered on the Mavic Air 2, providing you with a stunning image right out of the camera. Similar to the D-Cinelike profile, HDR boosts the amount of information in the highlights and shadows when a scene has very high contrast. An area where drones in this price range have typically struggled. While in HDR mode manual exposure settings are turned off and you’re stuck with full auto exposure. Be mindful of this while shooting your scene to avoid exposure adjustments mid-shot.
HDR [High-Dynamic Range] is a new picture profile offered on the Mavic Air 2, providing you with a stunning image right out of the camera. Similar to the D-Cinelike profile, HDR boosts the amount of information in the highlights and shadows when a scene has very high contrast. An area where drones in this price range have typically struggled. While in HDR mode manual exposure settings are turned off and you’re stuck with full auto exposure. Be mindful of this while shooting your scene to avoid exposure adjustments mid-shot.
8 - Focus Performance
The DJI Mavic Air 2 has a fixed focus to ensure that all your images will be sharp. This feature is very helpful and makes shooting photos and videos fast and efficient. There’s no lag while you wait for the subject to be in focus and you can shoot video without having to worry about changing your focus point.
Another thing to note about the DJI Mavic Air 2 is that it has a fixed aperture of f/2.8. With this, you’ll likely want to use a fixed or variable ND filter to get a natural shutter speed while shooting video.
Another advantage of using a filter is the possibility of getting a circular polarizer so that you’ll get more vibrant colors and less reflection.
PERFORMANCE
- Performance in the air
The maximum flight speed of the quadcopter remained in relation to the previous model, with a maximum of 68 km / h. The control distance is 10 km, something interesting to capture the movement of certain areas of the city, for example, or even to track moving objects. During all tests, TechTudo had no problems transmitting the images in real time to the cell phone.
- The quadcopter has 3 flight modes: the tripod, for more stabilized images, but with reduced speed, the normal and the sport, in which it is possible to reach higher speeds, but without the same fluidity as the gimbal. These last two modes were about 10 m / s.
- Batteries
The performance of the batteries is astonishingly good. The manufacturer claims a 34 minute max flight time, and during our tests lasted less than 30. While performing typical flight operations, we were getting around 25-27 minutes of usable flight time while in normal mode, however, we returned home when there was 15% left on the battery.
It is possible to end up getting just shy of 30 minutes of flight time by the time you’ve landed. The amount of flight time does vary depending on your situation. The flight mode you are using, altitude, temperatures, and wind speed will all play a role in how long your flight could last. As far as total distance, you can expect anywhere from 4-7 miles with a fully charged battery, depending on flight conditions.
Other problem is the drain of the battery per day, one week and a full charged battery drain almost to 40%, they say that it's becouse of the Lithium batterys problem to not overheat.
- Obstacle avoidance
The safety is also an important point of the DJI quadcopter. With sensors both at the front and at the back, as well as at the bottom of the model, the system warns when the drone is too close to an object, as well as in situations where the environment is not suitable for takeoff. Another technology used by the brand is APAS 3.0, which maps highly complex scenarios for a more stable flight.
- Speed
Max horizontal flight speed is listed at 19m/s (meter per second) for sport mode and 12m/s in normal more, or 60km/h and 43Km/h respectively. We certainly hit these values and even topped out in the high 40s with a tailwind.
- AirSense
Stay safe while in flight with AirSense technology. It utilizes an ADS-B receiver and satellite positioning to warn you of other nearby aircraft.
DJI FLY APP
The controller doesn't have a display, so you'll need to connect your phone if you want to see the view from the camera; if you're interested in a drone that you can fly without adding a smartphone, take a look at the Autel EVO. The Mavic Air 2 uses the DJI Fly app, introduced with last year's Mavic Mini. If you're upgrading from the original Air, you'll find its interface similar enough to the older DJI Go app. It's available for Android and iOS platforms; I tested the drone with an iPhone 8 Plus running DJI Fly.
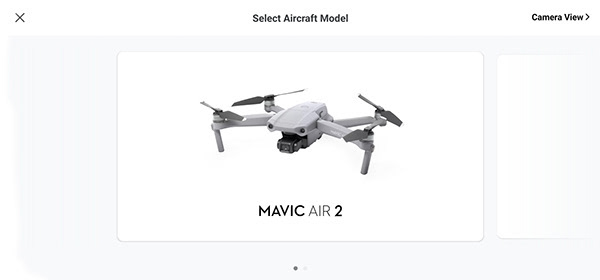
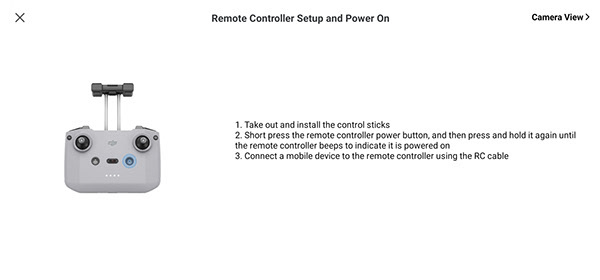
After that will apear a menu where you can choose the drone model that you will pilot, and than, after that menu appears other menu where you can see a small tutorial, where they show you a small video where they put the scticks corontollers, opening of the mobile support and its connect-it.
Then Launch the Main Menu of the App.
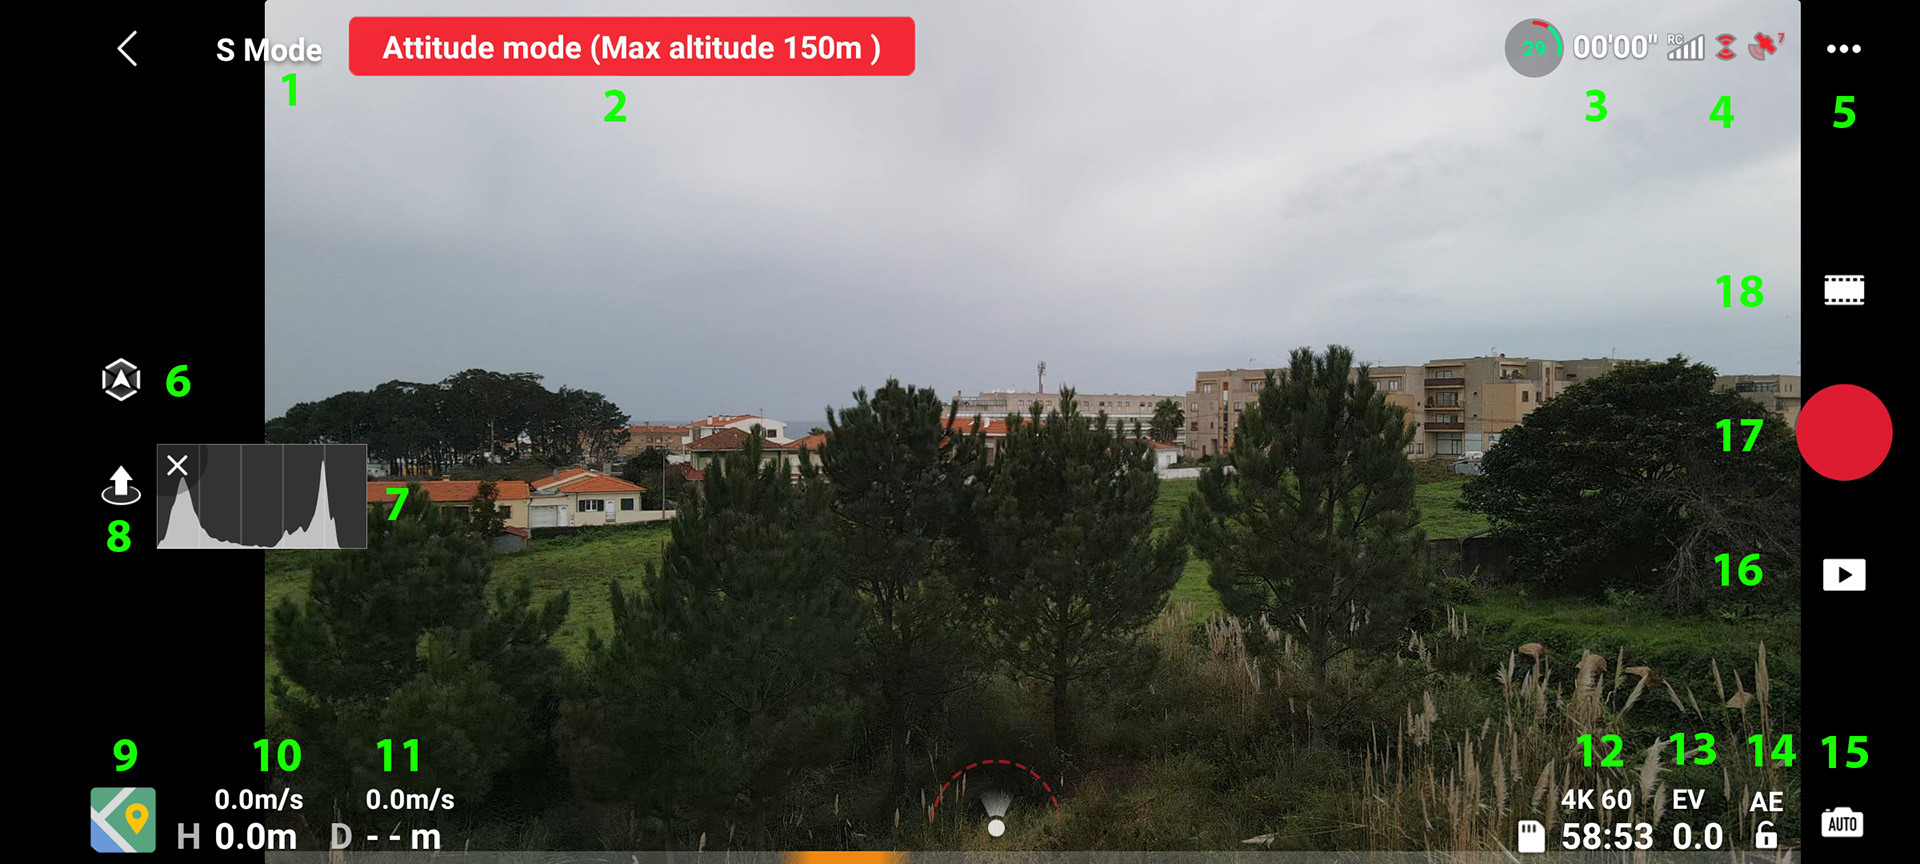
Here you can this options:
1 - FLIGHT MODE CHOSEN - Camera View allows the drone pilot to set one of three unique flight modes for your Mavic Mini or Mavic Air 2: Position, Sport, or CineSmooth mode. Let’s take a closer look at how these modes work and the way they affect your drone’s performance.
NOMAL- Normal mode is the default flight mode for your drone and enables access to essential aircraft functions, including GPS and obstacle sensors. This mode allows the aircraft to hover in place, making it ideal for taking stable shots, while the obstacle sensors stay active to ensure you have a safe, fun flight experience.
SPORT - Sport mode is designed for flying your drone with maximum speed and maneuverability. As a result, you won’t be able to access any of Mavic Mini or Mavic Air 2’s QuickShots when operating in Sport mode. Users tend to use this mode for traveling quickly to points of interest for shooting photos and video. Make sure you use only use this mode in a safe, open area to experience just how fast you can fly!
TRIPOD - Tripod is the ideal flight mode for shooting stunning, cinematic footage. Mavic Mini’s rotational movement is slowed and its control sensitivity is increased, ensuring you shoot the smoothest, most stable footage.
2 - AIRCRAFT STATUS - You can view the aircraft status indicator next to the flying mode indicator on the top left corner of the Camera View screen. Tap the status indicator to view and set your max altitude, flight distance, and Return to Home (RTH) altitude. You can also check your drone’s remaining storage space and format your SD card. Let’s take a closer look at some of these settings under the aircraft status indicator.
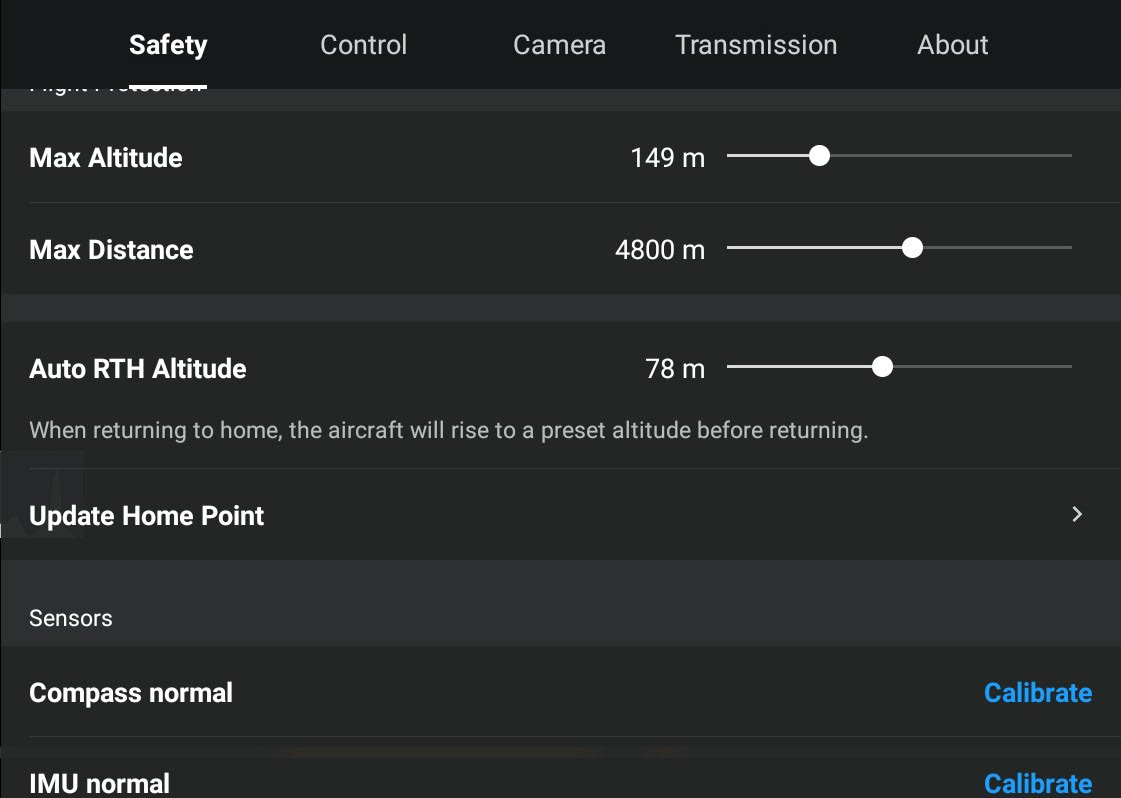
RTH ALTITUDE - Setting the RTH altitude ensures your aircraft will fly at a safe and stable altitude when you control it to return to home automatically. This setting is especially useful when flying in areas surrounded by tall objects, such as trees or buildings. Before making this setting, we recommended flying your aircraft to a height of around 100 ft to check the surrounding area and make sure the aircraft can safely clear the tallest objects based on the altitude you’ve set.
MAX ALTITUDE - You can also use the status indicator to set your drone’s max flight altitude manually. The max altitude is capped at 30 m during flight training and when you are not logged-in to the DJI Fly app.
MAX DISTANCE - Max distance determines how far your aircraft can fly from the remote controller. Make sure to set a safe distance that will allow your aircraft enough time to return to home before the battery runs out.
SD CARD - Use this space to view your available storage space for photos and videos and format your SD card. Make sure to back up any important files before formatting your card.
3 - BATTERY PERCENTAGE AND TIME DURATION - This indicator displays the battery life, temperature, voltage, remaining flight time, and information regarding the overall health of your battery.
4 - CONTROLLER SIGNAL, AND SATELITE SIGNAL - Check the small satellite icon on the top-right corner of the Camera View screen to view how many positioning satellites are currently connected to your Mavic Mini or Mavic Air 2, and use the indicator next to satellite icon to check their connection strength. You can also use the Wi-Fi indicator in this area to check the signal strength between the drone and the remote controller. The Wi-fi indicator’s signal strength will change as you encounter interference during flight. Always check and make sure you have a secure connection to your aircraft before flying.
5 - MENU ICON - Tap the three dots on the top right corner of the Camera View screen to open the overflow menu, which you can use to make important safety, control, camera, and transmission settings for your Mavic Mini or Mavic Air 2, and view your aircraft information.
5.1 - SAFETY
5.1.1 - SAFETY - This menu allows you to update your home point, reset the gimbal, and connect to your aircraft. Setting the home point is vital so the aircraft knows precisely where to return to if it becomes disconnected from the remote controller while flying.
You can also calibrate the compass and the inertial measurement unit (IMU). The IMU controls the speed and altitude of your aircraft. If your drone seems to be drifting a lot by itself, calibrating the IMU may fix this issue.
5.1.2 - Flight Protection - Set important flight safety parameters such as the max flight distance and speed.
5.1.3 - Update Home Point - Use this setting to update your home point to your desired location. Your home point can be set as your aircraft’s takeoff position or the current GPS location of your mobile device and remote controller.
5.1.4 - Update Home Point - Use this setting to update your home point to your desired location. Your home point can be set as your aircraft’s takeoff position or the current GPS location of your mobile device and remote controller.
5.1.5 - Sensors - Adjust the sensitivity level of your aircraft to control how fast and smooth it reacts to user operations with DJI Fly app and the remote controller.
5.2 - CONTROL - The Control menu allows you to switch between flight modes, and change the gimbal mode between Follow (default) and FPV. For the gimbal, Follow Mode provides stabilization along all three axes for shooting smoother footage. In comparison, FPV mode unlocks movement along all three axes for a more dynamic shooting experience. You can also set whether the app and aircraft data is displayed using the imperial or metric system depending on your needs.

The Control menu can also be use to make more professional settings, like gimbal pitch speed and smoothness, and recalibrate the gimbal.
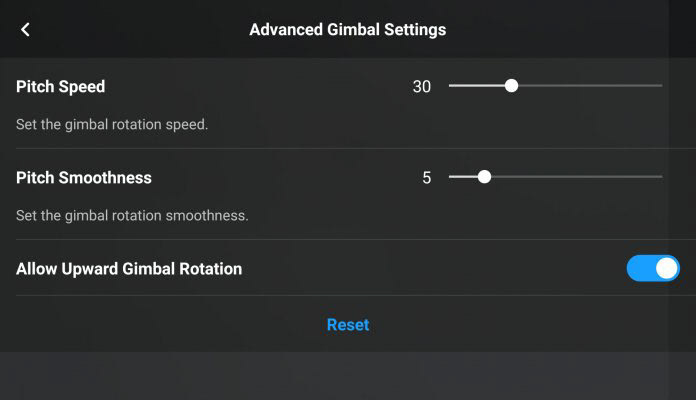
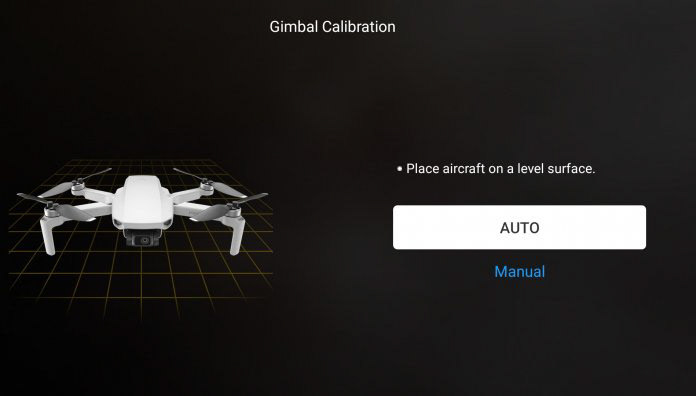
Gimbal calibration can be used if you experience any pitching issues with Mavic Mini or Mavic Air 2.
Finally, you can use this menu to set the control stick mode for your remote controller (Mode 1, 2, or 3). Doing so changes the way your aircraft responds to the movement of the control sticks. If you are experiencing issues controlling the aircraft, you can also recalibrate the remote controller via this menu.
5.3 - CAMERA - Tap the Camera menu to make advanced, professional settings to your drone’s camera. You can set parameters such as the image size (4:3 or 16:9) or format your SD card. We recommend using a 4:3 size when shooting to give you more room to work with in post-editing.
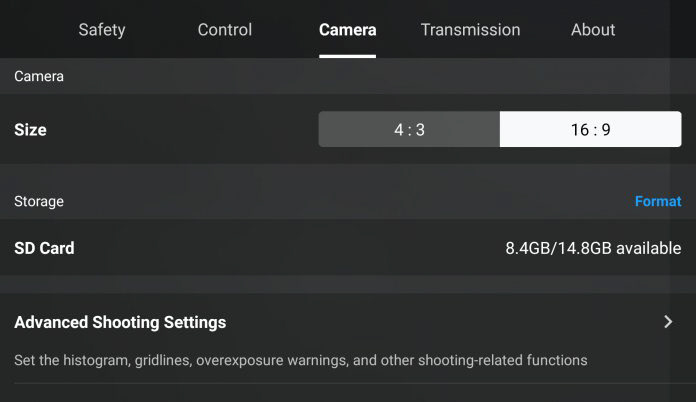
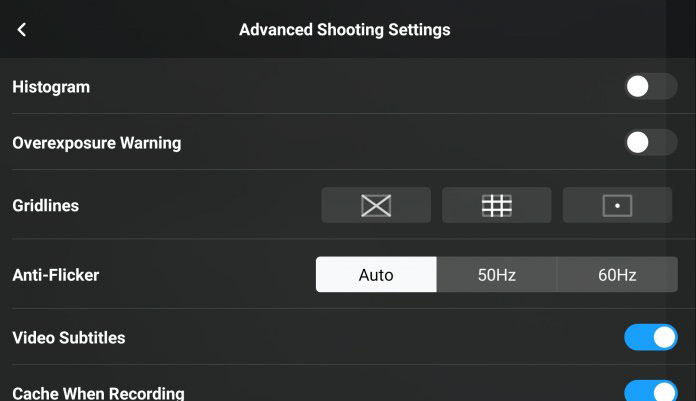
5.3.1 - ADVANCED SHOOTING SETTINGS
These advanced settings include histogram, grid lines, and an over-exposure warning. Each setting provides unique options to tighten up your aerial photography sessions.
Histogram - This setting allows you to change the exposure settings by providing a graphical view of the pixels in a frame. Using the histogram improves the exposure for high-contrast shots, like capturing a sunset with tall objects in the foreground.
Gridlines - Use the gridlines to help you line up your subject exactly where you want it in the frame.
Overexposure - Enabling this setting makes zebra stripes appear on areas with high overexposure in image previews and in Camera View. Using this warning helps you know when to adjust camera settings to match the brightness of an overexposed area.
Anti-Flicker - The anti-flicker feature helps reduce the impact of shooting in unsteady lighting, like cityscapes with bright fluorescent lights.
Cache Limit - Your Cache Limit is based on the max storage space of your device. Be careful when using the Auto setting, as shooting after your cache limit is reached will result in excess footage being deleted.
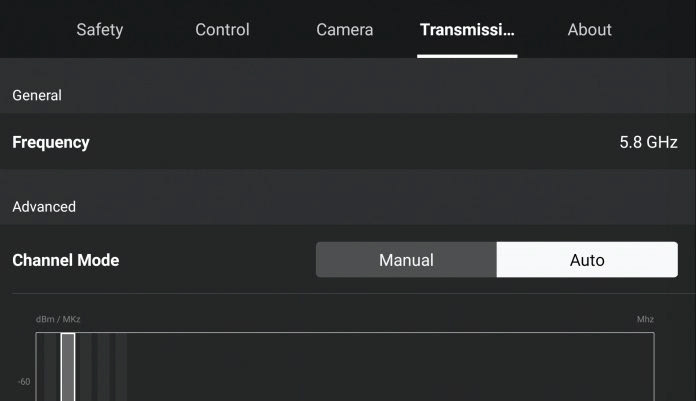
5.4 - TRANSMISSION - Use the Transmission menu to enable settings that improve communication between your aircraft and the remote controller. Avoid flying your Mavic Mini or Mavic Air 2 near rocks, trees, and metal structures that cause interference to achieve the maximum transmission range.
5.4.1 - Channel Mode - Set the transmission channels for your aircraft and remote controller. Use Auto mode to pick the best available channel for your surrounding environment. If you want to set your transmission frequency manually, note that low frequencies are more favorable for long-range flights, but the video quality will decrease on the live feed. Using higher frequencies is more optimal when flying at closer distances.
5.5 - ABOUT - The About menu contains important aircraft information, including the current aircraft firmware, DJI Fly app, and Fly Safe Database versions. You can also view detailed information such as the name and model of your aircraft, check for available updates, view battery information, and check other important serial numbers and information.
6 - SAFETY ASSISTENCE ICON- Thats the new feature that dji made in the new firmware update, that help the people without experience, lets think that this drone has no side sensors, so with the new update we can choose what to do when seeing an obstacle from the front, should, or stop, for those who have no experience as it has no side sensors I advise you to stop.
The obstacle detection and avoidance system—DJI calls it APAS—works quite well. I took the drone to a local park and attempted to crash it into trees, but the Air 2 automatically altered its course to fly around them. I was brave enough to test it on my own person and walked away uninjured.
I will note that the drone has a tendency to increase altitude on its own—not by much, but enough where you'll want to take extra care when flying beneath low-hanging branches; there are no upward-facing obstacle sensors.
I will note that the drone has a tendency to increase altitude on its own—not by much, but enough where you'll want to take extra care when flying beneath low-hanging branches; there are no upward-facing obstacle sensors.
7 - HISTOGRAM - For the most professional photographers and videographers. Histogram is a graphical representation of the tonal values of your image. In other words, it shows the amount of tones of particular brightness found in your photograph ranging from black (0% brightness) to white (100% brightness). As shown in the image above, dark tones are displayed on the left side of the histogram. As you move rightward, tones get lighter. The middle portion of the histogram represents midtones, which are neither dark nor light. Vertical axis of a histogram displays the amount of tones of that particular lightness. Histogram is exposure-dependent, but is also affected by tone curve and other settings.
8 - TAKE OFF AND RETURN ICON - Here is the Auto Takeoff icon at the left side of the screen, tap and hold the icon that pops up, and then Mavic Air 2 will automatically takeoff, is very usefull if you want to take off in the hand, fter takeoff, the icon will change to Auto Landing for when you decide to land.
9 - MAP ICON - Here if you din't have internet conection you can see the lines that your drone went through, if you have internet conection, you see the lines with the actual google map. The map show the view location information for your aircraft and the surrounding area. Check this map to find GEO Zones or areas with flight restrictions, locate your home point, and change the map overlays. The Auto Take Off button is also located just above the map, which comes in handy when you want to start flying without using your remote controller
10 / 11 - FLIGHT TELEMETRY - Check your flight telemetry data next to the map and location information field. You can view a variety of different data, such as the current height (H) and flight distance (D) of the aircraft, or check the aircraft’s vertical and horizontal movement speeds.
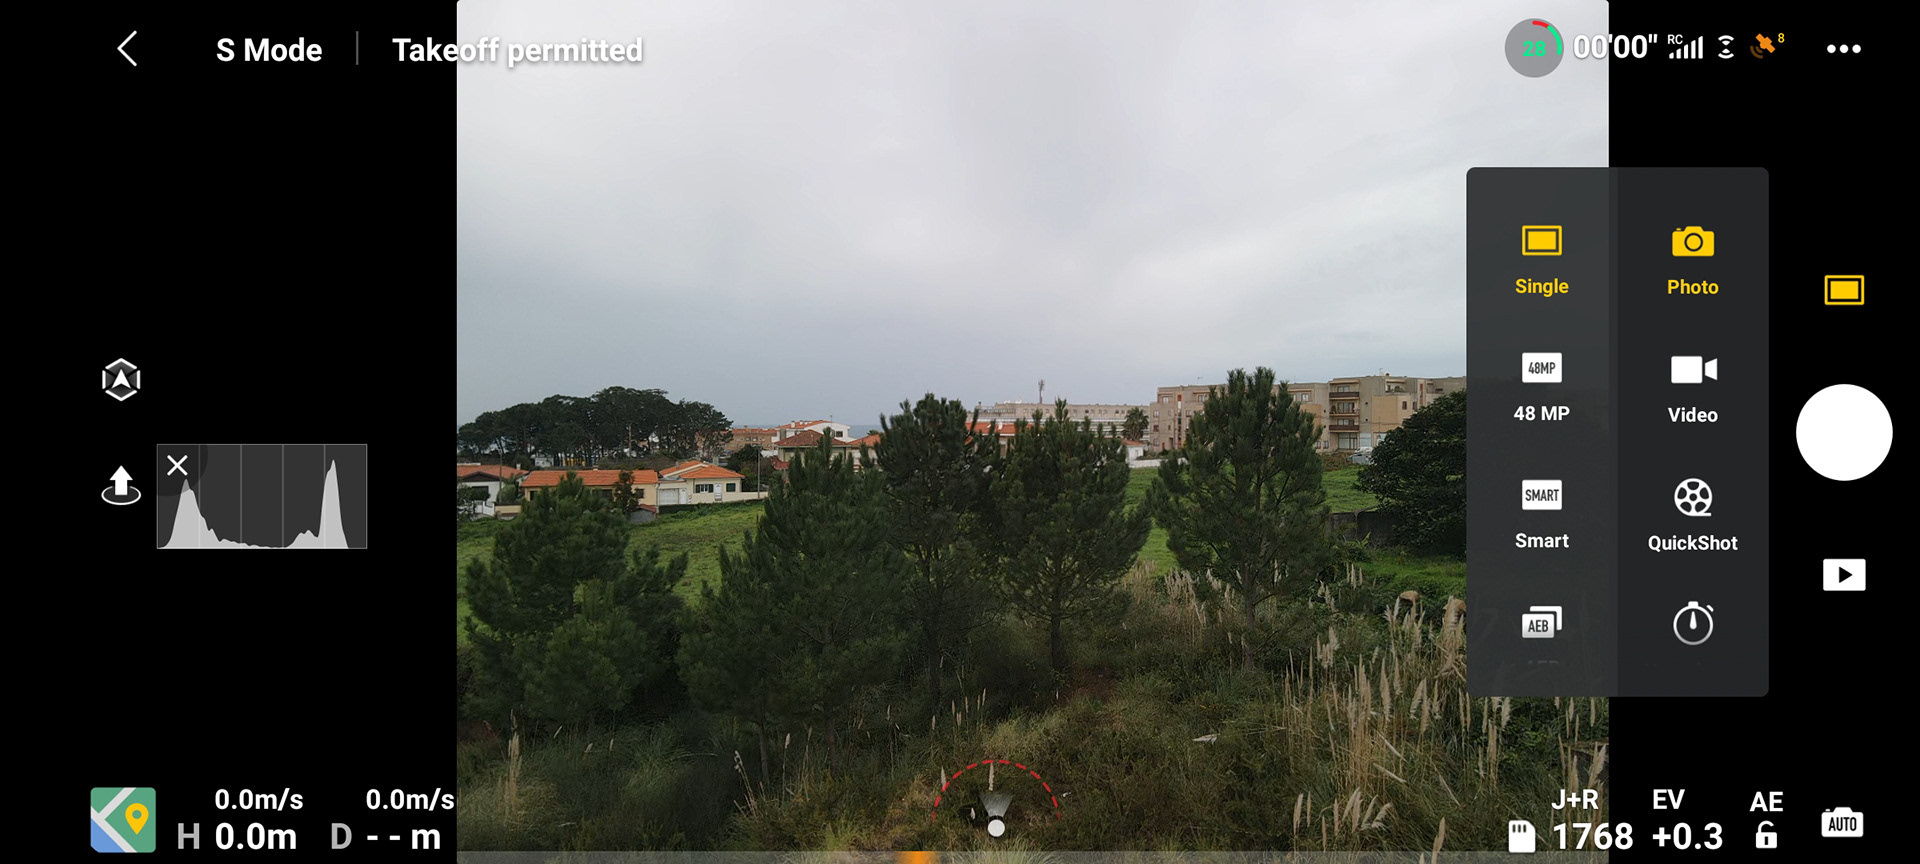
12 - TIME AND RECORD MODE - Here you can see the type of result chosen or for photo or video and time or number of remaining photos on the memory card.
13 - EV - Here we can see the Exhibition Value, we can underexpose or overexpose, the photos and videos.
14 - AE - Automatic exposure is an automated digital camera system that sets the aperture and shutter speed, based on the external lighting conditions for the photo. The camera measures the light in the frame and then automatically locks the camera's settings to ensure proper exposure.
15 - AUTO - Here we can define if we want the automatic or manual camera settings.
16 - REPLY - Here we can go see what we have recorded on the memory card.
17 - RECORD - Here is the button we press to take the photo, or to start/end the videos.
18 - CAMERA & VIDEO SETTINGS - With a sleeker and more efficient interface, DJI Fly app’s updated UI provides users with a clear, expanded view for shooting breathtaking shots. Tasks such as adjusting camera parameters, switching between shooting modes, and adjusting the gimbal angle can now be done with just one simple tap of your finger.
18.1 - PHOTO ICON - Use the photo icon to select whether you want to shoot single or timed photos, and set the timer for timed shots anywhere from 2-60 seconds. You can also use this area to manually adjust the shutter speed from a range of 1/8000 to 4 seconds. Setting the shutter speed helps you control how much light and motion is captured by the camera, making it ideal for use with shooting tasks like capturing clouds moving across landscapes, waves crashing into the seashore, or busy night scenes.
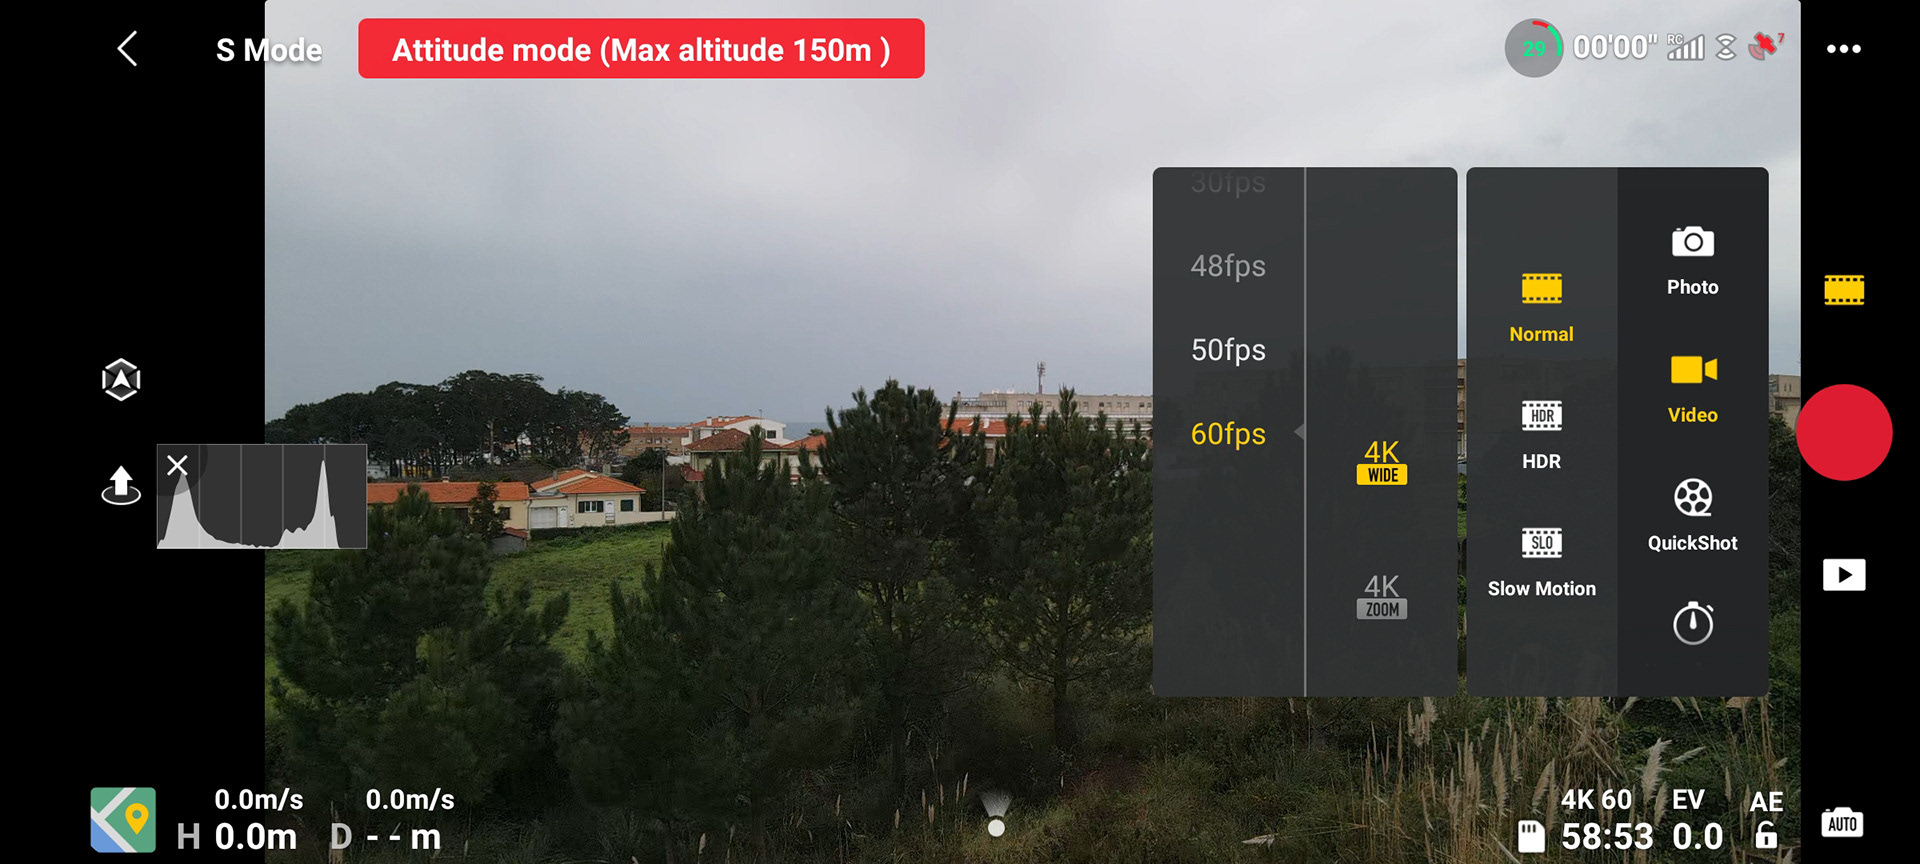
18.2 - VIDEO, now you can adjust the ISO filter value anywhere from a range of 100 to 3200 for help with tasks such as taking nighttime photos or snapping images in dark settings without using a flash. However, try not to set your ISO value too high, or you may introduce a lot of noise to your footage.
You can tap this icon to choose between shooting in 2.7K or 1080p resolution, as well as manually adjusting the frame rate between a range of 25-60 fps. When using 2.7K resolution, we recommend setting a frame rate of 30 fps for clearer images.
PRICES VS PERFORMANCE
You can buy normal Mavic Air 2 about 790€, the the fly More Version 1050€ .
It makes a little difference in the price of the normal for the combo, but for exprecia well justifies the price, bring two more batteries, the hub to be able to charge 3 batteries, very honestly I think only one battery, the drone is very limited
FINAL THOUGHTS
The Mavic Air 2 managed to exceed the expectations we had for this medium DJI drone. We had already tried more "pro" versions of the brand, in which case I'm able to do this analysis more freely, and accelerate, explore the various tools. The conclusion is that this is the right drone for those who want to venture into this world of flight exploration, and filming, without investing in a more professional model.
From what we tried it is worth investing in the package with more batteries so you don't feel frustrated with the flight time limitation and being able to do longer “missions”, but also choose a good SD card, with fast recording, to also increase the video time you record, especially if you want to do it in the best quality. The storage space on the drone is 8 GB and is used up quickly, and the backup of videos on your phone can also quickly blow up the storage space if you have limited capacity.
The Mavic Air 2, however, beats or essentially equals each of these aircraft – and other competitors – on range, speed, image quality, video quality, battery life, build quality and useability. In terms of value, that’s hard to argue with; most use cases are definitely better served by this drone than any other.
Pixel-peepers will, of course, be able to find fault – drone cameras are all a balance of weight and size against quality, and fast movement in low light will push the Mavic Air 2 past the camera’s limits. Feature-obsessives might believe all-round collision sensors are essential. They’re absolutely not, and I wouldn’t want an increase in price to pay for a feature of such little benefit. Most complaints apply to the competition too and – to my mind – DJI have achieved the best compromise between physics, price and functionality.
WHAT I LIKED
- Long battery life
- Affordable
- Portable
WHAT I FEEL COULD BE IMPROVED
- No side facing sensors
- Long battery life
- Affordable
- Portable
WHAT I FEEL COULD BE IMPROVED
- No side facing sensors